Whenever you buy a new set of arrows, you must consider the spine weight of the shafts. For new archers, this measurement can be quite confusing and hard to grasp. Even most experienced archers do not know how it exactly works and why it’s so important. Most archers just follow the step by step process and don’t think about it. Therefore, I will explain how spine weight works, how we use it to choose the right shafts, and why it’s an important metric.
Spine weight is a metric that measures how far the arrow bends in a laboratory setting. This metric is used together with a spine weight chart, to choose the optimal spine weight for your bow. When the spine weight of the shaft doesn’t match the bow, the bow will be less accurate.
In this article, I will first discuss the basic idea of spine weight. Then I will discuss two different spine weight measurements and discuss how you use these metrics to choose an arrow. At the end of this article, I will discuss why spine weight is an important metric and discuss why wooden arrows have an inconsistent spine weight.
What spine weight is
When an arrow is shot from a bow, you can see that the arrow flexes. The amount of flex of the arrow is determined by a multitude of factors. Some important factors are the weight of the point, the draw weight of the bow, and the stiffness of the arrow shaft.
Measuring the weight of the point is easy, just put the point on a scale. The same is true with the draw weight, you can easily measure this with a bow scale or a luggage scale. The stiffness of the arrow is more difficult to measure because we don’t have predetermined measurements for how stiff a material is.
Therefore, archers use spine weight, which is a special measurement just for archery. Spine weight is a measurement of the stiffness of the arrow shaft. With this measurement, we can compare the stiffness of different arrows. Based on previous tests, we can give clear recommendations on what spine weight you need for your arrows.


How to choose shafts with the right spine weight
To choose the right arrow shafts we use a recommended arrow chart. There are a lot of different available online. Although they tend to be quite similar some will have different recommendations. That is the case because it’s a prediction as we discussed earlier.
Alright let’s discuss how to use the arrow chart step by step:
Step 1: determine the length of the arrow
Before you can use the arrow chart, you need to know the length of your arrow. If you already have an old arrow with the right length you can just use that. We measure the length of the arrow from the throat of the nock to the tip of the point.
If you buy your first set of arrows you need to measure your draw length and add 2 inches to make sure that your arrow is long enough. You can also use the full 32-inch shaft if you don’t want to cut it down. It has a minor disadvantage that it slightly increases your arrow drop, but that isn’t much of an issue if you are just getting started.
You also must add about 1 or 1 ½ inch to your measurement to account for your nock and tip. Again, it’s not necessary to be super precise since the arrow chart is just an estimation. Getting it off by an inch doesn’t matter all that much.

Step 2: measure the draw weight of your bow
The next step is to measure the draw weight of your bow. Draw weight is quite confusing since there are two measurements. We have the default measurement at 28 inches which is printed on the limbs or advertised on the product page. But for choosing an arrow we need the actual draw weight, at your draw length. Read this article, if you want to know more about these two measurements.
How you measure the actual weight of your bow depends on the type of bow you are shooting. Since we need to know the peak draw weight of the bow, which is different between compound and recurve archery.
Traditional and recurve archery
If you have a traditional or recurve bow, the peak draw weight is at the point you are anchoring. To measure this draw weight, use either a bow or luggage scale.

Compound archery
Measuring the peak draw weight on a compound bow is more complicated than for recurve and traditional archery. The peak draw weight is somewhere in the middle of the draw. Therefore, you have to find this point and measure it. In most cases, it’s a good idea to measure it a few times and take the highest measurement. Read the article listed below, for more information on how to measure draw weight:
How to measure your draw weight
What if you don’t have your bow yet?
In general, it’s best to test the actual draw weight with a bow or luggage scale. But in some cases, that might not be possible when you don’t have your bow ready or when you don’t have a scale. The best option would be to buy a scale or buy your bow first, but you might not want to do that.
Therefore, I have a trick to estimate the actual draw weight based on the draw weight displayed on your limbs. This is not useful for compound archers of course, because the actual and the default draw weight should be the same. I have to say, that it isn’t all that accurate. It’s way better to visit an archery shop or make sure that you can measure the actual draw weight. But it’s much better than using the default draw weight to choose your arrows.
How to use the table
Step 1: look up the factor that corresponds with your draw weight
Step 2: multiply the default draw weight with the factor. The answer displays an approximation of your actual draw weight.
Example 1: An archer with a 30 LBS bow with a 25-inch draw weight will have an actual draw weight of 25.8 LBS (30*0.86=25,8)
| Draw length | Percentage | Factor |
| 20 | 65% | 0,65 |
| 21 | 69% | 0,69 |
| 22 | 72% | 0,72 |
| 23 | 77% | 0,77 |
| 24 | 82% | 0,82 |
| 25 | 86% | 0,86 |
| 26 | 90% | 0,90 |
| 27 | 95% | 0,95 |
| 28 | 100% | x |
| 29 | 106% | 1,06 |
| 30 | 111% | 1,11 |
| 31 | 117% | 1,17 |
| 32 | 123% | 1,23 |
Step 3: choose a point/tip
Although also the size and shape of the point can influence the flex of the arrow, we only consider the weight of the point in the arrow chart. Therefore, it doesn’t matter what point you buy, but you should know what the weight of the point is.
The next step is to choose a point. Essentially, we only need to know what the weight of the point is going to be. Archers often experiment with different points, since it’s quite hard to estimate what point is suitable for your arrow and bow. Make sure to note the weight of your point, because we will need it in the last step. But I would recommend the following:
| Archers profile | Draw weight | Point weight |
| Compound or recurve archer | 20 LBS or less | 75 grains or less |
| Compound or recurve archer | 20 – 30 LBS | 75-100 grains |
| Compound or recurve archer | 30 – 50 LBS | 100 – 125 grains |
| Compound or recurve archer | 50 LBS or more | 125 – 150 grains |
| Traditional archer | 25 LBS or less | 75 – 100 grains |
| Traditional archer | 25 – 50 LBS | 100 – 150 grains |
| Traditional archer | 50 – 70 LBS | 150 – 200 grains |
| Traditional archer | 70 LBS or more | 200 grains |
Please note: if you are a traditional archer and don’t shoot with wooden arrows, use the chart for compound and recurve archers.
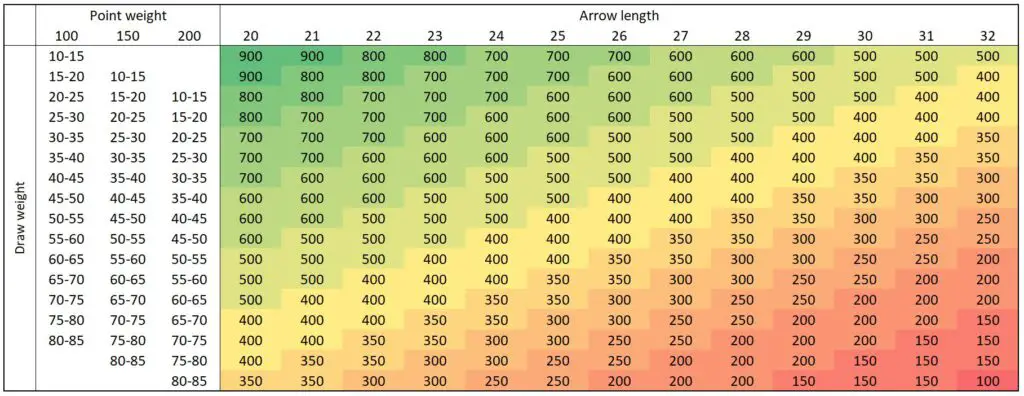
Step 4: use the arrow chart to find the right spine weight
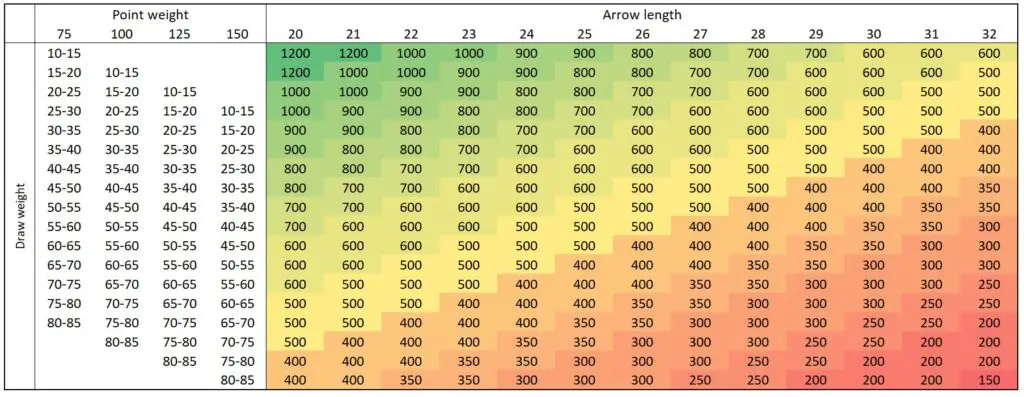
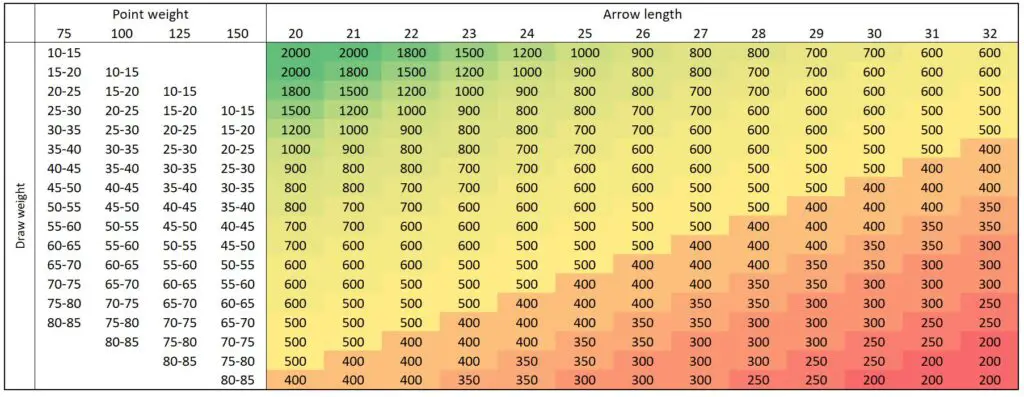
Now we have all our measurements, we can start using the arrow chart to pick the right shaft for the arrow. This is probably the easiest part of the entire process. You simply use all the measurements from the previous steps to find the right arrow spine.
First, use the draw length to find the right row. Then use the weight of the point and the draw weight to find the right line. Follow the row and the line and you will find the recommended spine weight for your bow.
At the end of this article, we will discuss a few frequently asked questions about the spine chart.
Tip: click on the charts to zoom
Compound
Recurve
Traditional
The details of spine weight
Now the basic idea behind spine weight is clear, we need to discuss spine weight in more detail. Because archers often discuss ‘’spine weight’’ and ‘’dynamic spine’’. A lot of archers confuse these two, therefore, I will discuss them in more detail.
Static spine weight
The first measurement is static spine weight, which is a laboratory measurement. With laboratory measurement I mean that all external factors that may influence the flexibility of the shaft are removed. This means that only the stiffness of the shaft influences the flexibility.
How static spine is measured
To measure the spine weight of an arrow, the arrow is put on a stand that holds the arrow suspended. The arrow is kept in place by two rods which are 28 inches away from each other. Then a heavyweight (880 gram, 1.94 LBS) is hanged in the middle of the arrow shaft. The amount of flex is then measured in inches. To get the final spine statistic the inches are multiplied by 1000.
Therefore, an arrow that flexes 0.5 inches will have a spine statistic of 500. Most arrows will have a spine between 200 and 900. Stiff arrows have a low number, while flexible arrows have a high number

Other (old school measurements)
The spine measurement has been around for decades. But a few years ago, most manufacturers used their own formula to indicate the spine weight of the arrows. Luckily, Easton made this a lot easier by using by multiplying the spine statistic by 1000. Since this statistic was very intuitive most manufacturers switched to this system.
Dynamic spine
Dynamic spine is not a standardized measurement but the ‘’real’’ flex of the arrow when it’s shot. You can of course measure this with a high-speed camera, but that is all a bit elaborate. Additionally, since it depends on so many factors it doesn’t make a lot of sense. Some factors that influence the dynamic spine are:
- The stiffness of the shaft
- The draw weight of the bow
- Weight of the point of the arrow
- Total weight of the arrow
- The tuning of the button (if used)
- How the arrow rest is configured
Therefore, static spine is quite a complicated process. Luckily, we can estimate dynamic spine quite accurately by using three factors:
- Static spine of the shaft
- Weight of the point
- Draw weight of the bow
- Length of the arrow
The arrow charts we use to choose are arrows, therefore, use these metrics. It’s not perfect, of course, because not all variables are considered. But it has a big advantage that all these measures are standardized. Therefore, you can easily buy shafts that fit your bow, without having to rely on trial and error.
The disadvantage of wooden arrows
Shooting a traditional bow has many advantages. The bows are a lot simpler and require less maintenance than recurve and traditional bows. But traditional archery also has its drawbacks. One of those drawbacks is wooden arrows.
Since wood is a natural product, it doesn’t have a consistent structure. Therefore, the spine weight between arrows can differ significantly. But since spine weight influences your accuracy, you need a relatively consistent spine weight for all your arrows.
Therefore, some expensive wooden arrows, have a less consistent spine weight than some cheap fiberglass beginners’ arrows. A lot of professional traditional archers, therefore, measure the spine weight off all their arrows. All arrows that have a spine weight significantly higher or lower than the average will not be used to shoot.
This issue is nonexistent for other materials such as fiberglass, carbon, aluminum, and composite. These materials are manufactured from the fibers of the materials. Therefore, the structure of the material is very consistent.

Why spine weight is so important
I believe that it’s often easier to work on your bow when you know the physics about archery. If you know the physics behind your arrow, you can more easily troubleshoot issues with your bow. Therefore, we will first discuss why an arrow flexes and why we need to control the amount of flex.
Why an arrow flexes
When you release the string, the limbs will accelerate the string forward which in turn accelerates the arrow. Therefore, the string pushes the arrow forward from the back of the nock.
As you may have learned in physics class, heavier objects require more energy to move than lighter objects. That’s why they try to make race cars as light as possible. Since arrow tips are heavier than the remainder of the arrow, the tip is more reluctant to move which causes the arrow to flex.
You might wonder, why don’t we just use a light tip or no tip at all? Well, we need a heavy tip since this helps stabilize the arrow. Without a heavy point, the arrow can easily tumble in mid-air.
Why we need to control the amount of flex
Okay, we now know that we need a heavy point to stabilize the arrow in mid-air. We also know that the arrow flexes because of the point. But why is it so important to configure the exact amount of flex of the arrow.
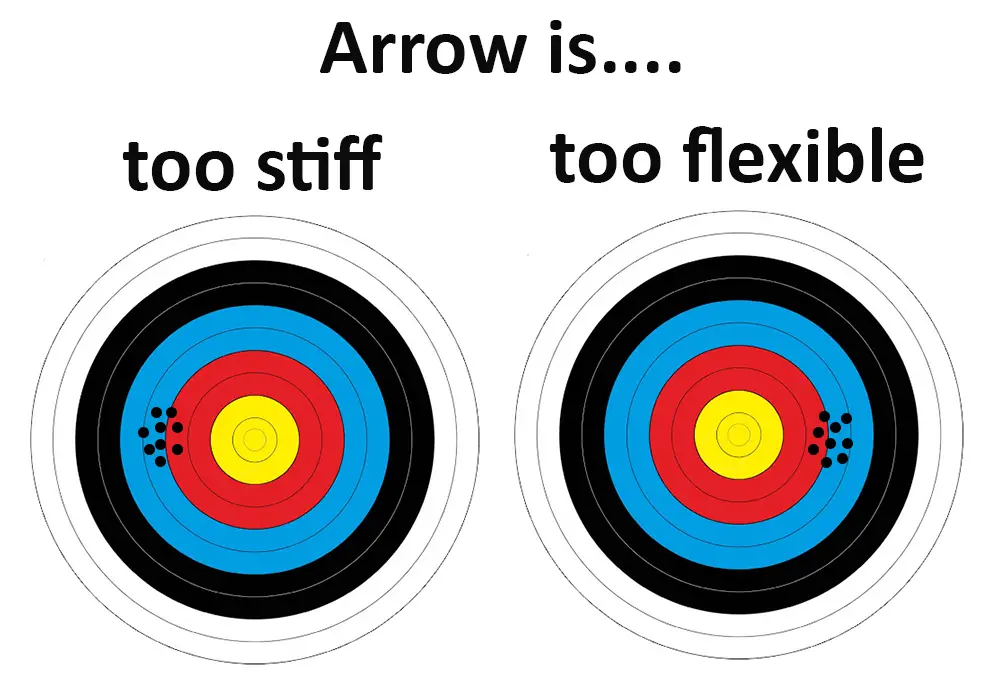
Let’s first discuss why an arrow shouldn’t be too lightly spined. A lightly spined arrow will flex a lot on a heavy bow. This flex can cause major clearance issues, meaning that the arrow hits the bow in mid-air. Additionally, the arrow could still be flexing while it hits the target which significantly decreases your accuracy.
An arrow shouldn’t be too stiff either. A too stiff arrow will not bend around your bow if you use a recurve or traditional bow. The arrow needs some flexibility to clear the bow correctly. In general, it’s better to have an arrow that is a bit too stiff than an arrow that is too flexible. But even better is to have it just right!
On a recurve and traditional bow, a too stiff arrow will go to the left of the target, while a too heavy arrow will go to the right of the target. You can, of course, change the horizontal position of your sight to accommodate this issue. But this makes it more difficult to shoot at different distances. Therefore, recurve archers often solve these issues by changing the plunger tension.
FAQ
Although the spine chart is a very useful tool, it often causes confusion amongst archers. Therefore, I will discuss the most common questions.
On what is the spine chart based?
Manufacturers of arrows make spine charts by experimenting with different arrows. With high-speed cameras, they can see whether the spine weight is correct for that setup. They don’t do this for every single grid in the chart but use the measurements to estimate it for other configurations.
A spine chart is always an estimation, in 99,9% of all cases, the spine chart advises the right arrow. But in some fringe cases, you might have to rely on trial and error instead. The spine charts in this article are based on spine charts from an array of different manufacturers and my own experience.
Does it matter if the spine of my arrow doesn’t match the chart?
No, in general, the spine of your arrow can be 100 lower or higher without an issue. Sometimes a difference of 200 can work as well, but anything more can cause serious issues.

Why are there so many different spine charts?
Every manufacturer and some archery stores have their own spine chart. In general, these spine charts are very similar, but they can differ a bit. Additionally, some spine charts are based on the default draw weight while most are based on the actual draw weight. Therefore, always carefully read the instructions on the spine chart!
Can I also use a heavier point?
In step 3, I give a recommendation based on the poundage of your bow. But of course, you can always use a heavier tip if you like. You will only need a stiffer arrow since the tip increases the dynamic spine of the arrow.
In general, it’s not a good idea to choose a lighter tip than advised. Heavier bows need a heavier arrow to prevent damage to the limbs. If you shoot a very light arrow with a heavy poundage bow, it will almost be the same as dry firing your bow.
Final words
You now know almost everything about spine weight. I purposely left out archers’ paradox and the difference between shoot-through risers and traditional risers. That is a topic for another day and only makes things more difficult.
I hope this article was helpful to you. I took quite a while to write so I would love to hear your feedback! If you have any questions, please let me know in the comment section below. I will respond to your question as soon as possible and send you an email with my reply.
Tim van Rooijen
For as long as I can remember, I have always been fascinated by archery. First due to its historic significance but later because I like being outdoors. With this blog, I share my knowledge about Archery and how you can improve your shot. More about author…

Excellent article thank you very much. I really needed a good and easy to follow explanation.
Hi Vincent
Great to hear that my article was helpful!
Thank You Tim, it helps a lot, now is much more easier to understand for what is spine.
Hi Paulius,
Thank you for your feedback. Great to hear that!