Shooting a bow isn’t difficult but shooting it accurately and consistently is a real challenge. The most challenging part of archery is the technique. Archery is a very technical sport. You can compensate for a lack of technique with stamina or strength like in a lot of ball games, but that is not the case for archery. Therefore, as a new archer, learning the right technique should be your number one priority.
To properly shoot a bow, you should turn 90 degrees away from the target and stay with your feet at shoulder width. While drawing the bow you should align your shoulders and keep them level. Draw to a consistent point on your face and make sure to keep your bow hand and arm steady while you shoot.
The information in the paragraph above might be adequate if you want to shoot at a fair or as part of an outing. But if you want to practice archery as a sport, you need to know a whole lot more. The better you master the technique, the more you will enjoy the sport.
A video summary
In this article, I explain how to shoot a bow in 10 steps. Since there is so much to discuss, I have written in-depth articles about each step. Reading this guide will serve as a good starting point. When you get more experienced, check out the detailed articles. They will allow you to perfect your technique to improve your archery!
So, make sure to save this page so you can use it as a reference and read the other articles another time.
Watch the video below for a quick overview of the 10-step process.
Before we start
The proverb goes: a picture says more than a thousand words. That’s why I used a ton of pictures of me shooting a bow. But a visual, like a live or video demonstration, says even more. That’s why I recommend taking the courses from Online Archery Academy. Of course, I can describe the technique and show it in a few pictures, but a step-by-step guide is even more helpful.
If you are serious about archery and you would like to learn the technique as fast as possible, I highly recommend taking the beginner’s course. Which teaches you all the fundamentals in 4 hours of quick and to-the-point videos. Online Archery Academy gives a 100-day money-back guarantee, so you can always ask for a refund if you feel that the course isn’t helping you.
You can use this link, and the coupon code IYA to get a 20% discount on all courses.
Step 1: your stance
The archery technique starts with the correct stance. A common mistake for new archers is to stand straight to the target. But that is not how you should stand while shooting your bow. You should turn 90 degrees from the shooting line.

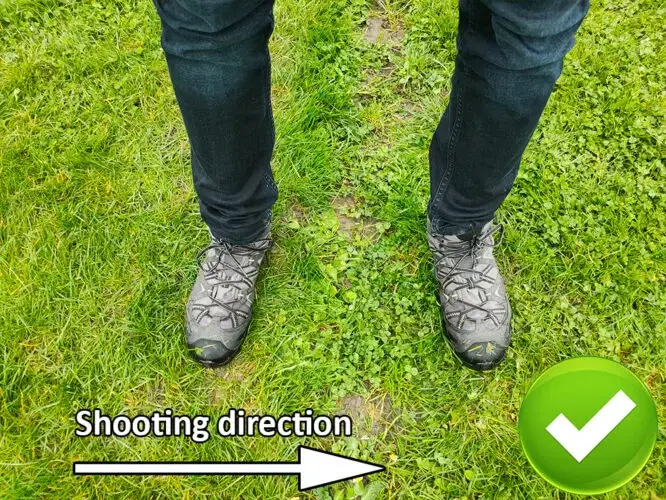
Keep your feet at shoulder width and point your toes slightly outwards to increase your stability. Although some archers slightly change their stance most archers shoot with this stance. This stance, known as the square stance, is the most suitable for new archers. It helps you align your back and improves your overall posture while shooting.
Read the article below, for more information on archery stances:
Step 2 nock the arrow
The next step is to nock an arrow. This is the easiest step to learn. You just place the arrow on the arrow rest and attach it to the string. You must be careful though how you attach it. You can attach it two different ways, but only one is correct.
The vanes should be pointing away from the bow. Normally the vanes of the arrow are colored to make this easier. The two vanes with the same color should be closest to the bow. This means that the off-color should be pointing outwards.
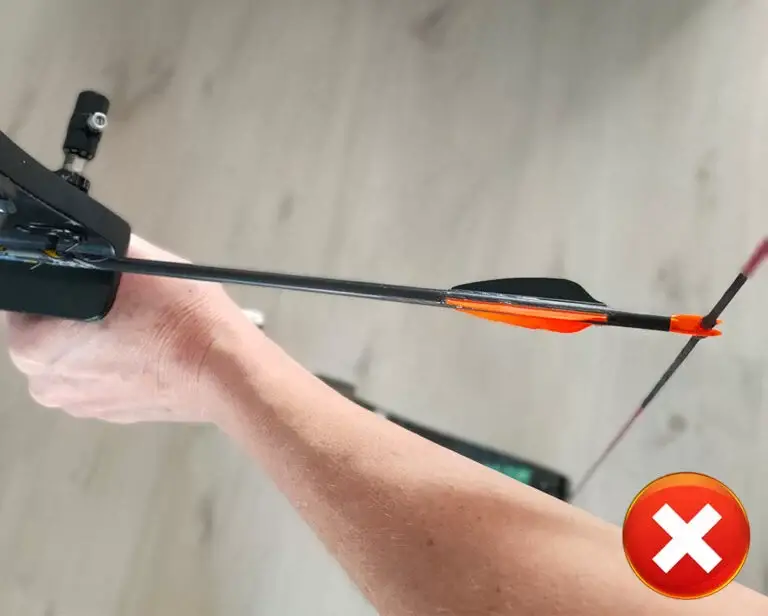
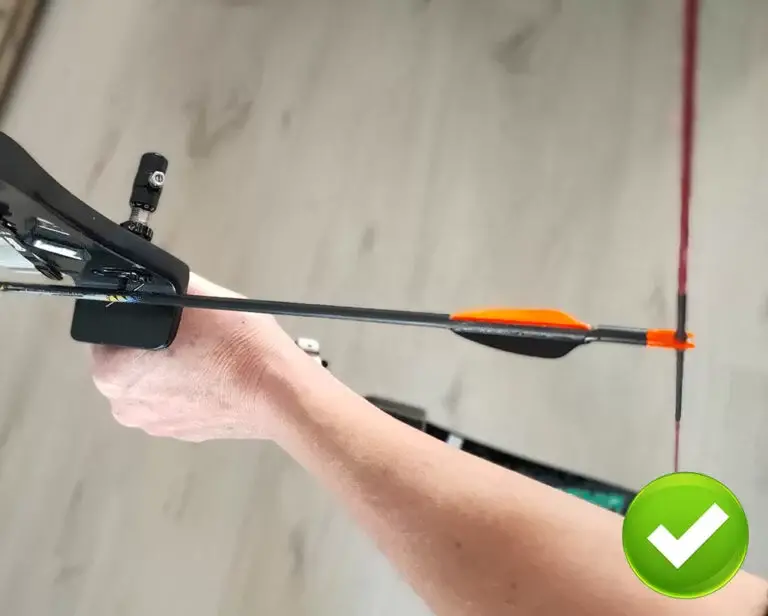
On a compound bow, the off-colored vane should be pointing upwards. For more guidance on how to nock the arrow, read the article below:
Nocking an arrow might feel a bit clunky. New archers often drop their arrows, so don’t think you look like a fool when this happens. The more you shoot the easier this will become!
Step 3: grip the bow
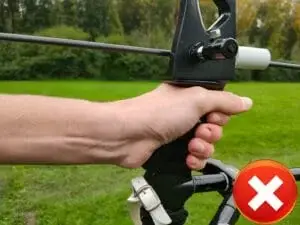
Most archers get their grip wrong when they are shooting for the first time. It makes sense that you want to keep a firm grip on the bow, but this hurts your accuracy. Instead of a firm grip, you should keep a relaxed hand while you fire the shot. A firm grip can cause you to twist the bow while you fire the arrow, which causes inaccuracies in your shot.
Therefore, you should keep a relaxed grip. I recommend shooting with an open grip since this is the most relaxed grip you can use. Some archers prefer to shoot with a closed grip, if you don’t tense your muscles that is fine too.
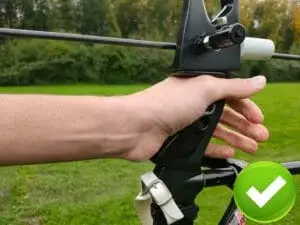
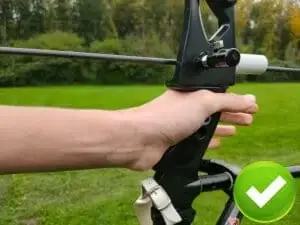
There are multiple ways to hold the bow, which are classified as a high, medium, and low grip. Which type of grip you use doesn’t make a huge difference if you keep it consistent. There is some debate amongst archers which is the best grip. So, I won’t cover these gripping techniques. If you want to know more, I recommend reading the article below:
Step 4: grip the bowstring
The next step is to grip the bowstring. There are two popular techniques to hold the bowstring. The first technique is the traditional technique. With this technique, you place three fingers under the arrow. This is especially useful if you aim along the arrow. Therefore, this is the best technique if you shoot your bow without a sight.
If you shoot with a sight, you want to use the Mediterranean style. With this style, you place your index finger above the arrow and the middle and ring finger below the arrow. This drawing technique makes it easier to anchor below your jaw, which is the preferred anchor point for archers that shoot with a sight.
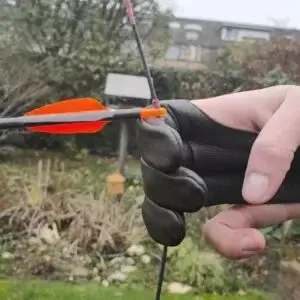
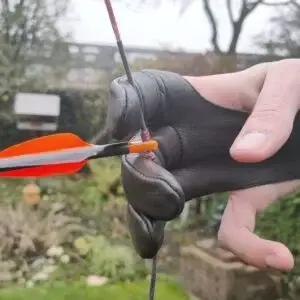
You want to make a hook out of your fingers and let the arrow rest on the joint of your last phalanx. Don’t put the arrow too much on your fingertips, because then it will be harder to keep the bow at full draw. You don’t want to grip it too tightly either because that might cause inconsistencies in your shot.
Step 5: keep the proper form
During the entire shooting procedure, you should keep the right form. So, in that sense, this step starts from step 1 and ends after step 10. I do mention it as step 5 because this is the perfect time to check whether you are standing correctly. If you don’t stand correctly before you draw you won’t stand correctly after it.
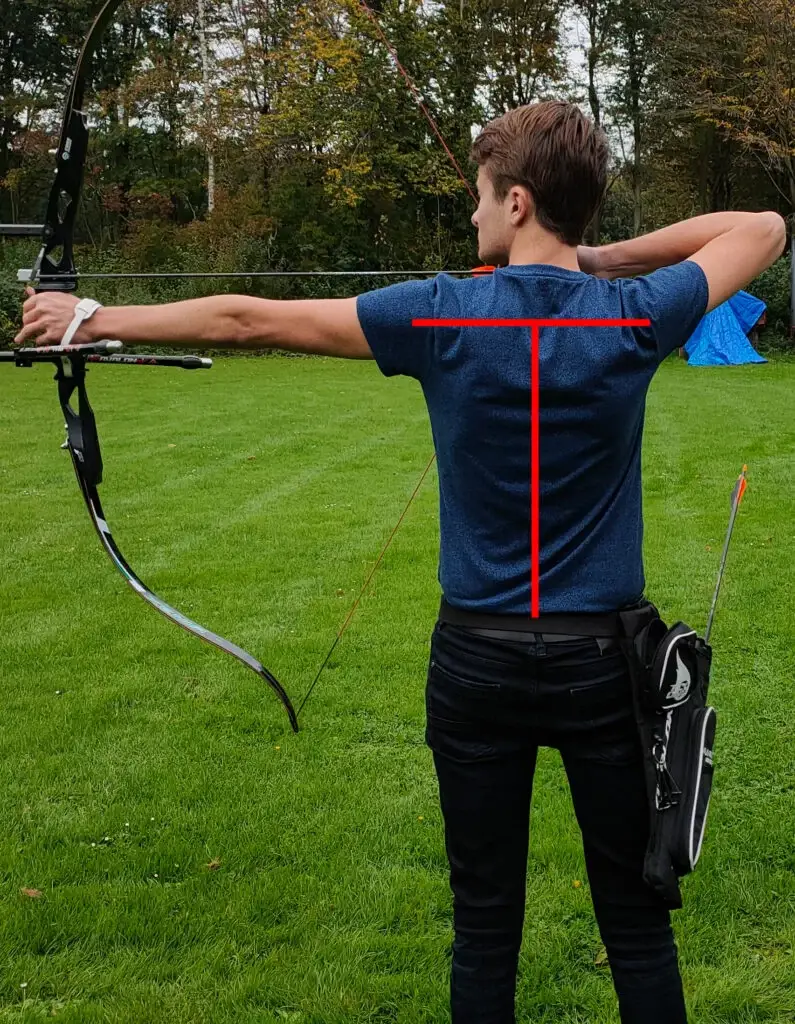
Therefore, make it a habit to check whether you are standing correctly. The basic technique is quite simple. You want to create a straight T-shape which means that both shoulders are level and both arms are horizontal. Also, your back should be straight. It’s a common mistake to lean backward to compensate for the weight of the bow.
It’s quite difficult to train this because you can’t see how you are standing. Therefore, training in front of a mirror or filming yourself can help to improve your form. Read the article below, for a more detailed guide on how to keep the right form:
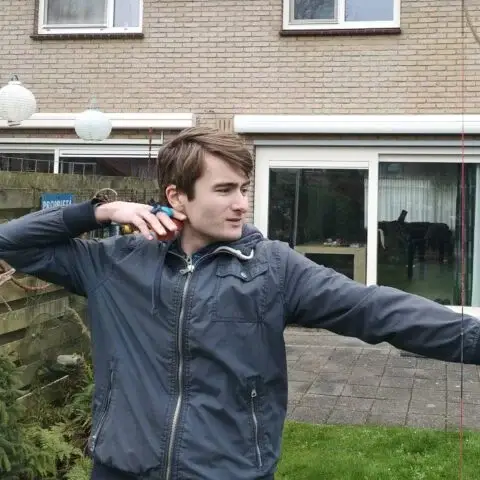
Step 6: draw the bow
Drawing the bow is quite simple, just draw the bow to your anchor point in a fluid motion. If you shoot a compound bow with a release you want to draw away from your face. You don’t want to hit your face when your release accidentally goes off.
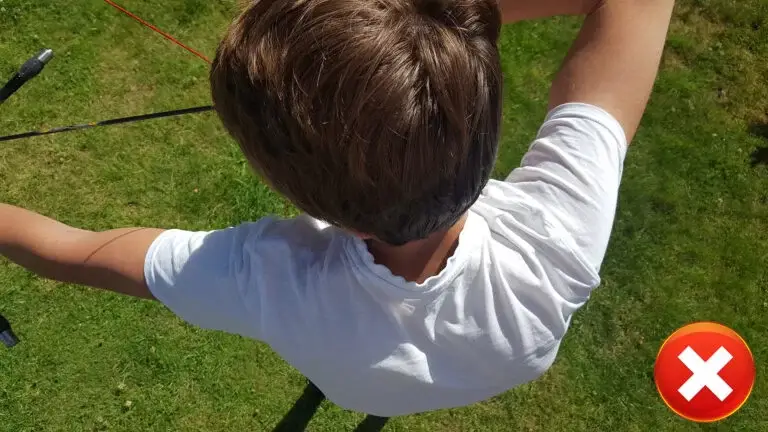
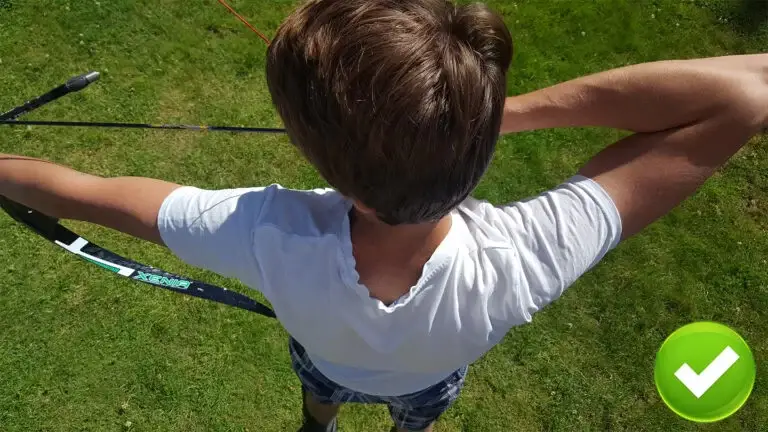
You should draw your bow primarily with your back muscles, so don’t be surprised if you feel muscle strain in your back after shooting. Makes sure that you align your shoulders, this makes it easier to keep your bow at full draw. This helps you to keep the bow still while you are aiming.
The more you practice the more efficient you will draw your bow. So, if you practice a lot, the draw weight will feel lighter every time you shoot. For more information on how to draw the bow, read the article below:
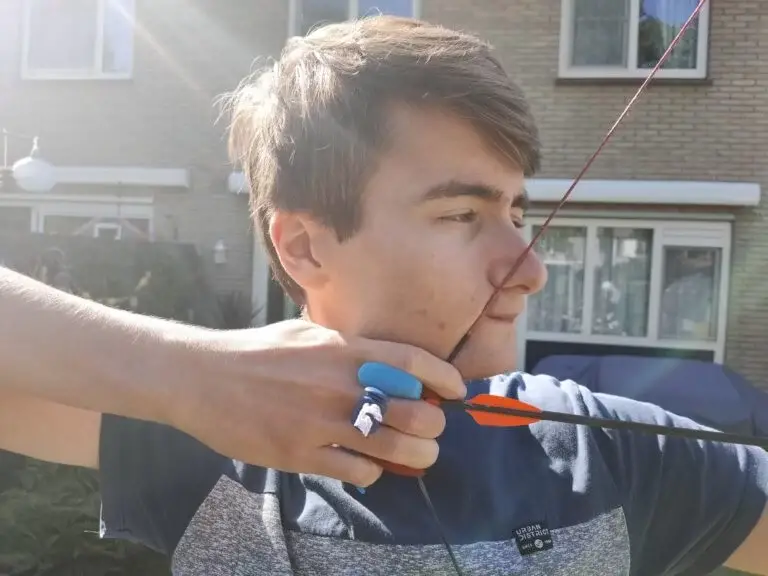
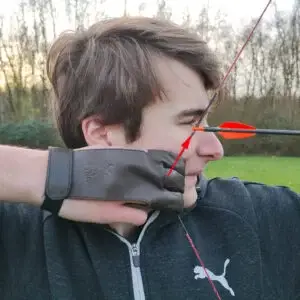
Step 7: anchoring
An anchor point is a spot on your face that you use to keep your hand position consistent. We use an anchor point because inconsistent hand placement has a detrimental impact on your scores. At this spot, your bow is a full draw which makes you ready to aim.
Finding and keeping an anchor point is extremely important and should be a priority when you are just getting started. It’s also one of the techniques that is the most difficult to learn.
You want to have a spot that you can easily feel. Therefore, some archers use a bone or another prominent feature such as the corner of your mouth. The most suitable anchor point depends primarily on your shooting style. I will discuss this in more detail below.
Traditional
If you shoot a traditional bow and you aim along the arrow, you want to have the arrow as close to your eye as possible. Therefore, most archers anchor either on their cheekbone or in the corner of the mouth.
Which one you use also depends on your aiming technique, which we will discuss in more detail in the next section. Try a few different anchoring spots and use the spot that is the easiest to keep consistent. It should also feel comfortable though. If your anchor point doesn’t feel comfortable it will cause inconsistencies in your shots.

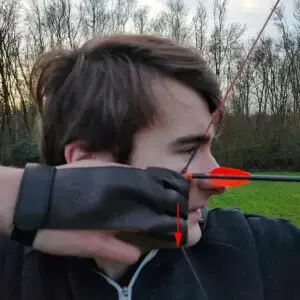
Recurve
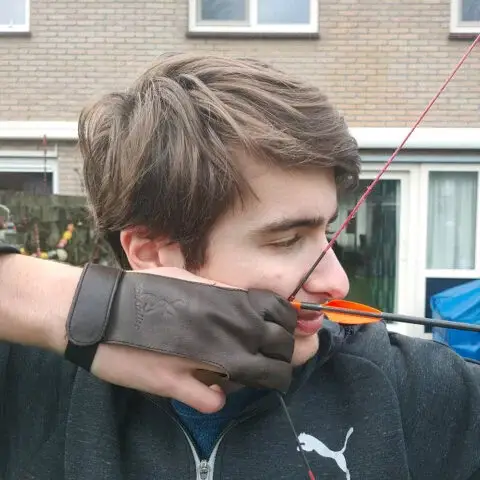
If you shoot with a sight, you want to anchor below your jaw. This is a comfortable and clear place to anchor. It also frees up your field of view which makes it easier to aim with your sight. Just lightly press the upper part of your hand under your jaw.
Make sure that you keep your mouth closed. If you open your mouth, your jaw will drop, which causes your arrows to fly higher than where you are aiming at. It’s recommended to anchor on your jawbone. This makes for a clear anchor point which makes it easy to stay consistent.
Some tabs have an anchor shelf while others have a thumb rest. If your tab has an anchor shelf it’s often easier to feel your anchor point, because it’s easier to feel the metal or plastic. If you use a thumb rest. Your thumb will hit your jawbone, this tends to be more comfortable, but it can be more difficult to feel.
Therefore, I often recommend buying a tab which you can use with both an anchor shelf as well as a thumb rest. This allows you to test what works best for you. If you want more information on the different parts of a tab, read the article below. I also provide recommendations on what kind of tab I would recommend if you shoot with a sight.
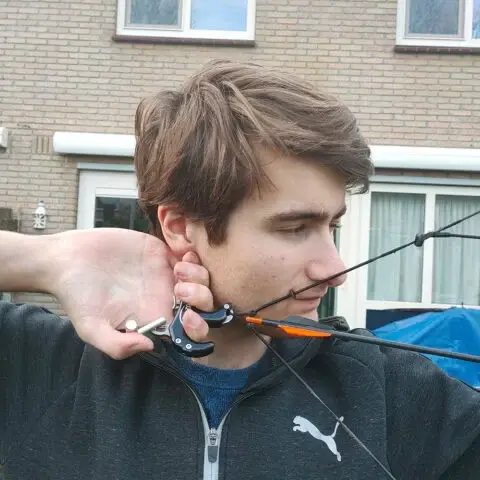
Compound
Compound bows are in almost all cases shot with a release. This makes anchoring a bit more difficult because your anchor point is in large part determined by your release. If you want to shoot your compound bow without a release, read the article below for more guidance:
Shooting a compound bow without a release
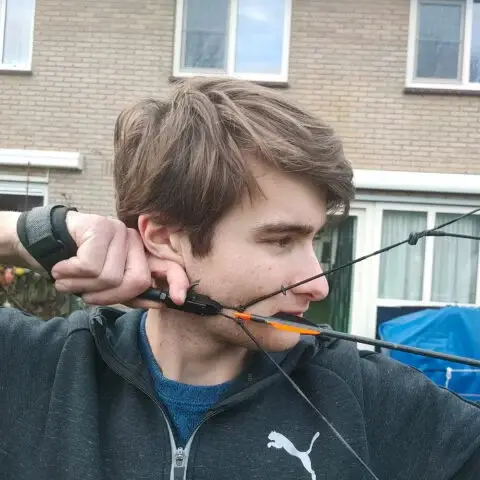
If you shoot with a wrist release, a good anchor point would be your ear lobe. If you get to full draw you will probably hit this spot with your index finger. Another suitable anchor point is behind your jawbone. Which one works better depends on your facial features, so try a few different spots.
If you shoot with a handheld thumb release you turn your hand 90 degrees. Therefore, you can easily use your knuckles to anchor behind your jaw. Some archers draw a bit further and hit their earlobe or their neck instead.
For compound archers, keeping a consistent anchor point is easier. If you anchor very inconsistently you will notice it. The peep sight will not be placed correctly in front of your eye which means that you can’t see your sight.
Training for consistency
Once you found a spot, you must keep it consistent. Therefore, you should often ask yourself: ‘’am I still in the right spot?’’ Especially when you are just getting started, training the consistency of your anchor point should be a priority.
Since it can be hard to identify whether you are consistent with only one anchor point, most archers use multiple. Most archers have a secondary anchor point on the tip of the nose, the chin, or the corner of the mouth. For more guidance and tips on how to keep your anchor point consistent, read the article below:
Finding and maintaining your anchor point
Step 8: aim
If you shoot your bow with a sight aiming is relatively straight forward. Just aim at the center of the target. When your sight is configured correctly you should hit around the center of the target. If your notice that your arrows land in a cluster away from the center, your sight isn’t configured correctly. Follow the guide in the article below if this is the case:
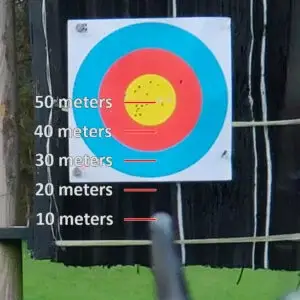
If you shoot without a sight, it’s more difficult because there are multiple ways to aim the bow. All these aiming techniques use the tip of the arrow. The major difference with these techniques is how you aim at different distances, below is a summary for each technique:
- Gap shooting: with this technique you keep your hand position and anchor point the same. To accommodate different distances, you either increase or decrease the distance between the tip of the arrow and the center of the target.
- String walking: with this technique you keep your anchor point the same for each shot. You also have the tip of the arrow in the center of the target. To accommodate different distances, you move your draw hand up or down the string.
- Face walking: with this technique you keep your finger placement on the string the same and you aim the arrow in the center of the target. But to adjust for different distances, you anchor higher or lower on your face.
There is also a third option, instinctive shooting. This means that you don’t aim but look straight at the target with two eyes open. By practicing this you will instinctively aim in the center of the target.
If you shoot a bow without a sight, you want to choose one of these four methods. For more tips and tutorials on how to use these methods, read the article below:
Step 9: release
Nearing the end of the draw cycle you want to release the shot while you are aiming at the center of the target. If you shoot without a release, you relax your fingers when you are ready to shoot. The string will automatically push the fingers out of its way and the arrow is shot. With a release, you simply pull the trigger.
It’s a common mistake to creep forward due to the heavy draw weight of the bow. Try to reduce this to a minimum. If you shoot with a sight, you want to take at least 5 seconds to aim before you fire. Without a sight, this should be about 3 seconds. Aiming longer helps you relax and focus.
For more tips on how to improve your release, read the article below:
Step 10: follow-through
A good follow-through is important in a lot of sports where accuracy is important. Think for example of basketball, volleyball, golf, or baseball. A good follow-through makes sure that the ball goes toward the intended target. The same is true for arrows.
It’s a common mistake amongst archers to keep a firm grip on the bow as we mentioned earlier. They feel that the bow might fall on the ground if they don’t hold it tightly. But that leads to a lot of issues.
Instead of holding it tightly, the bow should spring forward. It will even be completely airborne for a few seconds. This makes sure that you don’t cause any last-minute torque to the bow which causes inaccuracies in your shot.
The hand you hold the string with will shoot backward since all the tension is suddenly removed from your body. Don’t try to stop this motion, it is harmless and part of the technique. For more tips and tricks on how to master the follow through, read the article below:
Practice makes perfect
Okay, you now know the basic technique of how to shoot a bow. Try to stick with this technique as much as possible. Some archers slightly deviate from this technique. Since we all have slightly different bodies there is no one-size-fits-all technique.
But if you are just getting started, you don’t want to experiment too much with unorthodox techniques. We use these techniques for good reasons, and they have been proven to work great by professional archers.
So, go ahead and start shooting. Some parts of the technique might feel weird or uncomfortable at first, but once you start training it will feel second nature to you.
Improve your technique
Archery is all about technique. So, when you are shooting, you will always work on one of these steps from the shot cycle. The information in this article will give you a head start for your first archery session.
But if you want to improve your technique there is much more to discuss. Therefore, I would highly recommend reading my in-depth articles on these different steps. It contains information all serious archers should now:
- Step 1: stance
- Step 2: nocking
- Step 3: grip the bow
- Step 4: grip the bowstring
- Step 5: maintain the right form
- Step 6: draw the bow
- Step 7: anchor
- Step 8: aim
- Step 9: release
- Step 10: follow through
Final words
I hope this guide helps you to get started and improve your archery! If you have any questions comments or feedback, please leave it down below. I will reply as soon as possible, and you will receive an email notification.
Also, don’t forget to use the coupon code IYA if you register for any of the courses of Online Archery Academy.

Tim van Rooijen
For as long as I can remember, I have always been fascinated by archery. First due to its historic significance but later because I like being outdoors. With this blog, I share my knowledge about Archery and how you can improve your shot. More about author…