Whenever you buy a new recurve bow, you must tune it before using it. Shooting a bow that is out of tune will lower your accuracy and can even cause damage in the long run. Therefore, this article gives a full overview of how to tune your bow in 10 steps.
I have been practicing archery for many years and have helped many archers tune their bows. Not all archery gear works the same, therefore I explain how it works on all the different options available.
This article is meant as a beginner’s guide. Within each of the tuning steps, I have a more detailed guide. If you have trouble with any of the steps, make sure to read the detailed article!
What you need before you start
Before you start you will need to have all your archery gear. It’s no use to start tuning your bow without a string or nocking points, so make sure that you have all your essentials before you start.
Bow parts (essential):
- Riser
- Limbs
- String
- Nocking points
- Arrow rest
- Plunger
Bow parts (optional):
- Sight
- Clicker
In addition to your bow parts, you will also need some tools. I have listed these tools down below:
Tools:
- A bow square: also known as a T-square is a device that is primarily used to locate your nocking points. You can also improvise with a ruler, but it’s less precise. Therefore, I highly recommend buying a bow square. Here is the bow square I recommend.
- Center markers: also known as limb gauges allow you to align your bow limbs. You can also use some pieces of tape, but with bow gauges, it’s a lot easier. If you don’t tune your bow a lot, you will not use them often though. Here are the bow gauges that I currently use.
- Hex wrenches: if you bought a brand-new bow you probably have a set of wrenches included. You will need these wrenches to configure your bow. If you don’t have these wrenches, you might want to invest in an archery multitool. If you are looking for a good multitool, I can highly recommend this multitool from Pine Ridge Archery.
- Bow vise (optional): most archers don’t have this tool as it’s rather expensive. For example, the bow vise I have costs more than 100 dollars. Since I am often tuning bows it still makes sense for me, but I don’t think it makes sense for most archers.
Step 1: assemble your bow
Before we can get started tuning your bow, you need to assemble it first. If this is your first time assembling your bow, make sure to put the limbs securely in the limb pockets. Sometimes it can require quite a bit of force to get it fully in. Once the limbs are attached to the riser, you can string your bow.
To string your bow, place the big loop over the top limb and slide it all the way down. Now place the small loop on the limb tip and make sure that it sits securely in the limb grove.
The next step is to get your bow stringer and string your bow. If you have a bow stringer with a pocket, you will have to place the pocket over the bottom limb tip. Some stingers have two saddles, which are placed on both limbs.
In the video below, I show how to properly string your bow:
Step 2: set the brace height
Now you have assembled your bow; we can move to the next step. In this step, we will configure the brace height. Let me first explain how to measure it.
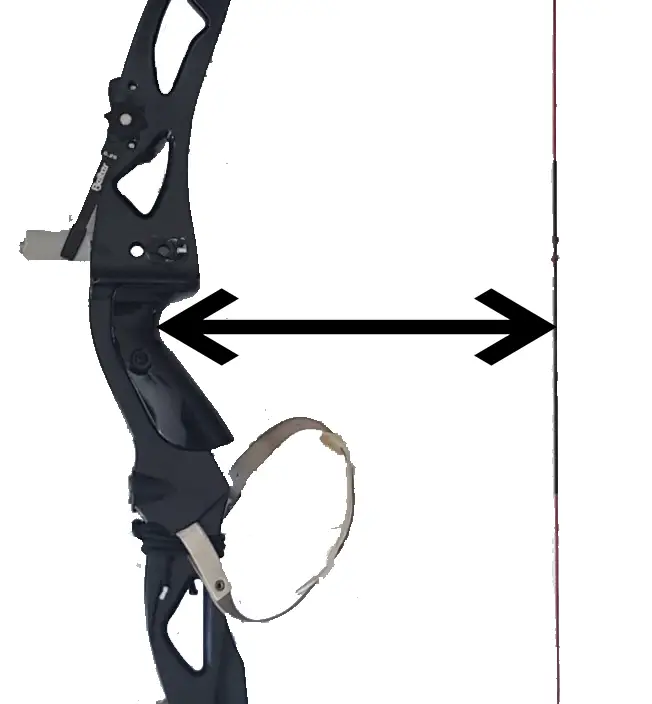
The brace height is the distance between the string and the deepest point of the grip.
The easiest way to measure this is by using a bow square and placing it in the deepest part of the grip.
Once you have taken your measurements make sure to compare them to the recommended brace heights in the table below:
| AMO bow length | Minimum brace height | Maximum brace height |
| 58 inches | 7 ¼ inch (18.5 cm) | 7 ¾ inch (19.5 cm) |
| 60 inches | 7 ½ inch (19 cm) | 8 ¼ inch (21 cm) |
| 62 inches | 7 ¾ inch (19.5 cm) | 8 ½ inch (21.5 cm) |
| 64 inches | 8 inch (20.5 cm) | 8 ¾ inch (22 cm) |
| 66 inches | 8 ¼ inch (21 cm) | 9 inch (23 cm) |
| 68 inches | 8 ½ inch (21.5 cm) | 9 ¼ inch (23.5 cm) |
| 70 inches | 8 ¾ inch (22 cm) | 9 ½ inch (24 cm) |
If you are just getting started with archery, you are probably not familiar with AMO bow length. So here is a table with Olympic recurve bow sizes:
| Riser length | Short limbs | Medium limbs | Long limbs |
| Short 23-inch riser | 64-inch bow | 66-inch bow | 68-inch bow |
| Long 25-inch riser | 66-inch bow | 68-inch bow | 70-inch bow |
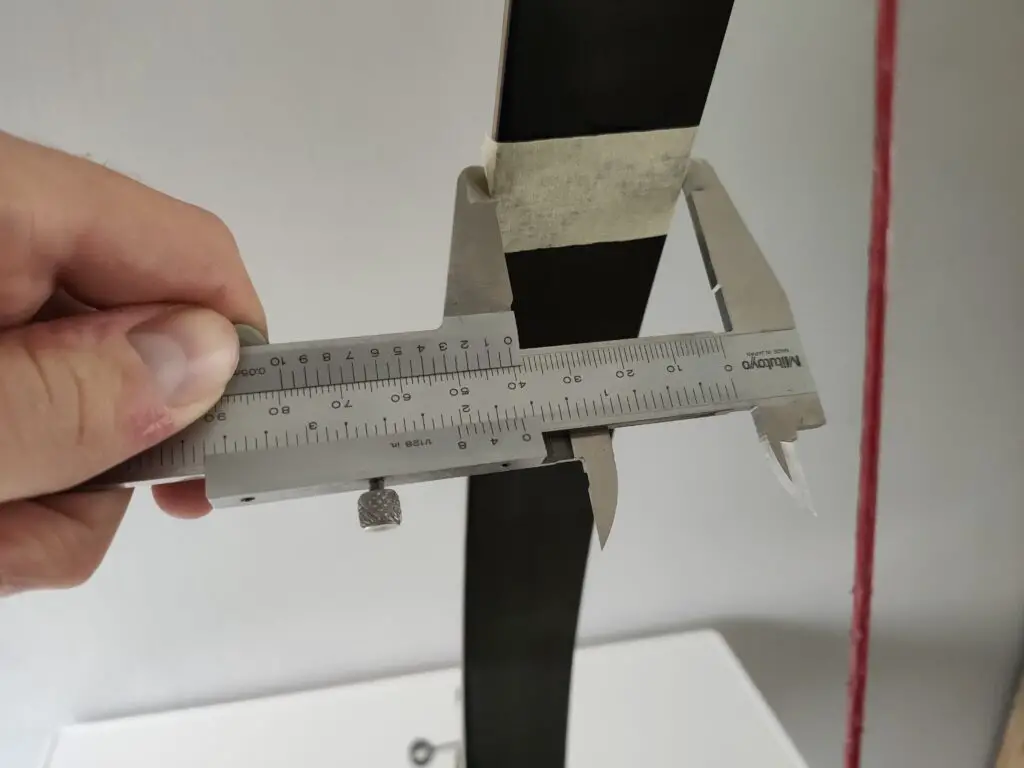
If you do not know the sizes of your riser and limbs, you can also manually measure your AMO bow length by using the video below:
Now you know your AMO bow length you can use the chart above to set your brace height between the recommended values. If your brace height is below the minimum, you should add some twists to the bowstring. If your brace height is above the maximum, you should add some twists.
In general, it’s better to have a brace height that is on the high side than on the low side. So make sure that your brace height is well above the minimum for best shooting conditions.
You can only do this to a certain extent though. If the brace height is more than ½ inch (about 1,5 cm) off from the minimum or maximum values, your bowstring is too short or too long. The only way to fix this issue is by buying a new bowstring.
If you think your bowstring is not correctly sized for your bow, I recommend reading the article below. In that article, I explain in more detail how to find the right bowstring length:
How to find the right bowstring length
For a more detailed guide on brace height, make sure to read my in-depth article below. I explain in a lot more detail how to set the brace height and how to finetune it.
Brace height – what it is and how to adjust it
Step 3: configure the tiller
Now you have set your brace height, we can move on to the tiller. To tune the tiller, we must take note of the tiller height. This measurement is like the brace height, but in this case, there are no individual recommended values. Instead, we focus on the difference between the upper and lower tiller height.
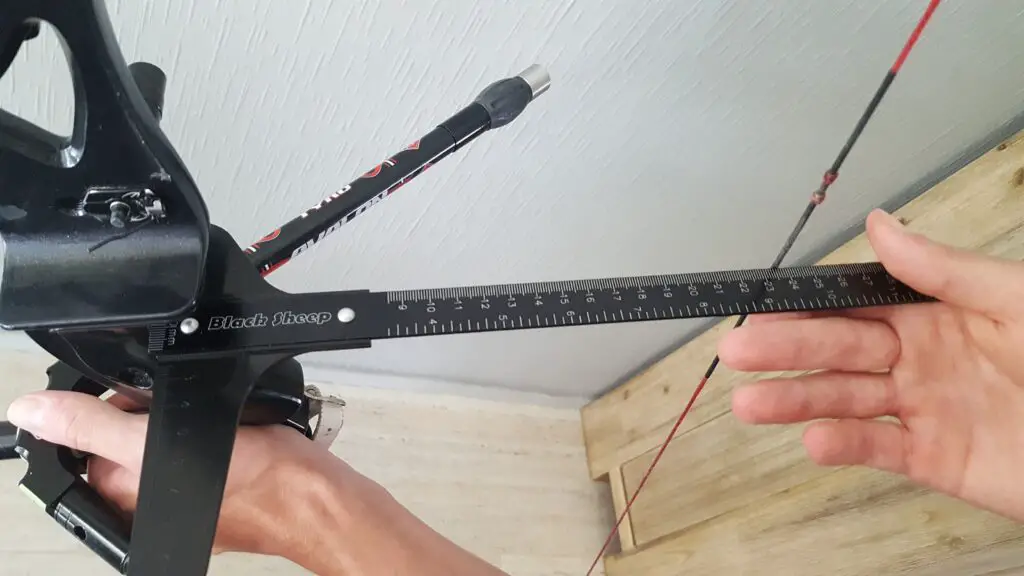
To measure the tiller height, place the bow square on the limb where it meets the riser. Hold it in a straight line and measure the distance to the string
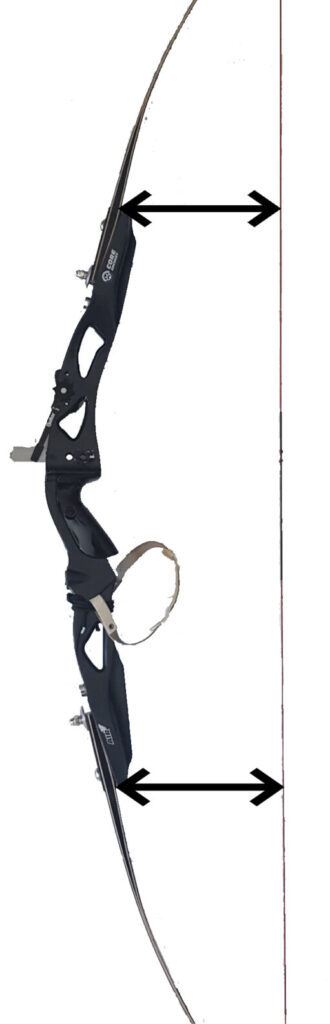
Before we can configure the tiller, we need to know the tiller setting. You can get to this number by measuring the tiller height of the lower and upper limbs. Now you simply have to subtract the tiller height of the lower limb from the tiller height of the upper limb.
‘’tiller upper limb – tiller lower limb = tiller setting’’
The most important part is that your tiller setting is between 0 and 15/32 inches (12 mm). This means that the lower tiller height is lower than the upper tiller height. A good starting point for the tiller is to set the tiller at 5/32 (4 mm). When we get to finetuning the bow, you might want to make some changes to the tiller height.
To change your tiller, follow these steps:
1. Measure the current tiller height: before you start adjusting the tiller, you should measure the tiller height of both the upper and lower limb. Now subtract the tiller height of the lower limb from the upper limb.
2. Lookup the ideal tiller height: most manufacturers have a recommended tiller height for their bows. Therefore, consult the owner’s manual to find the ideal tiller height. If you can’t find a recommended tiller height, you can use 5/32 inches (4 mm) which is generally accepted as a decent tiller height. Later in this article, I will discuss this measurement in more detail.
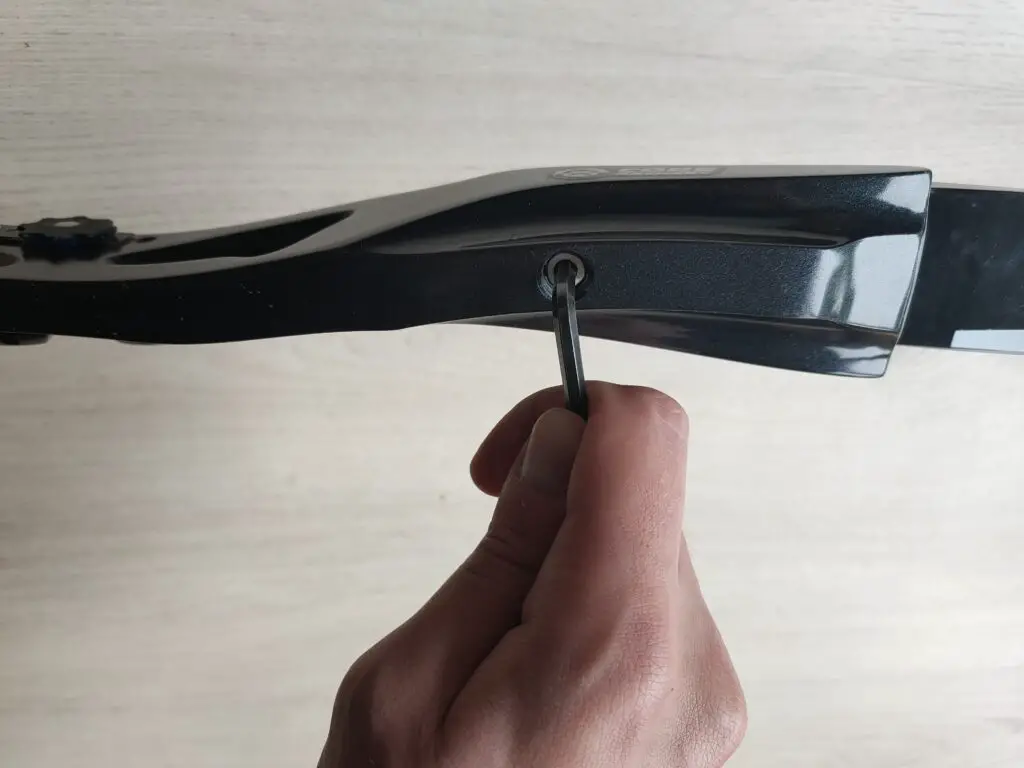
3. Unscrew the locking bolt in the back of the riser: most recurve bows have a bolt that locks the tiller in place. Otherwise, the tiller could change every time you store your bow. In most cases, you loosen this bolt with a 5/32 (4 mm) hex wrench.
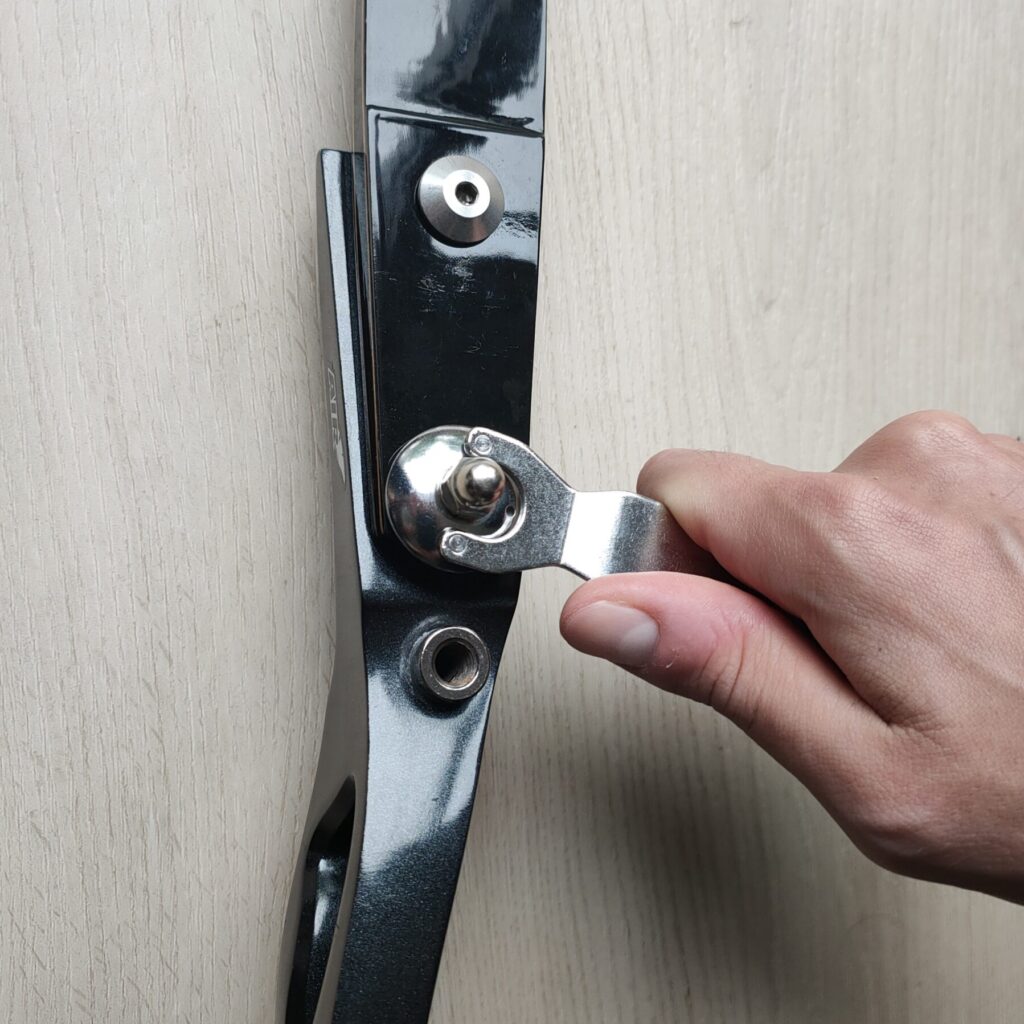
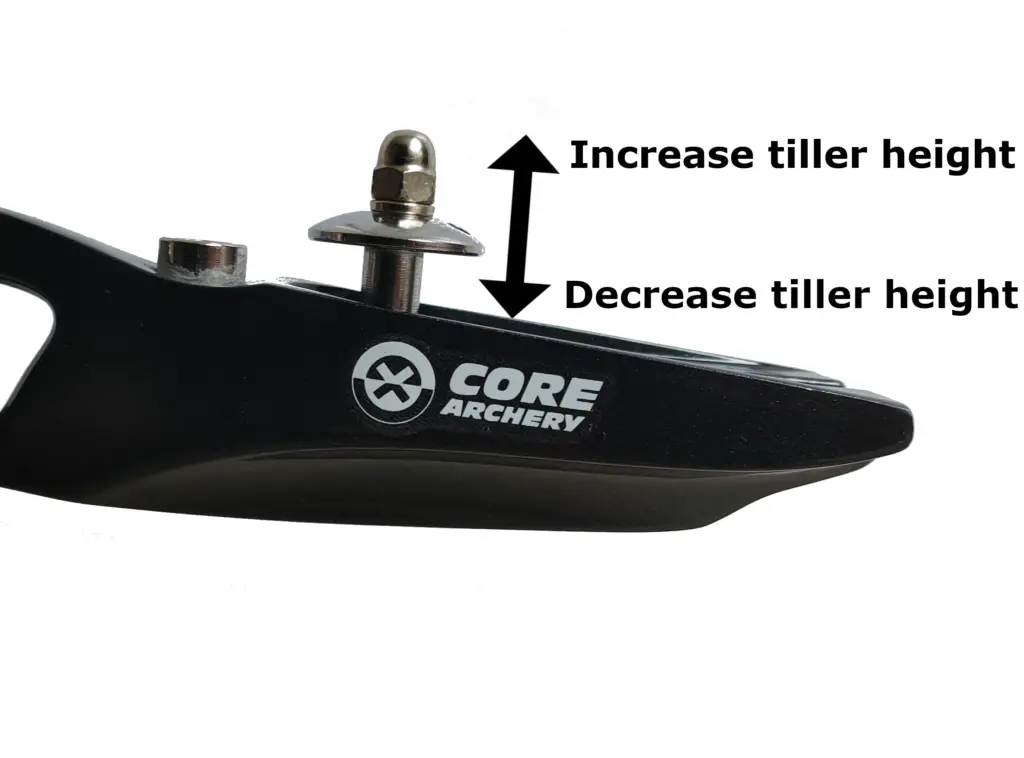
4. Adjust the tiller with a hex or your proprietary key: on most bows, you adjust the tiller with a hex screw integrated into the tiller head. Turn the head clockwise to decrease the tiller height and turn the head anti-clockwise to increase the tiller height. One turn increases or decreases the tiller height by about 3/64 of an inch (1 mm). But the actual amount differs per bow
5. Tighten the locking bolts once both tillers are configured correctly: in most cases, you can get to the recommended tiller setting by adjusting only one tiller. But sometimes you must adjust both tillers in the opposite direction. This might take a few tries.
If you still have issues setting the tiller height, I recommend reading the article below. Within that article, I explain in a lot more detail what the tiller is and how it works:
Tiller height – what it is and how to adjust it
Step 4: align the limbs
To align your bow limbs, you first need to know how to check your limb alignment. You can do that by following these steps:
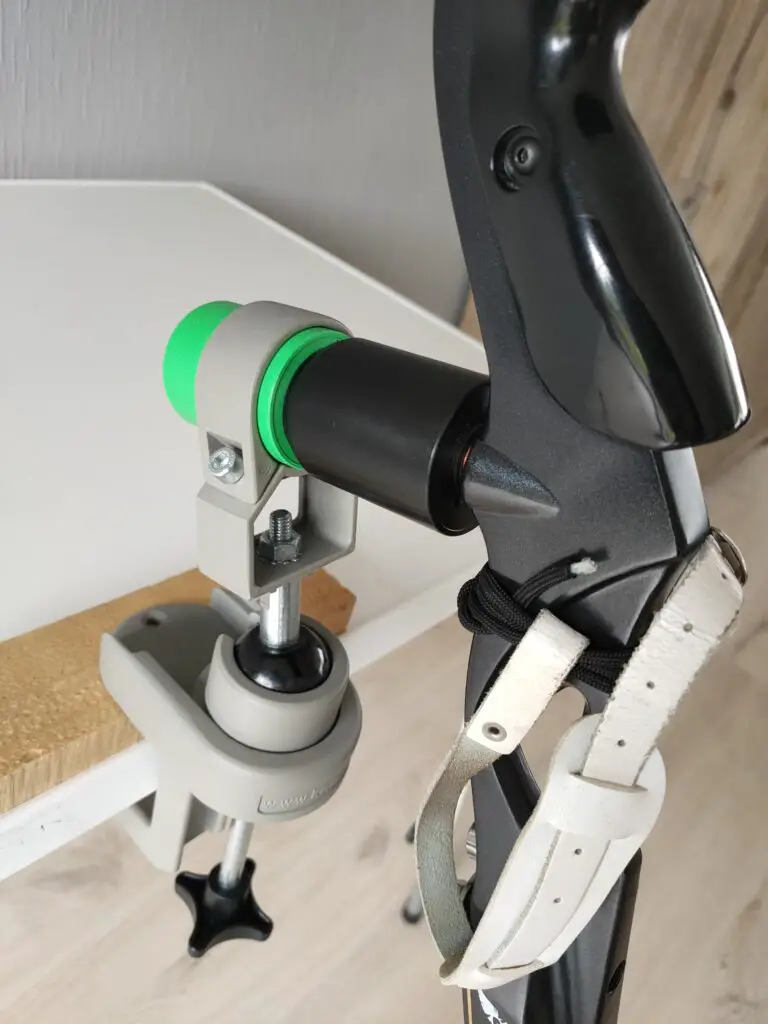
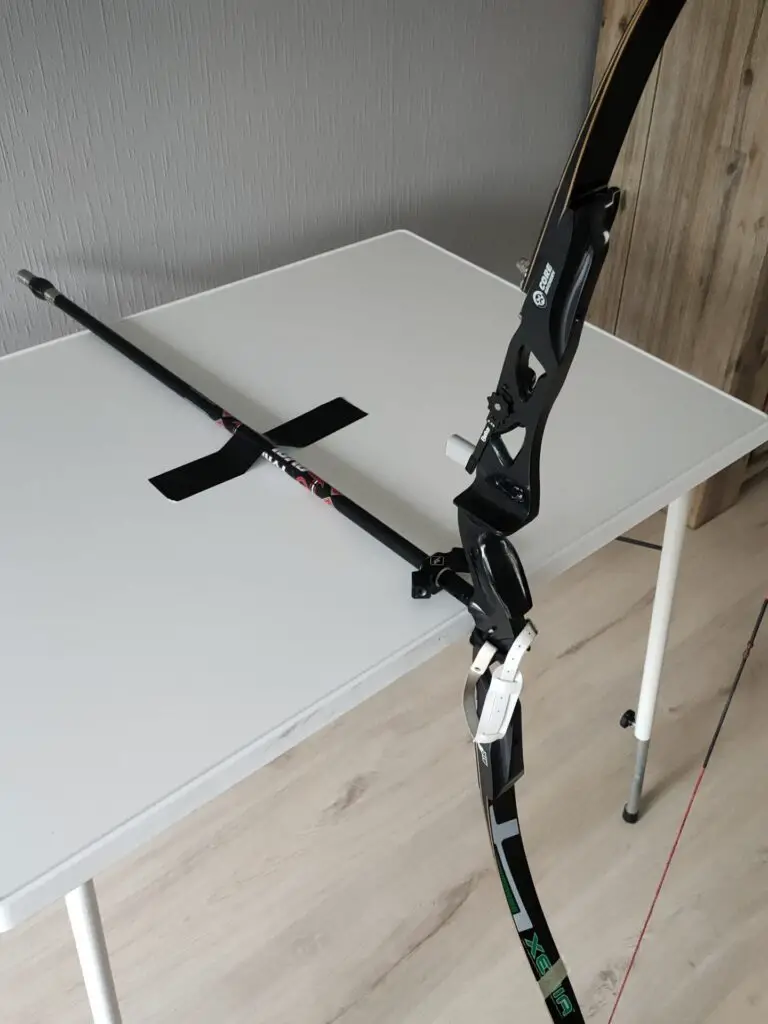
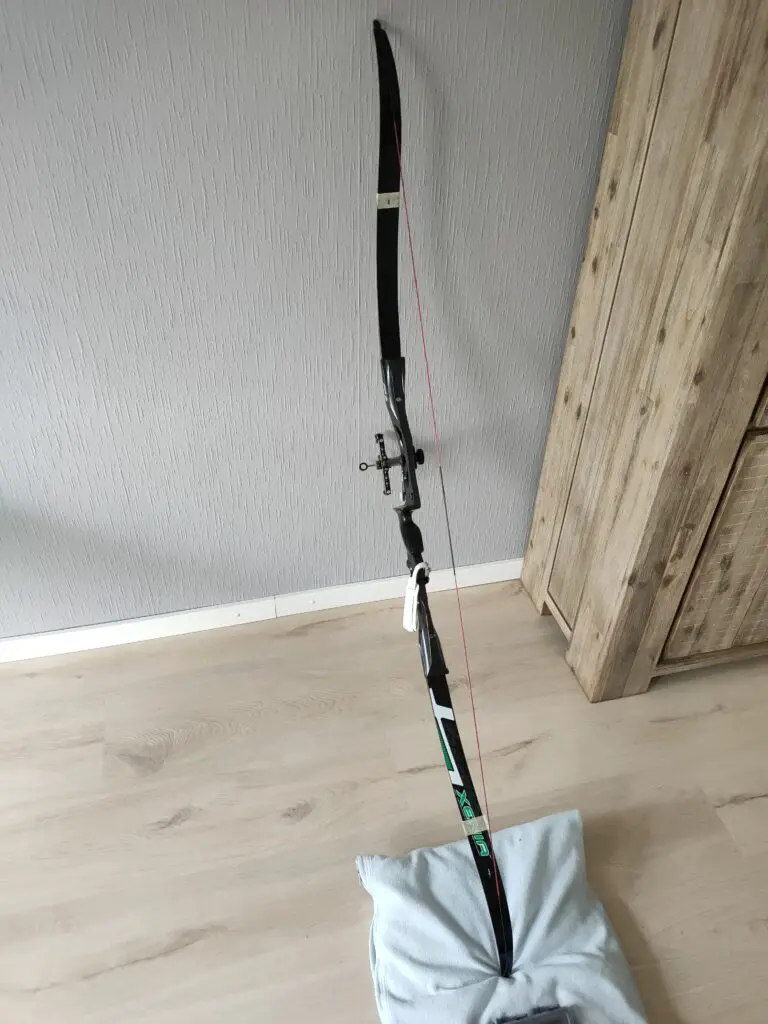
1. Place the bow in a bow vise: the bow needs to be propped vertically to check your limb alignment. The best way to do this is with a bow vise, which is a device that clamps to the table and holds your bow. You can also improvise a bow vise by taping the bow to a table with the stabilizer. Alternatively, you can also lean it against a wall. Make sure to use a cushion or anti-slip to prevent the bow from slipping.
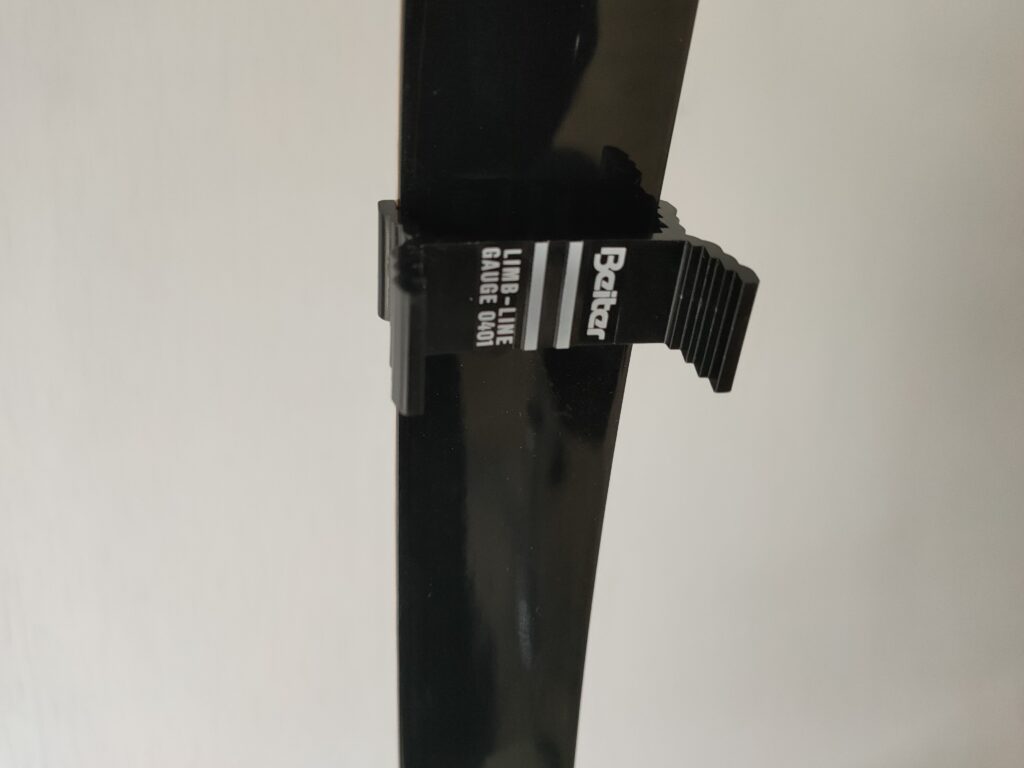
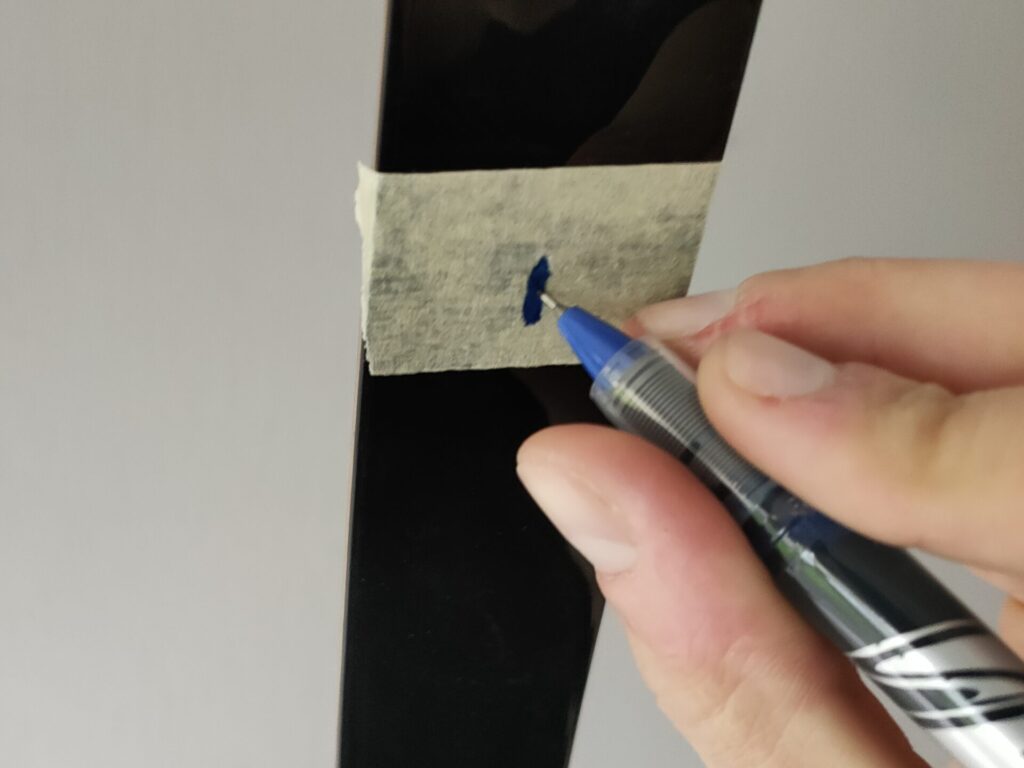
2. Install the bow gauges: to check limb alignment, we use a device called a bow gauge. If you don’t have bow gauges, you can also use a piece of tape and mark the center. I do recommend buying some bow gauges though because it’s much easier to see your alignment. Keep these center markers in place after this step, you will need them later as well.
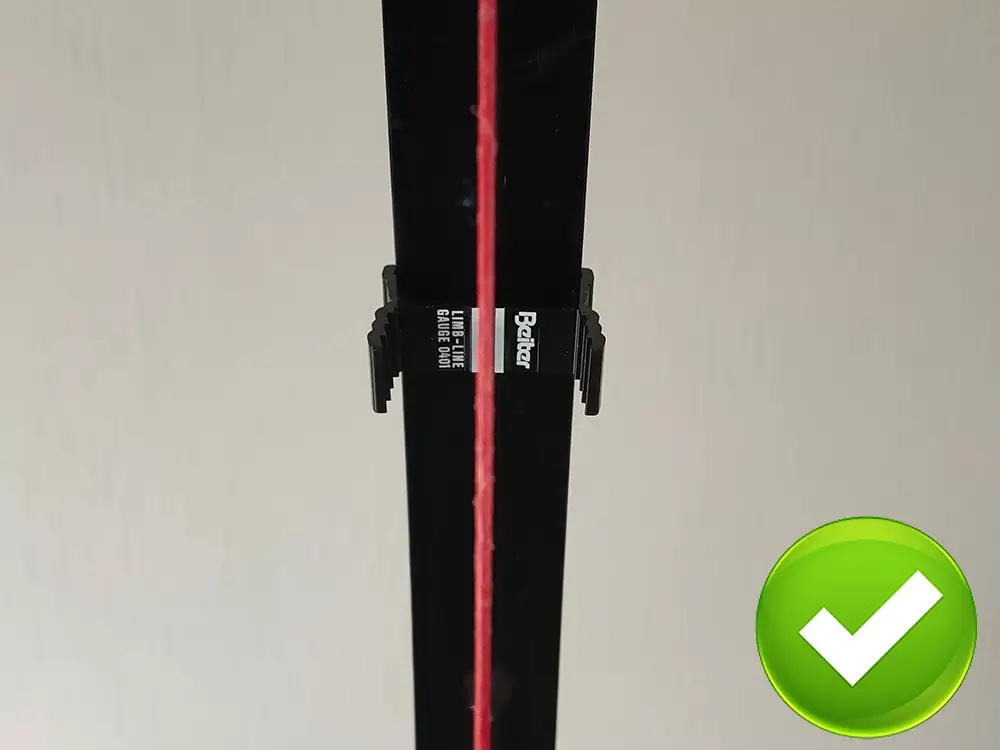
3. Look through the center of the string: take a few steps back and align the center of the string with the locking bolts of your riser. I recommend taking a seat because it can be difficult to keep your head still while standing. In some cases, you might notice that you can’t align the string on both bolts. That means that the limbs are not correctly aligned. Try to align it as best as possible and move to the next step.
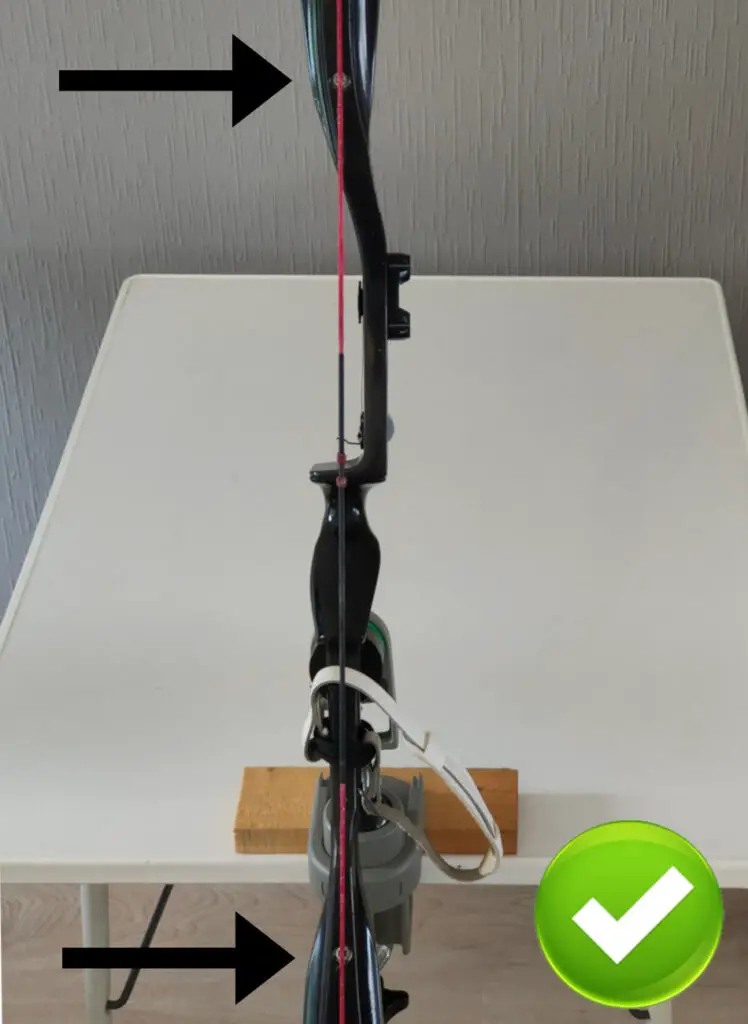
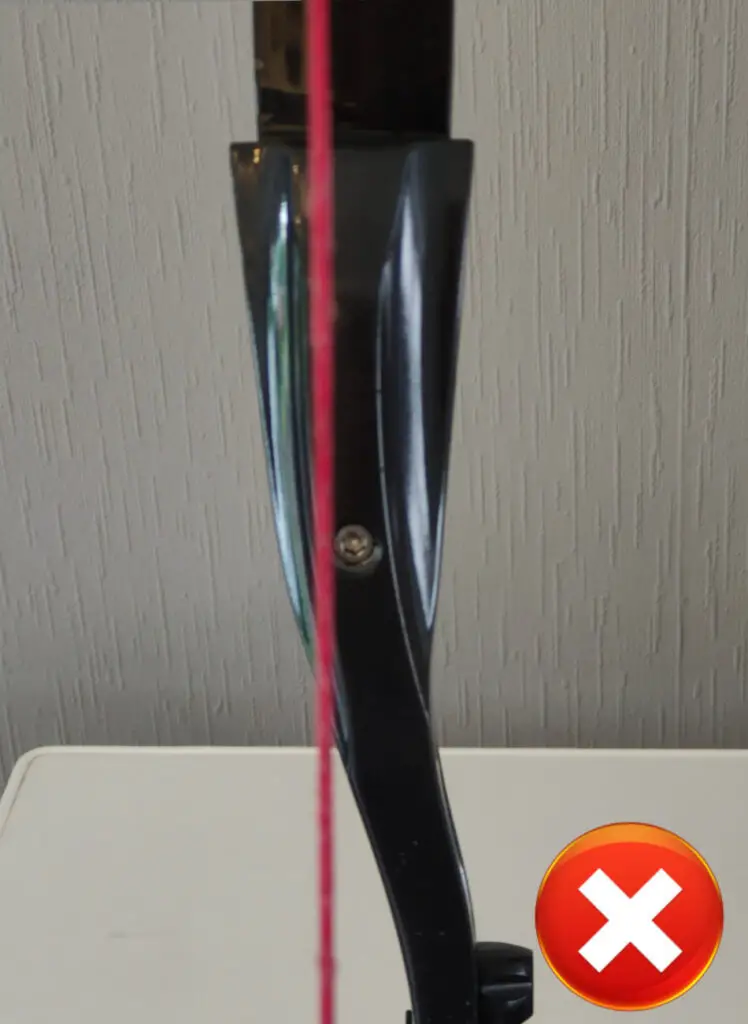
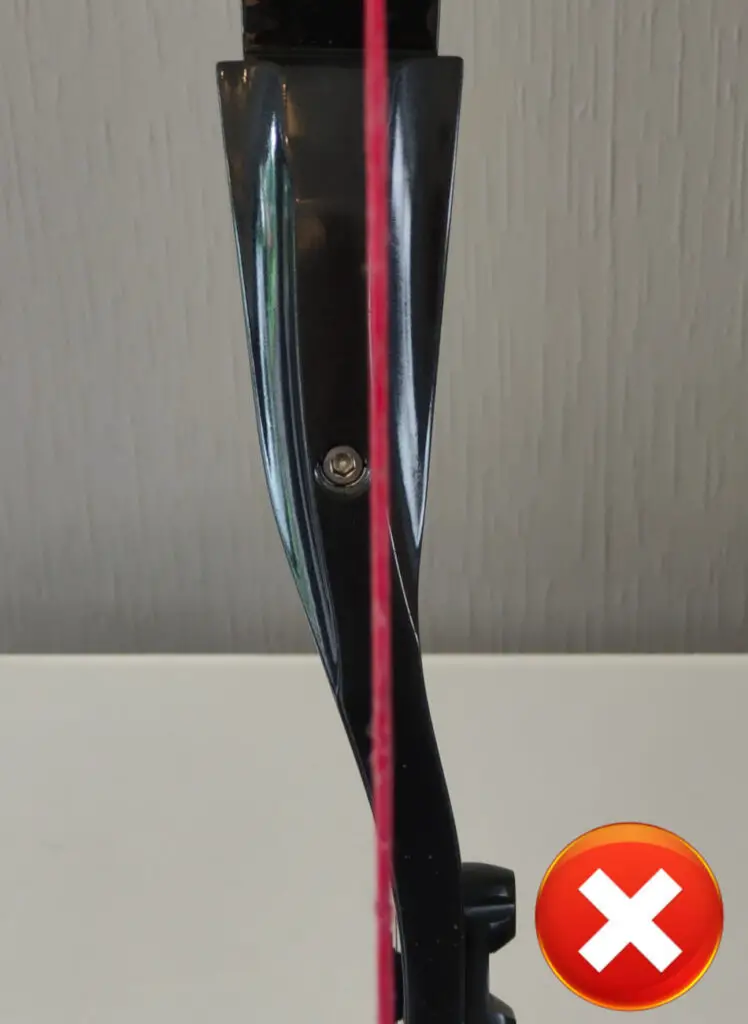
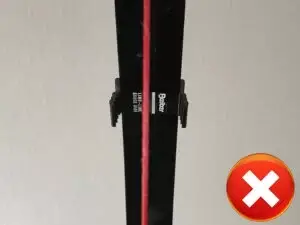
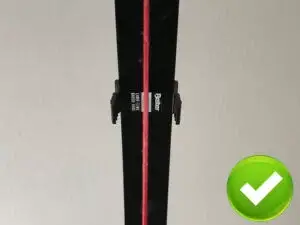
4. Check the limb alignment on both limbs by looking at the gauges: while keeping the string in the center of the riser, look at both bow gauges. If the string covers one of the two white lines that bow limb is not properly aligned. If the right line is covered, the limb is skewed to the right. If the left line is covered the limb is skewed to the right.
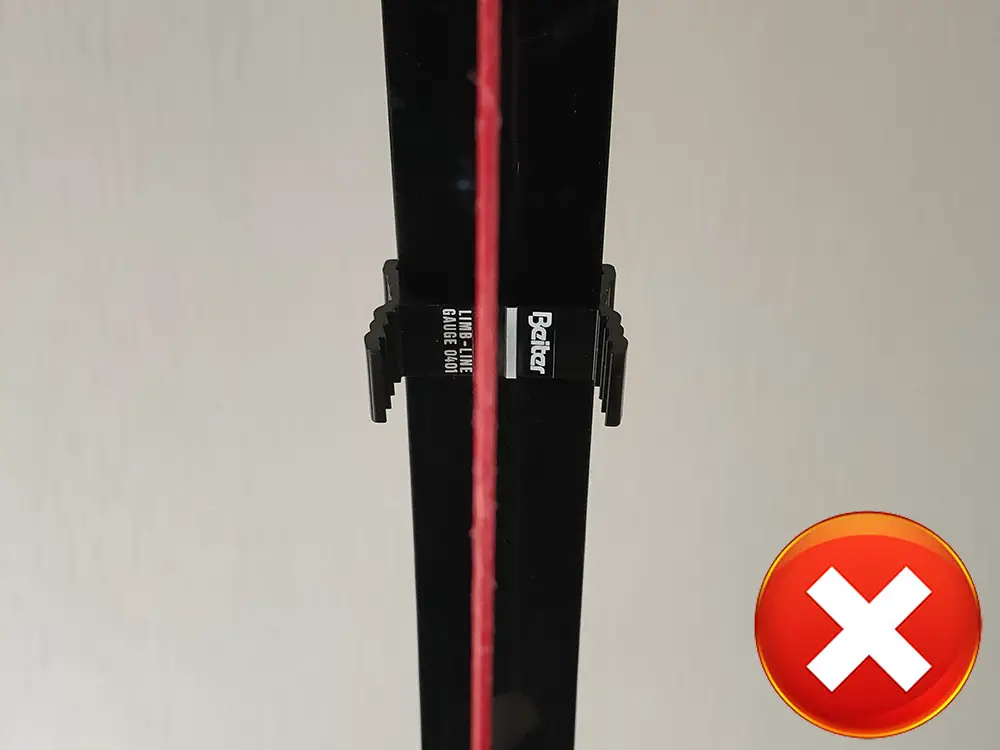
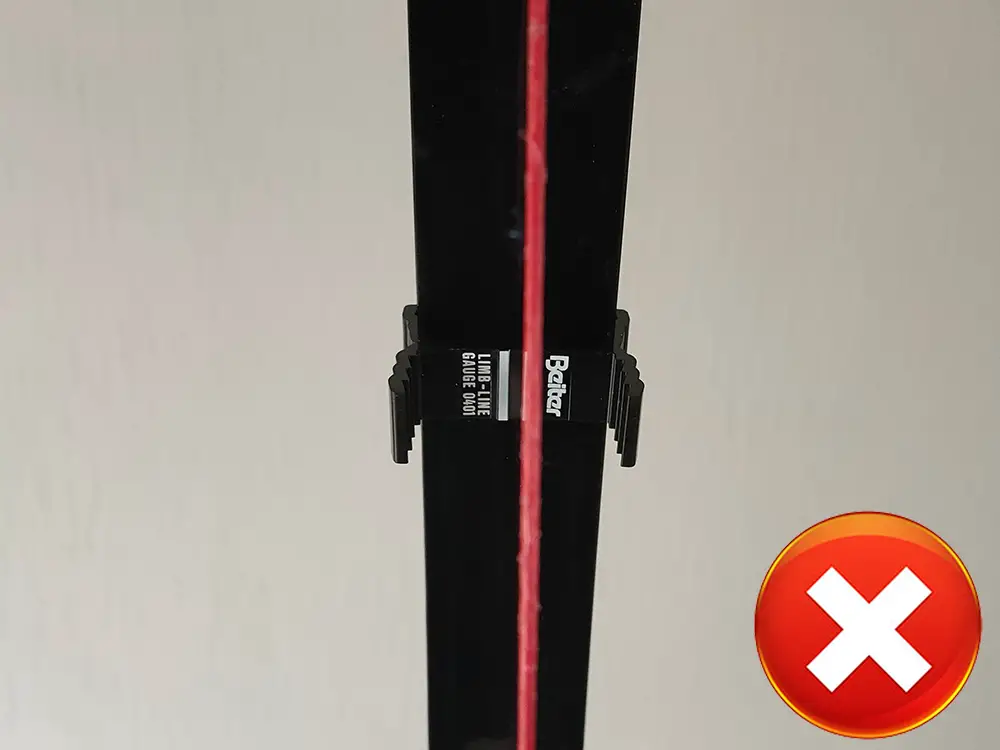
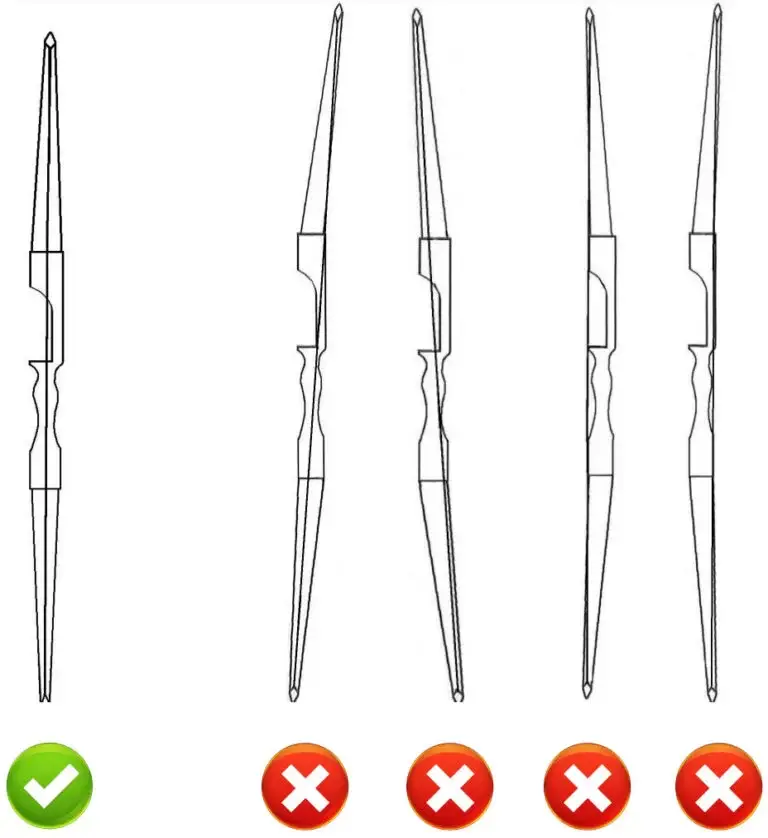
With the center markers, you can identify which limb is crooked and correct it. The diagram below will show you some of the possible ways your limbs can be misaligned. By the way, if you find that there is no alignment issue, you can move on to step 5.
Now you know which limb is out of alignment, we can start adjusting. To adjust your limb alignment, follow these steps:
- Check which screws you must tighten and which you must loosen: if the limb tip needs to be more to the right, you tighten the right screw and loosen the left screw. The reverse is true if your limb tip needs to be more to the left.
- Adjust your limb alignment: first, loosen the screw you need to loosen and then tighten the side you need to tighten. Make sure that it’s tight because otherwise, the limbs will get unaligned while shooting.
- Check your limb alignment and make changes if necessary: it might take a couple of tries before you get it perfect.
- Tighten the locking screw: some risers have a locking screw that you use to lock the fitting in place. To tighten this screw, you first must unstring the bow and remove the limbs.
You can also see this in action in the video below:
This guide will work for most risers, but not for all. Especially old risers tend to have a different system. I explain these other systems in the detailed article listed below:
Step 5: attach the arrow rest
The next step is to attach and configure your arrow rest. If you have a plastic stick-on arrow rest, you will not be able to adjust it. But an arrow rest with a wire is adjustable in most cases.
Arrow rests are attached with either sticky tape or a screw that is screwed into the arrow rest bushing. To attach your arrow rest, you screw the corresponding screw in the bushing that is closest to the front of the bow when you shoot.
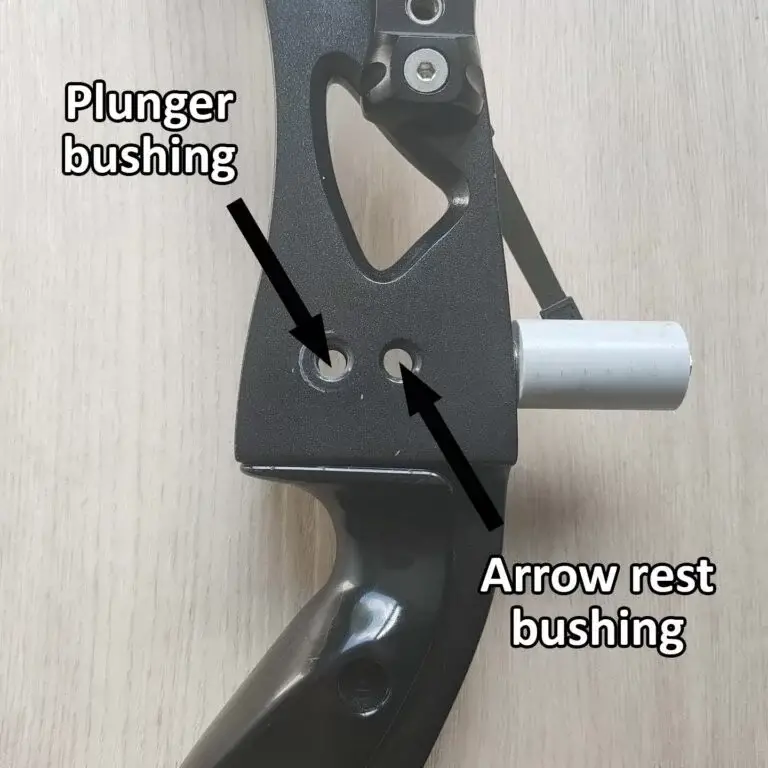
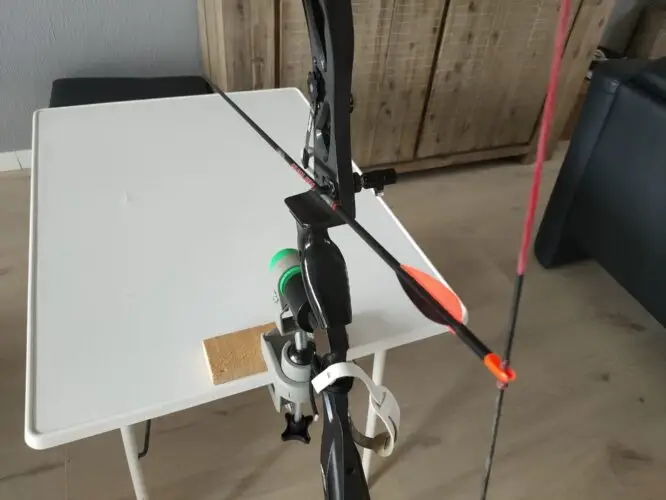
If you have an arrow rest with sticky tape, you remove the backing and line it up with the plunger bushing. The plunger goes through the hole in your arrow rest plate as shown in the picture below. Make sure to do it right in one go as you will have to replace the sticky tape if you move it.
We can now continue to configure the arrow rest. If you have an arrow rest that is not configurable you can continue to the next section. We often configure the arrow rest in combination with the plunger, so you might want to move back and forth between this and the next step.
Your arrow rest should be configured so that the plunger hits the center of the arrow shaft. Therefore, you should make sure that it is not too high or too low.
Also, make sure to check how far the arrow rest protrudes from under the arrow. It should not protrude too far, but the arrow should also not balance on the tip of the arrow rest.
You can configure the plunger by loosening the set screw on the plunger wire. Once this screw is loosened you can configure the plunger.
If you are having issues with configuring the plunger, make sure to read my in-depth article, which explains the process in a lot more detail:
Step 6: configure your plunger
Now the arrow rest has been set, we can continue to the plunger. If you have a plastic arrow rest, a plunger is not a necessity, as there is a makeshift plunger built in. It is not adjustable though, so I highly recommend buying a separate plunger. If you are looking for a high-quality plunger I can recommend this plunger from NIKA archery. I explain in more detail why, in this article.
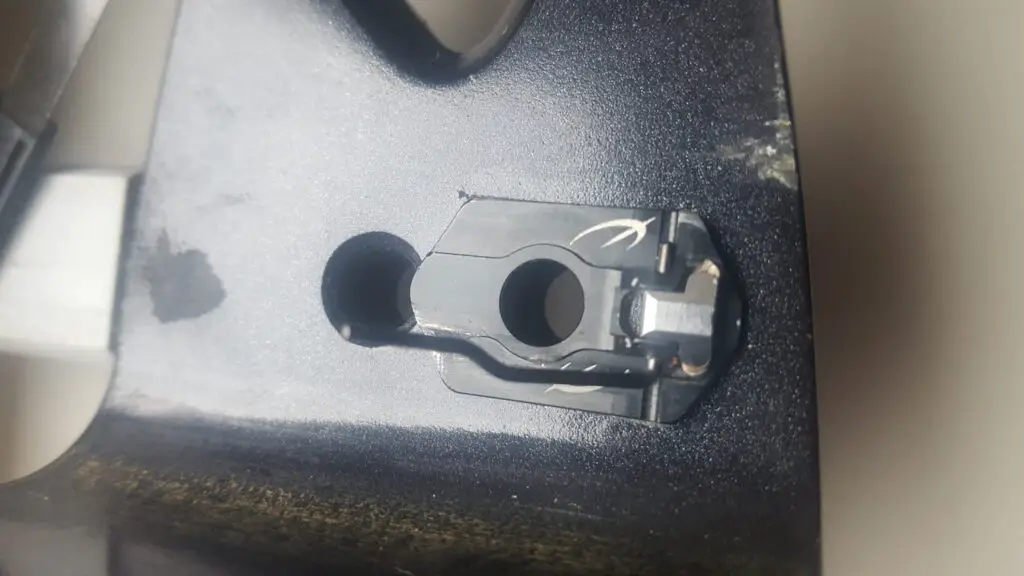
If you use a plunger on a plastic arrow rest, make sure to remove the ‘’makeshift plunger’’ from the arrow rest. Just get a pair of snips and remove the little tab above the arrow rest.

Let’s continue to configure the plunger:
1. Screw in the plunger in the plunger bushing
2. Put the bow in a bow vise and attach the bow gauges: see step 1 till 3 from the limb alignment section for more tips.
3. Place an arrow on the arrow rest and step a few paces back
4. Align the center of the string between the bow gauges

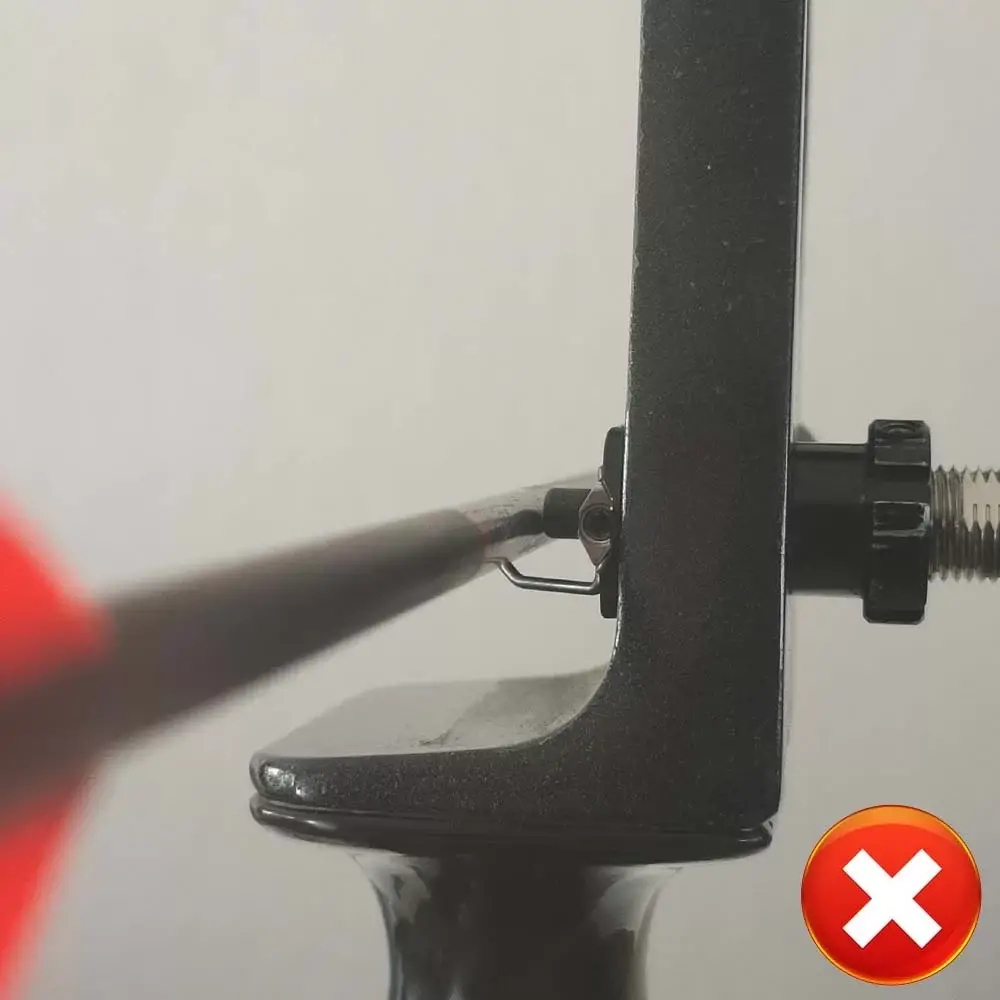
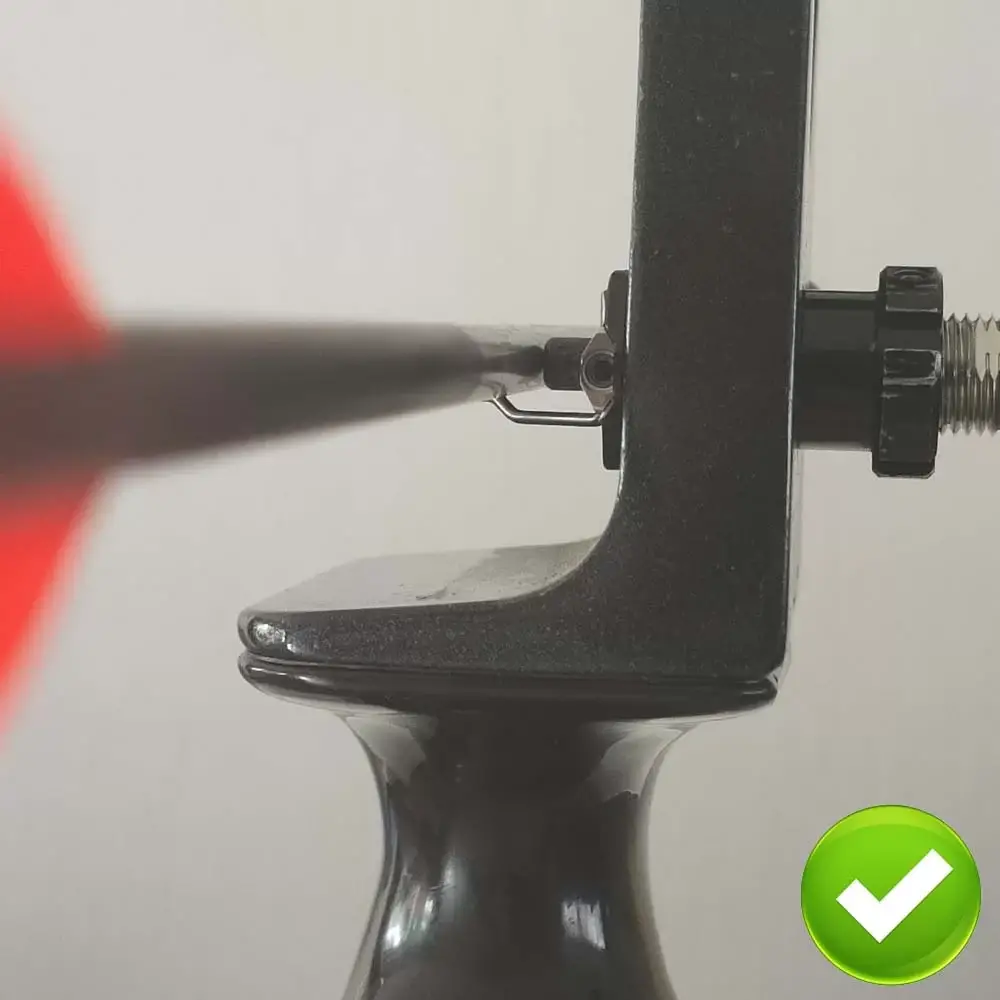
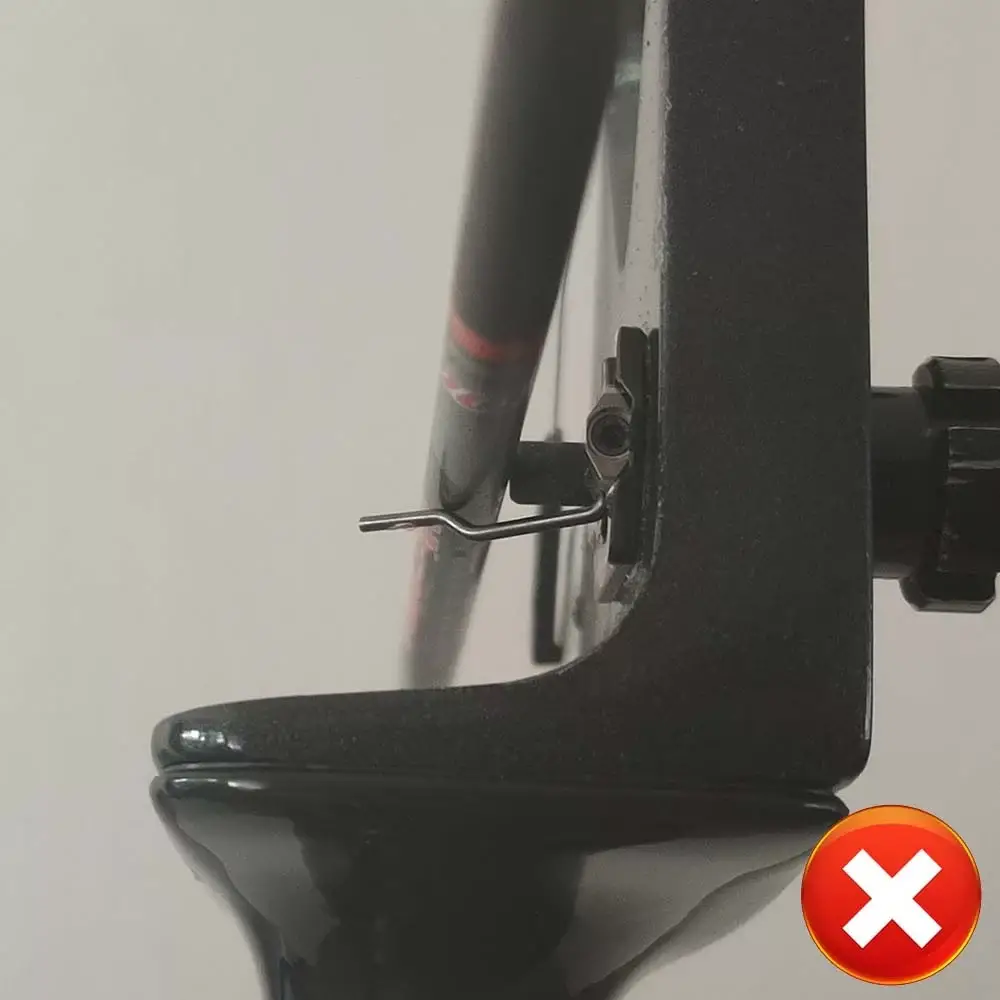
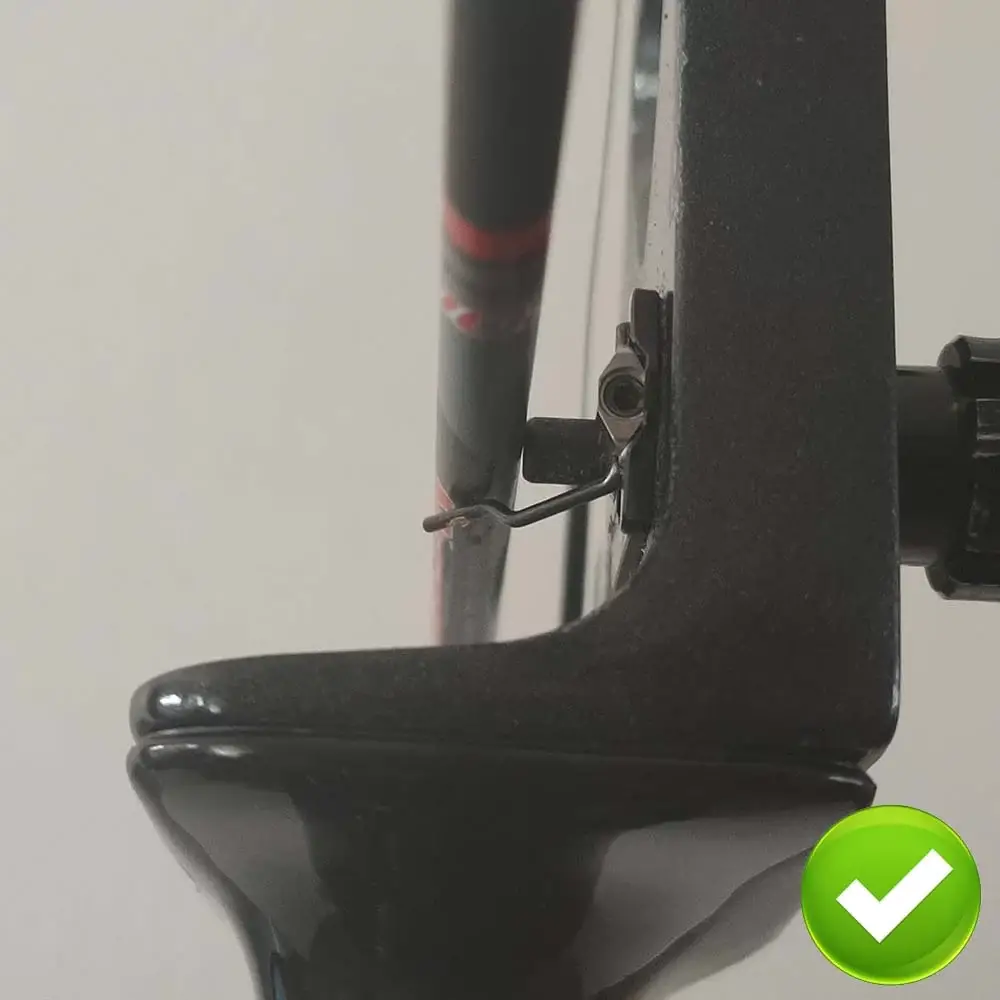
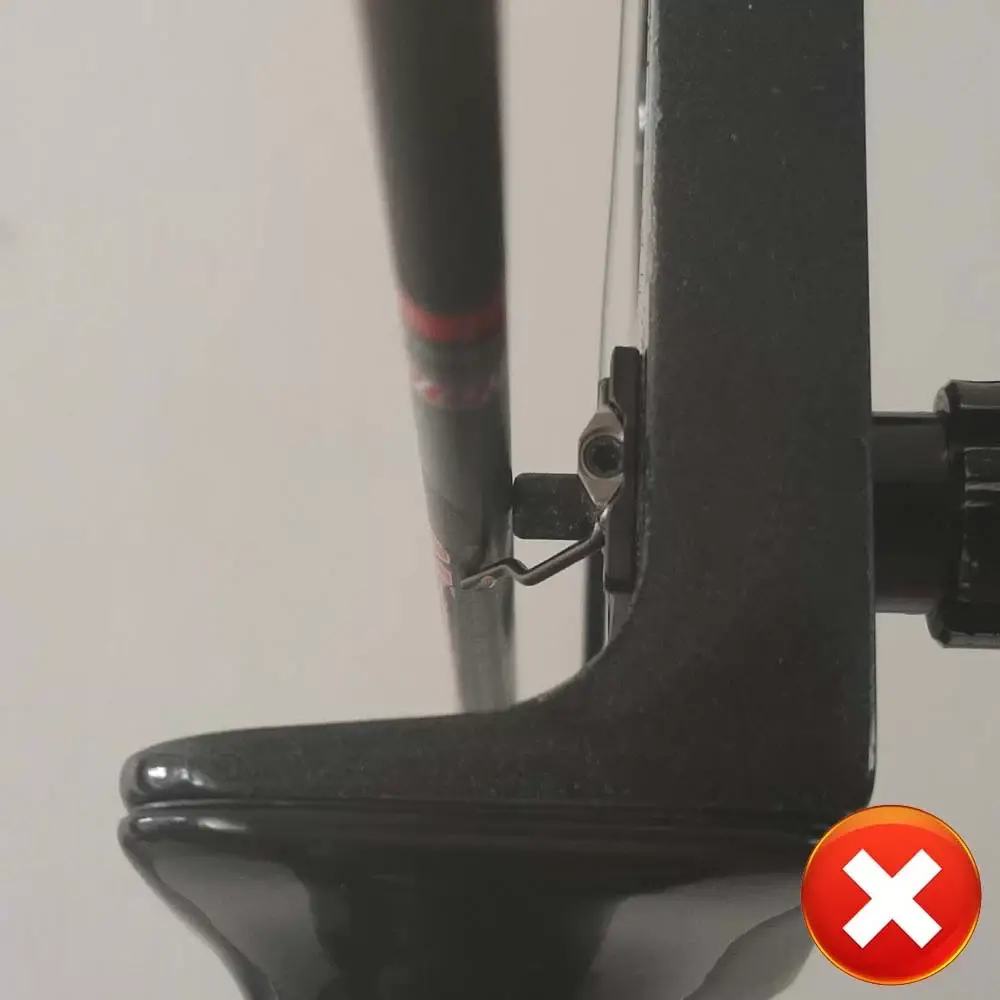
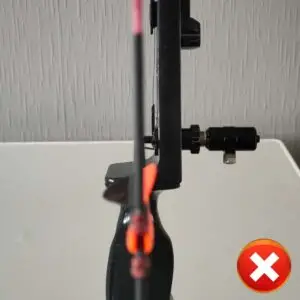
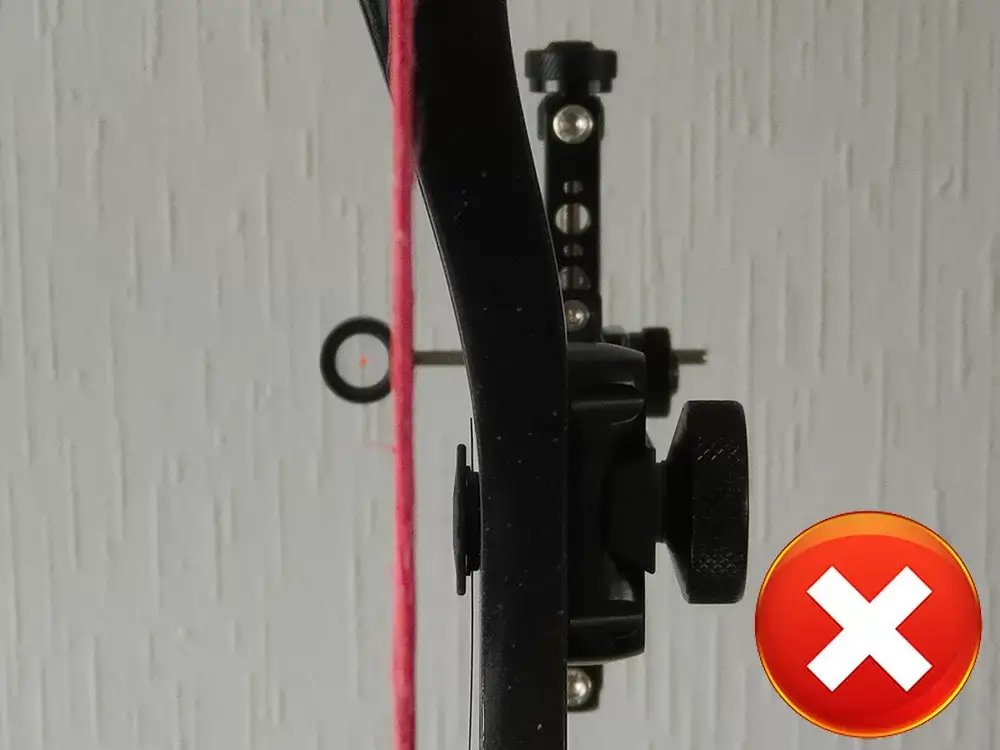
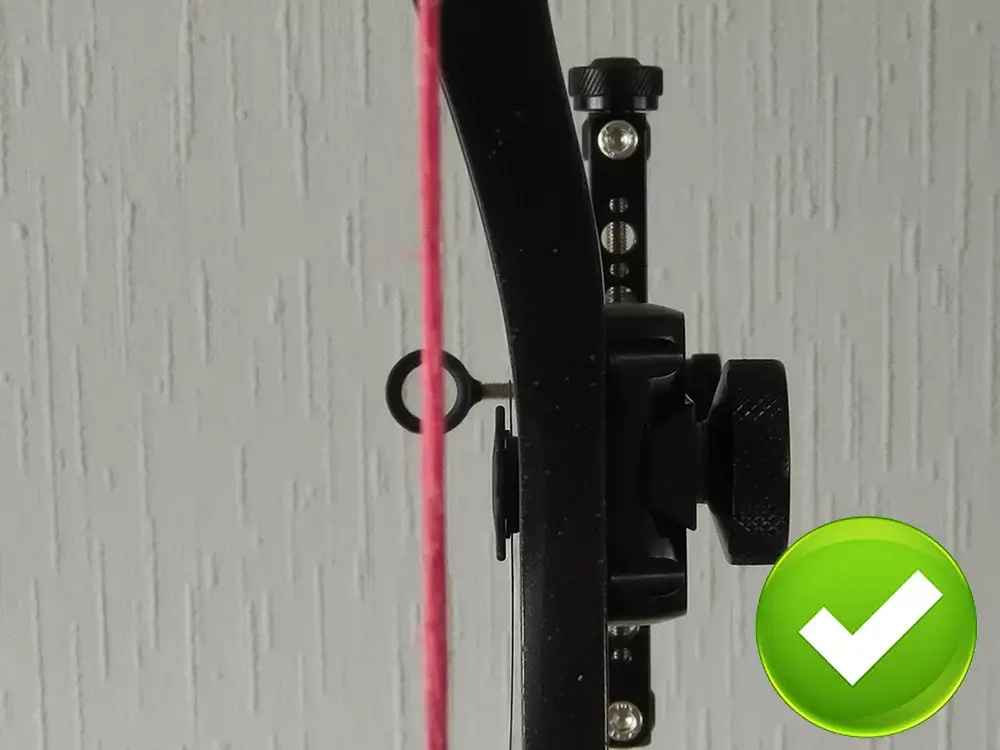
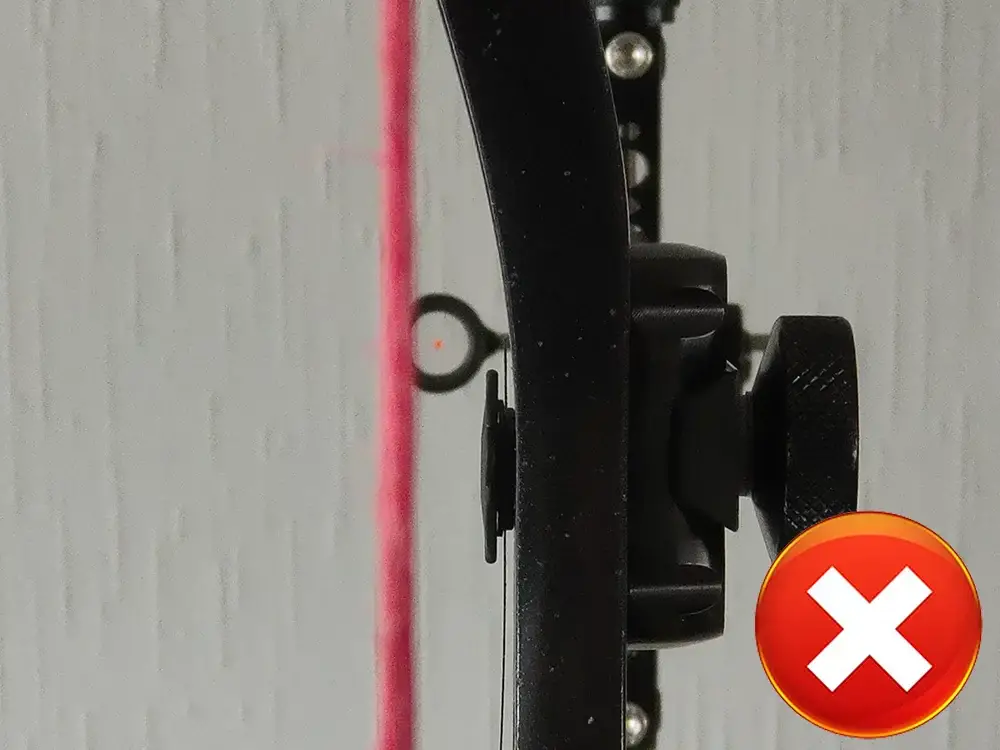
5. Stay still and look downwards at the arrow: the point of the arrow should point a bit to the left (for a right-handed bow). It should be about ½ to 1 arrow width away from the string, as you can see below

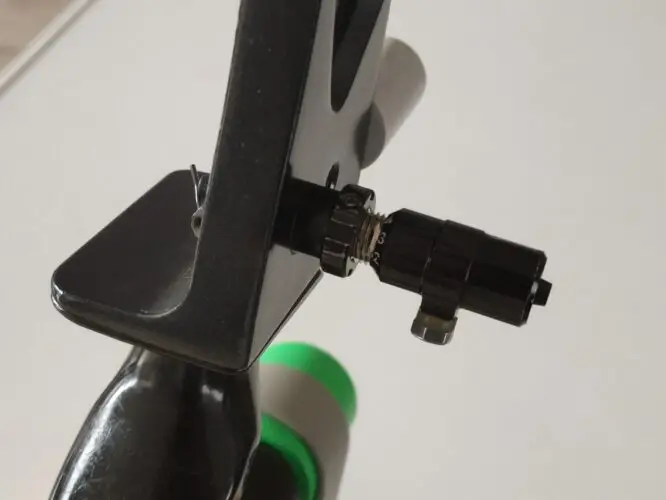
To change the plunger position, you must first remove it from the bow. On the plunger, you will see a large ring, this ring determines how far the arrow gets pushed away from the bow by the plunger. Loosen the small hex screw in the ring to allow it to be turned. On some plungers, there are two screws on either side of the ring.
To change the plunger position, you must first remove it from the bow. On the plunger, you will see a large ring, this ring determines how far the arrow gets pushed away from the bow by the plunger. Loosen the small hex screw in the ring to allow it to be turned. On some plungers, there are two screws on either side of the ring.
Once you have made your adjustments, check it again to see if it is configured correctly. It can take a few times before you get it right.
Another thing that can be configured is the plunger tension. This is quite advanced, so I do not cover it in this guide. But you can read my recommendations in more detail in the detailed article below:
How to tune and configure the plunger
Step 7: tie your nocking points
The next step is to attach your nocking points. Nocking points come in two variants: tied nocking points from serving wire and brass nocking points clamped on the string. I won’t discuss the pros and cons of both options, but I do discuss that in this article.
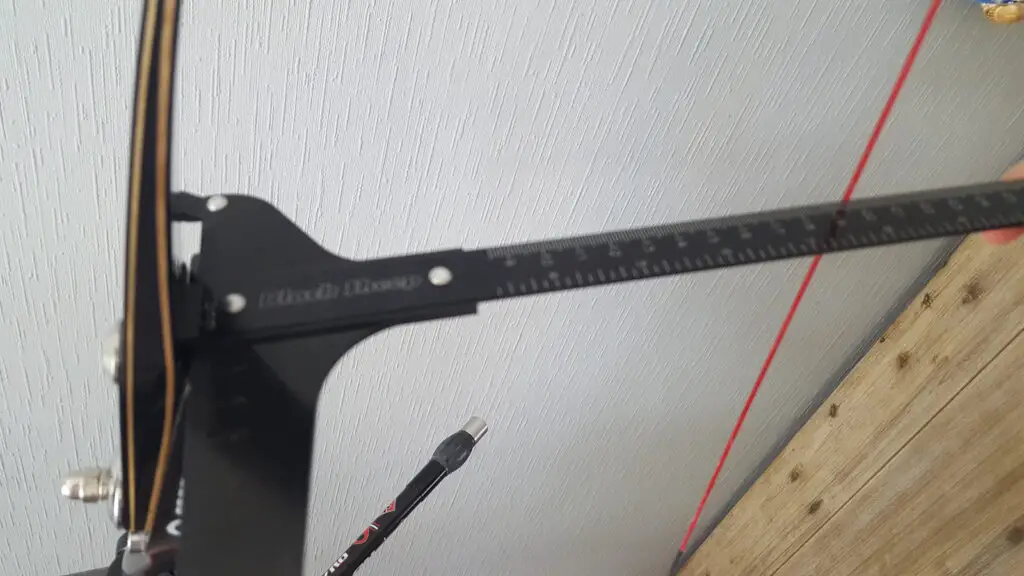
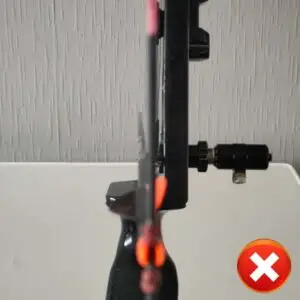
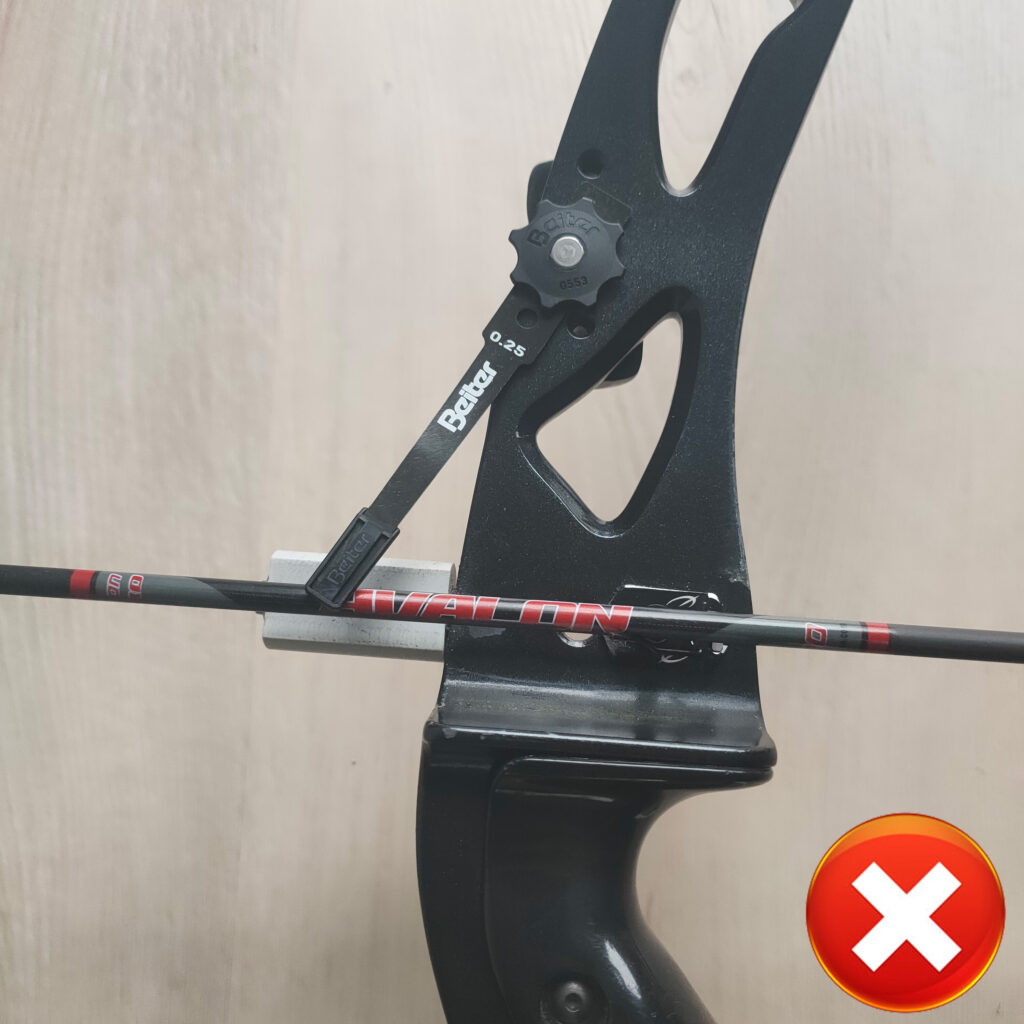
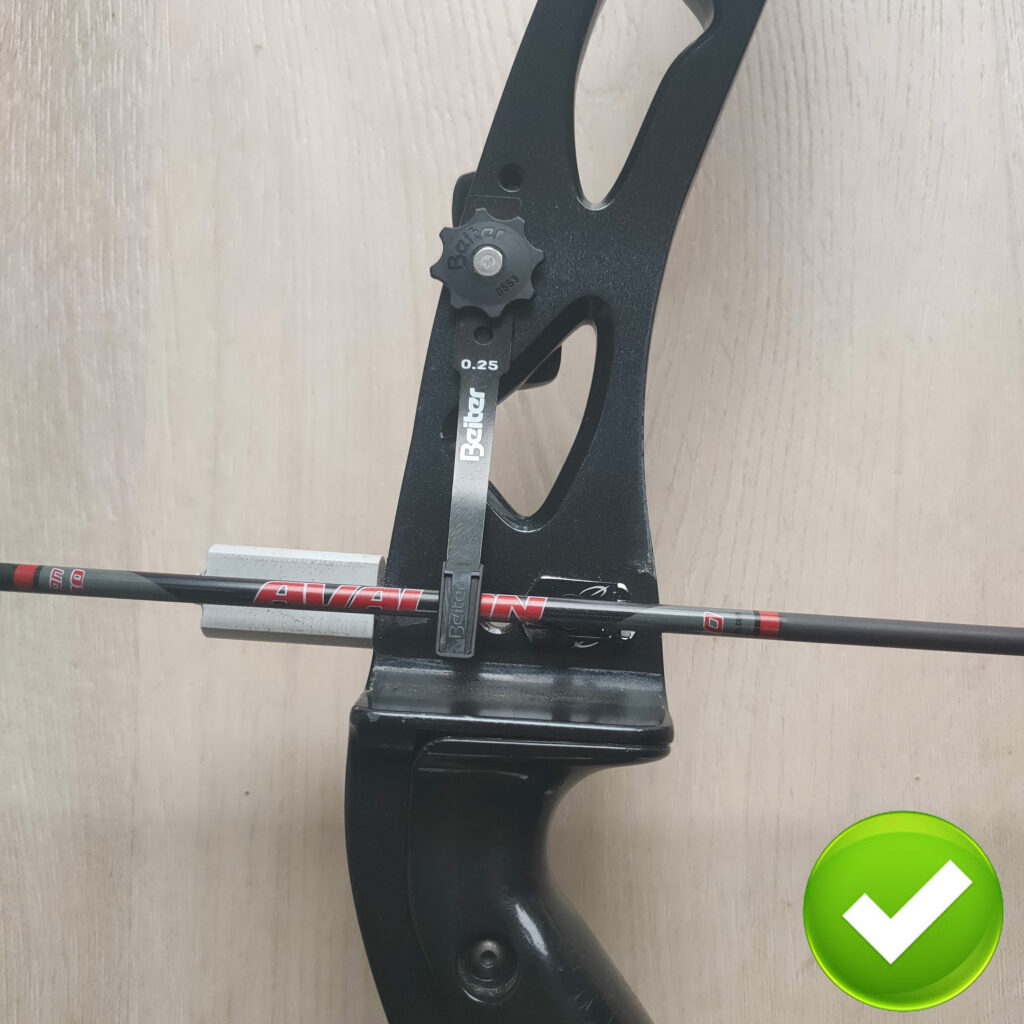
It is very important that you place your nocking points at the correct height. Especially the upper nocking point is very important. You can measure the placement of the bow square. Clip the bow square on the string and place the ruler on the arrow rest, see the picture below:
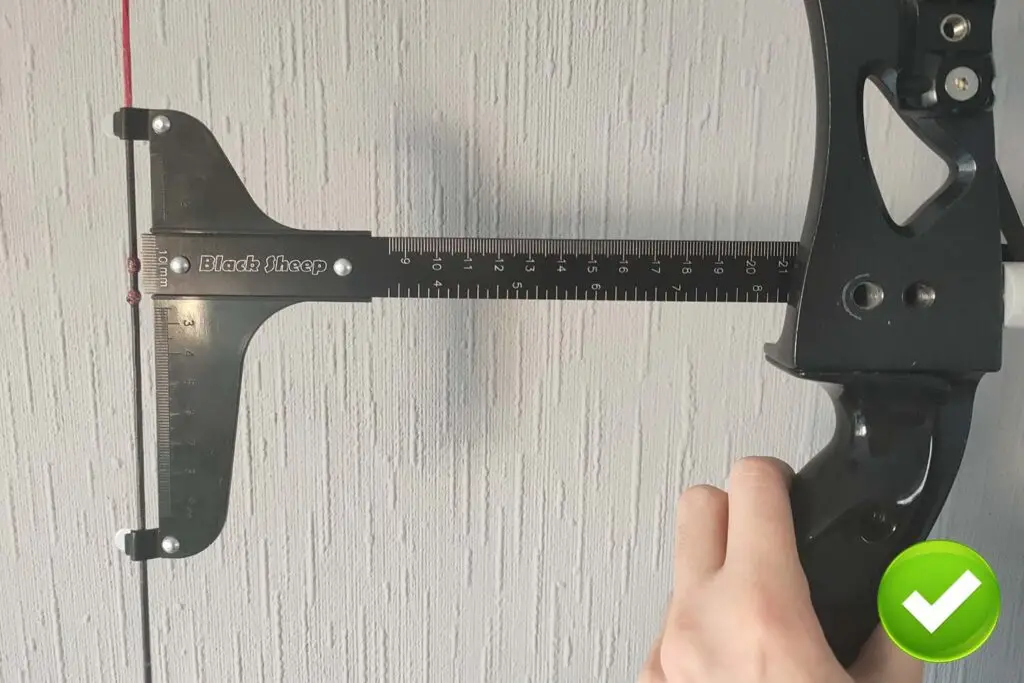
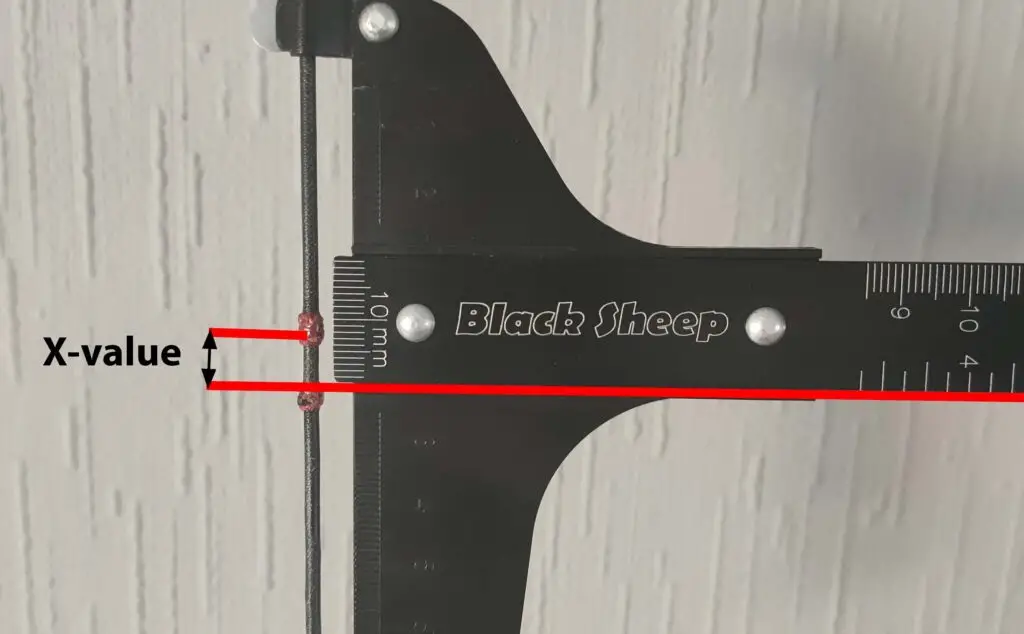
I recommend that you set the x value to .4 inches (10 mm). But make sure that it’s at least between .2 inches (5 mm) and .6 inches (15 mm). Mark the spot with sharpy or a piece of tape before you remove the bow square. The videos below demonstrate how to attach both types of nocking points:
Tied on nocking points
Brass nocking points
Once you have set the upper nocking point, we can continue to the lower nocking point. Some archers like to use only the upper nocking point. That will also work, but I recommend using two nocking points. I explain why in more detail, in this article.
The space between the two nocking points should be at least 1 ½ times the width of the nock of the arrow. You should almost be able to add another arrow between the nocking points, this is to make sure that the nock of the arrow does not get pinched by the nocking points.

For a more detailed guide on adding your nocking points, make sure to read my detailed article below:
How to place your nocking points
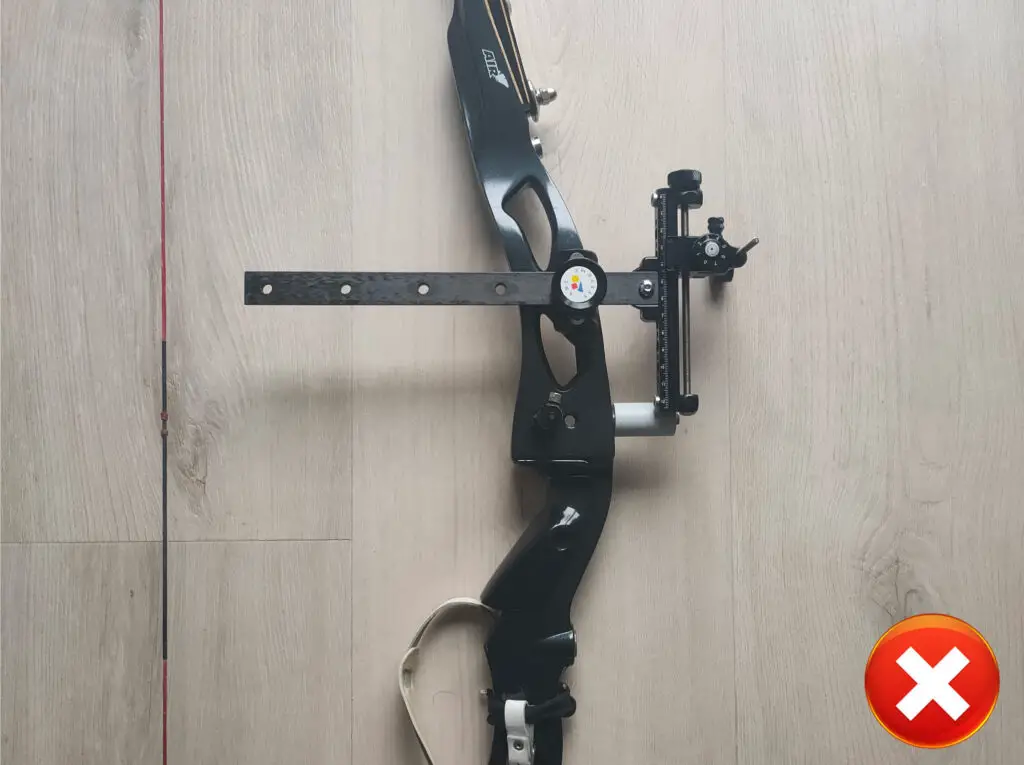
Step 8: center your sight
The sight is one of the more difficult parts to configure. Sights can have multiple adjustment methods, but in general, they all allow you to adjust the vertical axis (elevation) and horizontal axis (windage). While setting up your bow, only the horizontal axis requires your attention. The elevation will be configured on the field by trial and error.
During the tuning procedure, we are aiming to set our sight center shot. This means that the arrow is exactly in the middle of the string. You can check your center shot by following these steps:
1. Assemble your sight and attach it to the bow: put the sight in the farthest position away from the riser, so the sight is fully extended.
2. Put the bow in a bow vise and attach the bow gauges: see step 1 till 3 from the limb alignment section for more tips.
3. While keeping your head in place look at the placement of the sight: the sight pin should be exactly in the middle of the string. If that is not the case you will have to make adjustments
Once you are on the field, you will have to field-tune your bow. In the article below, I explain how to do this. I also discuss how to set your sight center shot in more detail.
Step 9: screw on your clicker (optional)
If you are just getting started, you might want to start without a clicker. In that case, you might want to skip to the last step. This section is quite advanced, so it’s better to skip it if you are a beginner. If you are still uncertain whether it makes sense to start with the clicker, make sure to read the detailed article at the bottom of this section.
Just like the sight, the clicker must be configured on the field. So just attach the clicker and do a few test fires to figure out where it should be. Here are some general recommendations while changing the clicker position:
- Keep the clicker as vertical as possible: the ideal position for the clicker is straight down. If it’s at an angle it can cause uneven pressure on the arrow. This could mean that you must cut down the arrow to keep the clicker vertical.
- Make sure that the clicker doesn’t interfere with the arrow: some clickers are attached to the sight. This is very handy if you want to shoot with a full-length arrow, but it can also interfere with the flight path of the arrow. So be mindful of this!
- Don’t try to increase the clicker tension: some people have issues with hearing the click from the clicker. Therefore, some people increase the tension of the clicker with some DIY for example by using stiffer metal or adding a piece of tape. Too much pressure can cause the arrow to press the plunger inwards. This will change the flight path of the arrow.
As mentioned earlier, you need some archery experience before you start shooting with the clicker. Therefore, I have written a more detailed article that also explains how to use the clicker:
Step 10: check all your settings
You have now completed all the steps to configure your bow. Before you go to the range, check your tuning one more time. When you configure one part of your bow, you can slightly change another. For example, when you change the tiller height, you will also slightly change the brace height. So, make sure to do one final check before you start shooting.
Finetuning
In this article, I explain how to do the first setup of the bow. But after this, you will have to finetune your bow. You won’t have to do this when you are just getting started, but the more accurate you get, the more important it will be.
This is much more complicated than the first setup. You will first have to develop a feeling for archery and learn more about all the different steps in the tuning process.
There can also be some distinct reasons why you might have to change some settings of your bow. For example, you might notice that your bow does not shoot smoothly (for example excessive vibration or strange sounds). Also, if you see that the arrow doesn’t fly straight, you might have to change the tuning of the bow.
Therefore, make sure to read the in-depth articles to understand how tuning works more deeply. It will help you once you experience these kinds of issues and when you want to finetune the bow. I have added links to the detailed articles below:
- Setting the brace height
- Configuring the tiller
- Aligning the limbs
- Tuning the arrow rest
- Configuring the plunger
- Locate the nocking points
- Center the sight
- Adding the clicker
Next steps
I tried to keep this article as short as possible, but I see that I easily surpassed the 4000 words. Tuning is such an essential part of archery that you could easily write a book about it. And in fact, many archers did just that.
With this article, my goal was to get you up to speed as soon as possible, but also provide you with some nuances to deepen your understanding of archery. Tuning your bow is a bit of a rabbit hole. The deeper you go the more nuances and information you find.
Just go at a slow pace and try to learn something new every few weeks. You will not learn everything about archery in one day. You can use my list of detailed articles above as a good starting point to deepen your knowledge.
Apart from tuning, make sure to think about your technique as well. In the article, I have a lot of pictures to demonstrate some common mistakes. A quick scroll can help a lot to identify potential issues.
Don’t worry, the article does not only contain beginner info. Just like this article, I link to more detailed articles to truly master archery!

Tim van Rooijen
For as long as I can remember, I have always been fascinated by archery. First due to its historic significance but later because I like being outdoors. With this blog, I share my knowledge about Archery and how you can improve your shot. More about author…