For new archers, it can be very difficult to buy a new recurve bow. There are a lot of different options available on the market and a lot of things you must consider before making a purchase. In this article, I will explain everything you need to know if you want to buy a recurve bow.
This is quite a long article; it will take about 20 minutes to read it all from start to finish. There is just so much to discuss. Therefore, you might want to save the link or bookmark this page so you can read it later if you can’t finish it now. You can also download my quick guide for reference while shopping by using the button below.
Before we get started
The word ‘’recurve bow’’ is quite ambiguous. Technically all bows with bent tips are considered recurve bows. So traditional Mongolian bows are also considered a recurve bow in the official definition.
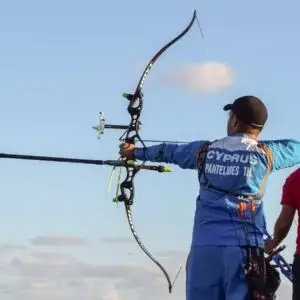
In the sport of archery, we use ‘’recurve bow’’ as a shorter version of the word ‘’Olympic recurve bow’’. The name already suggests it, these bows are used in the Olympics and competitions.
To make things even more complicated, beginner’s bows tend to look very similar to recurve bows. But they lack a lot of features such as ILF limbs and tunable limb pockets.
What you need
Alright, now we got that out of the way, let’s discuss what you need when you want to get started. Below I listed all gear you need with some additional information. I will only cover the basics though. If you want more detailed information on one of the parts, click on the more info link.
If you are already familiar with this gear, you might want to skip to the next section for more detailed information.
Bow essentials
If you want to start shooting you will need at least the following gear:
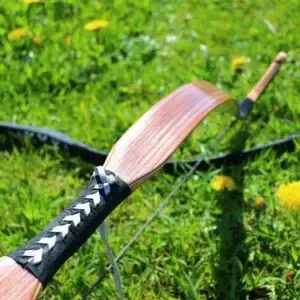
- Riser: the riser (also sometimes called the handle) is the middle section of the bow where you attach your limbs and aids to such as sight, stabilizer, button, arrow rest, and clicker. Therefore, you can see the riser as the motherboard of your bow. Read my detailed guide here.
- Limbs: the limbs store the energy to propel the arrow. Limbs are available in different lengths and draw weights. We will discuss this in more detail later. Read my detailed guide here.
- String: the string is attached to both the tip of the upper and lower limb. The ends of the string and the middle (where you hold the string) are protected with serving. Read my detailed guide here.
- Nocking points: on the middle serving there are two bumps, which are called nocking points. These points act as a guide to place the arrow in the correct position. They can either be made from rope or metal.
- Arrow rest: on a modern recurve bow, the arrow is placed on an arrow rest. This device holds the arrow until the arrow is shot. The arrow rest is small to reduce the amount of interference with the arrow. Read my detailed guide here.
- Arrows: most modern arrows are either made from carbon or aluminum. The arrow needs to be flexible but not too flexible, this is often indicated with a number which we call the ‘’arrow spine’’. Read my detailed guide here.
This is the absolute bare minimum if you even want to fire your bow. You can buy these essentials separately, but there are also some deals where you get everything in a set.
Bow extras
If you want to shoot the ‘’Olympic recurve style’’ you need at least the following extras:
- Sight: modern bows are often shot with a sight. This makes aiming much more intuitive and easy. High-end sights can be surprisingly complex and expensive. Read my detailed guide here.
- Stabilizer: the stabilizer removes vibration before and during the shot. Therefore, shooting with a stabilizer makes it easier to aim steadily and improves your accuracy. Read my detailed guide here.
- Plunger/ button: the plunger regulates the amount of side pressure applied to the arrow to avoid clearance issues and to make the arrow fly true. Some arrow rests have a build-in plunger, but these are not adjustable. Therefore, buying a separate plunger is recommended. Read my detailed guide here.
- Clicker (optional): a clicker is a metal strip that makes a clicking sound when you reach the end of your draw. New archers shouldn’t start with a clicker right away. But after 6 months of extensive training, you probably benefit from using this device. Read my detailed guide here.
Protection
Technically, you can fire your bow without protection, but it will be uncomfortable, and it can be dangerous. Therefore, I recommend buying the following protection gear:
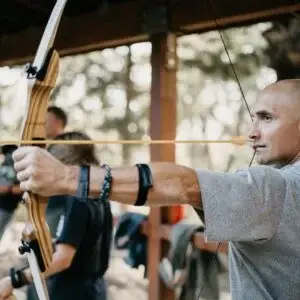
- Armguard: if you are new to archery, you should buy an armguard. This protects your arm from string slap which can cause nasty bruises. This is the result of overextending your bow arm which is a very common beginner mistake.
- Tab: if you shoot a bow without a tab it will get very painful after a few shots. Therefore, all archers use a tab to protect their fingers and provide a smooth release. Read my detailed guide here.
- Finger sling or wrist sling: a finger or wrist sling helps to catch the bow in case you drop it. Since you should shoot your bow with a relaxed grip, it’s important to buy either a finger or arm sling. Read my detailed guide here.
- Chest guard (optional): a chest guard protects the archer from abrasion from the string. Most archers don’t need a chest guard, but some archers do experience discomfort. Especially females often use a chest guard.
Accessories
The following items are not always necessary. It largely depends on where you shoot and where you shoot. Most archers will buy all this equipment as well though.
- Bow stringer: to properly string a bow, you must use a bow stringer. There are also some methods to do it by hand, but they are not ideal.
- Quiver: you must keep your arrows somewhere before you shoot them. You can leave them on the ground of course, but using a quiver is much more convenient and saves your back! Read my detailed guide here.
- A bag or case: if you frequently transport your bow (to and from the archery field for example), you want to have a case or bag. This allows you to organize all parts and prevents them from getting damaged. Read my detailed guide here.
- Bow stand: after you have shot your arrows, you must leave your bow somewhere. Some archers leave their bow on the ground. But it’s better to keep it on a bow stand. That prevents the string from getting dirty and wet.
- String wax: to increase the lifespan of your bow, you should wax your string when it starts to get fuzzy. Therefore, it’s recommended to buy some string wax with your bow.
What you should consider
Recurve bows are quite complicated, therefore there are a lot of things you have to look out for. Although there are probably hundreds of details, I only mention the most important things. If you want to know all details, I recommend reading my in-depth articles about each piece by following the links above.
Draw weight
The draw weight of the bow tells you how much energy it requires to get the bow to full draw. A 40 LBS bow will require significantly more strength than a 30 LBS bow.
Draw weight is one of the most important specs of a recurve bow. Because a higher draw weight will increase the arrow speed which makes you able to shoot at longer distances. Draw weight is also important because you need enough strength to get the bow to full draw.
One of the most common mistakes new archers make is to buy a bow with a too heavy draw weight. This can cause major muscle strain and leads to bad form and technique. Therefore, it’s better to have a too light bow than a too heavy bow. For more information, read the article listed below:
The benefits of a heavy (draw weight) bow
The length of the bow
The length of your bow determines how far you can draw your bow. If you have a small bow, you can still draw it very far, but that will damage the bow in the long run. Therefore, you need a bow that is properly sized to your draw length.
People with longer arms have a longer draw length and therefore need a longer bow. Having a longer bow can make it more difficult to wield. Therefore, especially for children, it’s important to have a bow that isn’t too long.
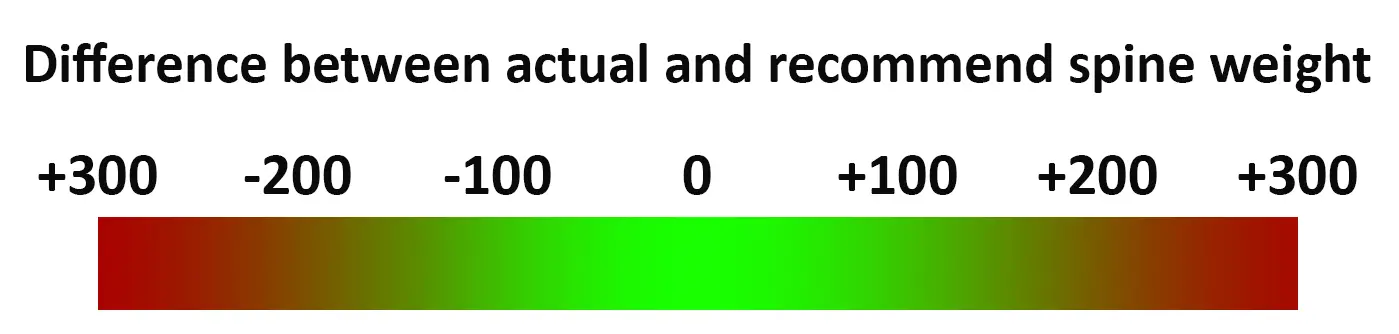
Spine weight of the arrow
Spine weight tells you how flexible the arrow is. This is indicated in numbers ranging from 300 to 1500. An arrow with a spine of 300 is stiff, while an arrow with 1500 is very flexible. Arrows need to be properly spined to make sure that the arrow clears the riser. A properly spined arrow will also fly straighter than when the spine weight is mismatched.
In general, heavier bows need a stiffer arrow, because the bow is applying more energy into the arrow. But not only the weight of the bow is an important factor. Also, the weight of the point and the length of the arrow determine the required spine weight. For more detailed information about spine weight, read the article below:
Spine weight: how to find the right arrow shaft
Limb fitting
Every recurve bow has a limb fitting. This fitting allows you to attach and remove the limbs. The type of fitting used is especially important if you want to buy new limbs. You need to buy limbs and a riser that have the same limb fitting, otherwise, you can’t connect the two.
Luckily, there is one limb fitting that most manufacturers use which is called ILF (stands for International Limb Fitting). But you must be careful though. There are also some proprietary limb fittings. If you buy one of those, you won’t be able to connect limbs from any other manufacturers to your riser.
One proprietary limb fitting that looks a lot like ILF is the Formula fitting from Hoyt. But don’t be fooled, a formula fitting doesn’t fit on an ILF bow and vice versa. Most archers prefer ILF for flexibility, but Formula is also an option. But then you must accept that you can only attach Formula limbs from Hoyt on that riser. I discuss the differences between ILF and Formula in more detail in the article below:

Grip
Having a good ergonomic grip on your bow is essential. Luckily, most risers have a removable grip, which allows you to attach a different one. Some budget risers have a fixed grip, but I wouldn’t buy one of those. When you don’t like the grip, you must replace the entire riser. Sadly, I had to learn this the hard way.
Buying a recurve bow: step by step guide
Selecting the right bow seems complicated? Well, it’s quite simple, just follow these 5 steps below and you can order your equipment today!
1. Measure your draw length
The first step is to measure your draw length. There are multiple ways to do this, but I will only explain one: the arm span method. Read this article for the other methods and a step-by-step guide.
To estimate your draw length, we need to measure your arm span. You do this by spreading your arms horizontally and measuring from fingertip to fingertip. This requires 2 people to measure, but you can also use some pieces of tape to mark the measurements on the wall. You then simply measure the distance between the pieces of tape.
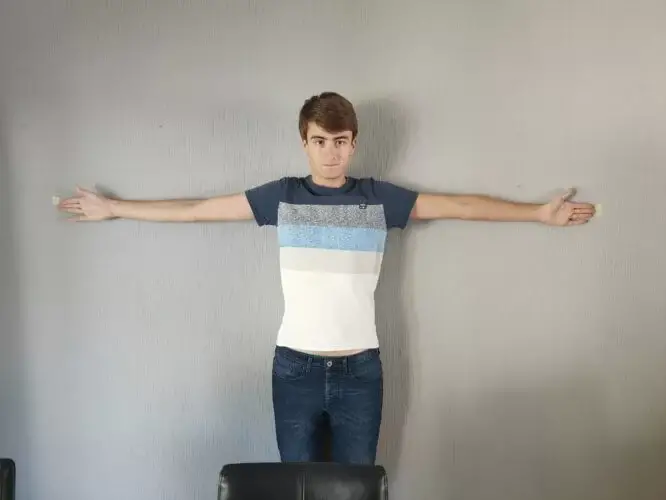

This measurement should be in inches. So, if you measured it in centimeters you need to divide it by 2.54. Your measurement in inches should now be divided by 2.5 to get your draw length. Write this measurement down, so you can use it later!
2. Determine your draw weight
The next step is to determine your draw weight. This is extremely important because if you choose a heavy bow you will start to shake while shooting. Therefore, it’s better to choose a bow that is a bit too light than a bow that is a bit too heavy.
I recommend the following draw weight based on your profile:
| Archers profile | Draw length: 26 inch or less | Draw length: 27 – 28 inch | Draw length: 29 inch or more |
| Small children | 16 LBS | x | x |
| Larger children | 18 LBS | 16 LBS | x |
| Teenage female | 22 LBS | 20 LBS | 18 LBS |
| Teenage male | 24 LBS | 22 LBS | 20 LBS |
| Female | 26 LBS | 24 LBS | 22 LBS |
| Male | 28 LBS | 26 LBS | 24 LBS |
In case you are wondering, I recommend a lighter bow to people with a longer draw length because the draw weight of all bows is measured at 28 inches. So, if you have a 30-inch draw, your actual draw weight will be higher than the draw weight listed. The reverse is true if you have a draw below 28 inches. I explain the difference between limb draw weight and the actual draw weight in more detail in this article.
Use this guide as a quick reference. If you are strong and athletic, you could choose a heavier draw weight. If you are not sporty at all, you might want to go a bit lower. Read this article for more guidance on how to choose your draw weight:
How to choose the right draw weight for your recurve bow
3. Choose your bow
Now you have your draw weight and length you can start to select your bow. Since the riser is the center of your bow, we start with that first.
The riser
Risers are available in two lengths: 23-inch (often called short) and 25-inch (often called long). Adults should always choose a 25-inch riser regardless of the draw length. For children, I would recommend a 23-inch riser if the draw length is less than 26 inches. Buying a 25-inch riser will make it more difficult and clunky to wield the bow.
Read this article, for more information on how to choose the right riser.
The limbs
The next step is to choose the length of your limbs. Limbs are available in three sizes: short, medium, and long. Combined with the different risers and the limbs we can create four different bow lengths namely:
| Riser length | Short limbs | Medium limbs | Long limbs |
| Short 23-inch riser | 64-inch bow | 66-inch bow | 68-inch bow |
| Long 25-inch riser | 66-inch bow | 68-inch bow | 70-inch bow |
Normally we don’t add medium and long limbs to a short riser because this makes the bow more difficult to wield for children. Based on your draw length I recommend the following limbs.
| Draw length | Bow length |
| 26 inches or less | Short |
| 27 till 28 inches | Medium |
| 29 till 30 inches | Long |
Having longer limbs than necessary isn’t an issue. So, you can shoot with long limbs even if you only need short limbs. But you don’t want to use short limbs if you have a long draw length. Generally, it isn’t an issue to overdraw the bow 1 or 2 inches, but more than that can damage the bow in the long run.
Read this article, for an in-depth guide on how to choose the right limbs.
4. Choose your arrows
To select the right arrow, you use a spine chart. This chart tells you which combination of point and shaft you need for your bow. If you want a full guide read the article below:
How to select the right arrows for your bow
Below I will summarize the most important steps from that article:
4.1 Measure or predict your actual draw weight
As mentioned earlier, the draw weight on all bows is measured at 28 inches. But to use the spine chart, we need the actual draw weight you will experience.
The best way to get your actual draw weight is to measure it with either a bow or luggage scale. But that isn’t possible if you don’t have your bow yet. Luckily you can also predict your actual draw weight with this table, with reasonable accuracy.
4.2 Choose the weight of the point
The weight of the point influences the amount of flex of the arrow. A heavier point will cause more arrow flex than a light point. Therefore, we first need to know the weight of the point before we choose an arrow shaft.
If you shoot a bow with a draw weight of less than 20 LBS I recommend a point weight of 75 grains. If you shoot a bow with more than 20 LBS I recommend a point of 100 grains. If your draw weight is more than 30 LBS, you should consider a 125 grains point.
Choosing a heavier point that necessary isn’t an issue, it will only slightly slow down the arrow. But choosing a too light point can cause damage to the bow.
4.3 Find your ideal spine with the chart
The next step is to select the ideal spine weight for your arrow. Simply look up the arrow length (which is 30 or 32 inches in most cases) and the point weight to find what spine weight would be ideal.

4.4 Compare your arrow with the ideal spine
Now you compare the ideal spine weight to the spine weight of the arrow you want to buy. If it matches, you can safely buy the arrow. In most cases, a spine weight of 100 more or less is also fine. But much more than that can cause clearance or arrow stability issues.
You might have to check several arrows, but you want to make sure that the arrow is decently spined. When I was just getting into archery, I shot a few arrows with a very weak spine, and they had an extremely floppy flight pattern.
5. Choose your accessories
The final step is to buy your accessories. Although it might be tempting to only buy the bare minimum, I would advise against it. Having the right accessories can make the entire archery experience much more convenient.
Later in this article, I will give some tips on what gear you can save money on and on what gear you should spend a bit more.
What you can expect to pay
You might wonder what you could expect to pay for all this gear. This is quite a difficult question to answer because it depends on what gear you want to buy and how much you are willing to invest.
Since archers choose wildly different starting gear, I have added three columns:
- Lower bound: if you only buy the cheapest gear available. Not recommended in most cases.
- Average: what most archers spend on that item
- Upper bound: if you buy the most expensive name brand archery gear.
Bow essentials
| Equipment | Lower bound | Average | Upper bound |
| Riser | $50 | $150 | $700 |
| Limbs | $50 | $120 | $800 |
| String | $5 | $10 | $50 |
| Arrow rest | $1 | $12 | $60 |
| Arrows (12 pcs) | $24 | $48 | $480 |
| Total | $130 | $340 | $2090 |
Bow extras
| Equipment | Lower bound | Average | Upper bound |
| Sight | $8 | $30 | $400 |
| Stabilizer (full stabilizer setup) | $80 | $120 | $300 |
| Clicker | $5 | $10 | $30 |
| Total | $93 | $160 | $730 |
Protection
| Equipment | Lower bound | Average | Upper bound |
| Armguard | $2 | $10 | $50 |
| Tab | $8 | $15 | $200 |
| Finger or arm sling | $2 | $6 | $20 |
| Chest guard (optional) | $8 | $10 | $20 |
| Total | $20 | $41 | $290 |
Accessories
| Equipment | Lower bound | Average | Upper bound |
| Bow stringer | $4 | $10 | $20 |
| Quiver | $5 | $20 | $150 |
| Bag or case | $15 | $35 | $200 |
| Bow stand | $5 | $15 | $45 |
| String wax | $5 | $15 | $30 |
| Total | $34 | $95 | $445 |
Total
| Lower bound | Average | Upper bound | |
| Total | $277 | $636 | $3355 |
As you can see on average most archers spend about $600. But this differs wildly depending on the gear you buy. I think a budget between $400 till $2000 is acceptable. Spending much less will cause you to buy suboptimal gear. Spending much more will cause you to buy expensive gear you won’t need.
Budget allocation
One of the most difficult things for new archers is to allocate the budget. Therefore, I often get questions on what gear you should spend more and on what gear you can save by buying the cheaper alternatives.
Why the price is not always important
Archers often believe that they need expensive gear to shoot accurately, but that is not true. It is way more important how the bow fits your shooting style, preferences, and body. Therefore, I think you should never buy a shorter bow or a heavier draw weight, just because it was a cheap deal. You need gear that is a good fit for you.
Where you should spend more
With some parts of the bow, you can easily notice the difference between a cheap and expensive option. Below I discuss a few parts where I would spend a bit more since it gives you a real advantage.
- Sight: a lot of archers start with one of those beginners’ sights. These sights often obstruct a lot of the sight picture and don’t allow you to aim very precisely. Therefore, I recommend buying a sight that is a bit more advanced. I explain why in more detail, in this video.
- Riser: a riser will last a lifetime, so spending more on a good riser with a nice grip makes a lot of sense. More expensive risers also have a better tuning mechanism, which I explain in more detail in this article.
- Tab: apart from protecting your fingers a good tab also helps you to keep consistent finger pressure. A cheap tab won’t allow you to configure anything. With a more high-tech tab, you can completely configure the feel to the tab to fit your hand and shooting technique. Read this article for more information.
Most archers upgrade this gear within a year if they bought cheaper options. So, it’s also more cost-effective to buy decent sight, riser, and tab.
Where you can spend less
With some products, the difference between an expensive and cheap option is more difficult to feel of gives little advantages. In this section, I will discuss these products in more detail.
- Stabilizers: stabilizers are relatively simple devices. They are simply a weight on a stick. Some stabilizers also have a dampener but also that device is simple. Therefore, I feel little difference between a high-end or a budget stabilizer. I do recommend getting a stabilizer with a dampener though, as I explain in more detail in this article.
- Arrows: some archers believe that it’s important to have expensive arrows, but I disagree. If you have arrows that fit your bow (in terms of spine and point weight) they will fly great. Just buy some inexpensive arrows and spend your money on other gear, which doesn’t get lost if you miss your target.
- All accessories: basically, all accessories and protection (except the tab) are mostly depending on your preference. Having a nice quiver or armguard doesn’t help your archery performance. But it can make your day on the range a bit more comfortable and convenient.
Recommended gear
Do you want to get started as soon as possible, without spending hours finding the right gear? Well, I got you covered. Below I share some great options, both for a low and a high budget.
Low budget
Below, I will list down the gear I would buy to get new archers started that is on a tight budget. I can’t display the prices here because they can change anytime. So, you have to click the links to check the actual price of each product.
Recurve package
If you are on a budget, I would recommend buying the Endeavor recurve package. This package includes a riser, limbs, nocking points, string, and bow stringer. It also contains limb sleeves and a riser pouch to protect your gear from getting scratched. You will still need to buy some additional gear to get started, which we will discuss next.

Left-handed options
Sadly there are not many budget-friendly options available for left-handed archers. Finding a cheap riser is often more difficult because there are much more right-handed risers, which means that they can buy these in bulk. If you are left-handed, I can recommend the following gear, which would replace the kit mentioned above:
- HYF CNC machined riser
- Sanlida Miracle X8 limbs
- Legend recurve bowstring
- Legend String Easy bow stringer
The HYF riser mentioned above is more expensive than the riser of the package for right-handed archers. But it also has better materials, a nicer grip, and better build quality.
Arrows
For arrows, I recommend the Pinals Carbon arrows. These arrows are one of the cheapest carbon arrows available on the market. You can choose both feather and plastic vanes. I recommend plastic vanes since they tend to last longer. To choose the right stiffness, use the spine chart below.

Arrow rest
For recurve archers, I always recommend getting a screw-on arrow rest. These arrow rests are more secure than stick-on arrow rests and allow you to adjust the height and angle of the rest. They are a bit more expensive, but they are a more solid long-term investment. If you are looking for a good screw-on arrow rest, I recommend this one from Dioche.

Plunger
If you want to buy a high-tech plunger, I recommend this plunger from Nika Archery. The main advantage of this plunger compared to other cheaper plungers are:
- Quick adjustment system: you don’t need to unscrew a hex screw to adjust the plunger tension, because of the ratcheting ball system.
- Securing tools: with this plunger, you get two tools to securely screw in the plunger to your riser.
- Two locking hex screws: most cheaper plungers only have one locking hex screw on the retainer ring. On these cheaper plungers, the retainer ring is more likely to come loose. When that happens, you must tune the plunger again.

Tab
There are a lot of high-end tabs available, but most of those are expensive. A cheaper alternative is the SAS Elite Finger tab. I have recommended this tab in a few articles already because it has all the features of more expensive tabs, but for a fraction of the cost.

Sight
Although there are cheaper sights available, I recommend the SOOHUPET recurve sight. This sight is basically the budget version of an advanced target sight. Therefore, this sight has all the feature which are found on high-end sights, such as:
- Micro adjustment nobs
- Clear aperture with a small and crisp sight pin
- Long sight arm (9 inches)
- Quick-release system for the aperture
Therefore, with this sight, you will have all these features which are often found $100+ sights for a fraction of the price.

Stabilizer
If you want to shoot your bow with a sight it also makes sense to buy a stabilizer. If you want to shoot with a full stabilizer setup, which I recommend, this set from NMCPY is one of the cheaper options. I also like that this set has dampeners which are often not available on cheaper stabilizers. Since the set also has an extender rod, it will fit on all recurve bows.

Quiver
Although there are a lot of great quivers available on the market. I would stay away from the extremely cheap ones. These often don’t include a belt, which is very inconvenient. They are often attached with a small clip to your belt or belt loop. Therefore, the quiver tends to be very unstable and flops around when walking.
I bought one of these XTacer Quivers and I am very happy with it. It allows you to store your tab in the upper pocket and other gear in the lower pocket. There are also a lot of other quivers available with this same setup.

Other gear
Depending on your situation, you might also want to buy the gear below. I won’t discuss these in detail because it largely depends on your preference. Some archers like a backpack because they walk or cycle towards their range. While others like a hard case for additional protection. Below I have linked to products which I would buy:
High budget
If you have more to spend, I highly recommend considering the Sanlida Archery Miracle kit. This kit has been composed for competition recurve archers, which you can see in some specific design features:
- More robust sight with dampeners for a steadier sight picture
- Limb savers which increase the lifespan of the bow
- Upper stand-alone dampener
- Continues clicker plate which makes for a more solid clicking sound while using the clicker
- Lifetime warranty
Overall, this package is a great option for archers that want to take the sport seriously. So, if you want to shoot in competitions, you might want to buy the right gear from the get-go!

You will need to buy some gear separately, such as your arrows, protection, and accessories from the previous section.
Where to buy?
Archery equipment can be both bought online as offline. Below I will discuss a few things you should consider depending on where you buy your bow. I will also discuss buying a bow second-hand.
Online
Online there are a lot of different webshops where you can buy your equipment from. If you are budget-oriented buying from a webshop is your best bet. Webshops tend to be a lot cheaper than archery stores because you can easily compare prices.
The major con of a webshop is that you often must assemble and tune the bow yourself. It’s also more difficult to get advice. Therefore, before you buy from a webshop you need to know exactly what you want. With this buyer’s guide and my in-depth buyer’s guide per product, I believe you will have all the information you need to make this purchase decision yourself.
Tuning your bow can also be a bit of a struggle when you are just getting started. If you buy your bow online, you will have to tune it yourself. Luckily, there are a lot of resources available which explain how to do so.
Archery store
Archery stores, or pro shops as they are often called, are local stores that are run by archery enthusiasts. These local stores are great if you want to get started without learning the ins and outs of bows. The archers running the store can help you with both choosing your bow and tuning your bow.
Archery stores tend to be more expensive than webshops because they also provide more service. Whether you need that service depends on how much time you are willing to spend reading about archery.
In general, I would advise against going to an archery shop without some basic knowledge about bows. Salespeople sometimes advise expensive gear, which is not needed to enjoy the hobby. Eventually, most archers will do most tuning and maintenance themselves. So, you might want to ask your local professional if they can show you how to do it.
Second hand
Although there are some great deals available second-hand, I would refrain from buying a used bow. The problem with buying a bow second hand it will be near impossible to find a bow that fits you.
Let’s say, for example, that you need a 70-inch bow with 30 LBS draw weight. It will be hard to find a bow with these exact specs. Therefore, you might have to make concessions you don’t want. You might be tempted to buy a with a 34 LBS draw weight. The 4 LBS seems like a small difference, but it can make a huge impact on your performance.
Another reason to buy a new bow is that you don’t know how long it will last. Did the last owner take good care of the bow, or did he/she keep the bow strung for ages? And was the bow dryfired or shot with incorrect arrows. These things can all significantly decrease the lifespan of the bow.
Sadly, I have learned this the hard way. I have bought multiple bows second-hand and made these and similar mistakes. If you are an experienced archer and you know exactly what you want, this isn’t much of an issue. But if you are new to archery, you should be very careful!
More buyer’s guides
Choosing the right archery gear is very important, therefore I have written a lot of buyer’s guides on all kinds of archery equipment. Learn more by clicking on any of the articles below.
Bows
Bow parts
Archery equipment
Final words
Alright, you made it to the end of this article. You now know the basics of buying a recurve bow. Since recurve bows are quite complicated devices there is a lot more to learn about archery gear. If you want to know more, I recommend visiting this page to learn about these different parts of your archery gear. Also, check out my other articles about recurve archery.
If you have any questions, comments, or suggestions for this article, please leave it in the comment section down below. I will respond to any comments as soon as possible and I will send you an email once I replied.

Tim van Rooijen
For as long as I can remember, I have always been fascinated by archery. First due to its historic significance but later because I like being outdoors. With this blog, I share my knowledge about Archery and how you can improve your shot. More about author…
thank you for the info. can you make any other reformations for the budget minded. I shoot left handed and that isn’t an option on that model
Hi Bill,
Sadly, most budget-friendly kits are focused on right-handed archers. That’s why I couldn’t find any left-hand kits.
But you can also buy the required gear separately. I can also recommend the following gear:
– Riser: https://amzn.to/3JNvR0R
– Limbs: https://amzn.to/3OesOC9
– String: https://amzn.to/3JNjBxk
– Bow stringer: https://amzn.to/3KNr4xC
The riser is more expensive, but a higher-end riser than in the budget kit for right-handed archers. But to be honest, I think buying a more expensive riser is often a good idea. A good riser can last a lifetime and together with the string, it’s the only part you hold while shooting.
If this riser doesn’t fit in your budget, I can also recommend the Krossen Xenia bow. Both the limbs and riser are solid options, similar (in terms of price and quality) to the right-handed kit I recommend in the article. But you will have to visit an archery shop to buy these, as I could not find them online.