There are many reasons why you might want to disassemble a compound bow. You may want to replace a part of your bow that can’t be replaced if the bow is assembled. Think for example about the string, cables, or cams. Another good reason to disassemble a compound bow is for long-term storage or shipping.
Sadly, disassembling a compound bow isn’t as easy as disassembling a takedown recurve bow. You can’t simply unstring the bow and remove the limbs. Compound bows are not made to be disassembled on the fly. In this article, I will discuss this in more detail. Below is a quick overview in case you are in a hurry.
All modern compound bows can be disassembled with a bow press. This device flexes the limbs which allow you to remove the string. You then release the tension of the bow press which allows you to remove the limbs from the riser. Some beginner compound bows allow you to disassemble a compound bow without a bow press.
In this article, I will explain in more detail both methods. I will also discuss a cheap bow press I recommend and mention some things you should consider before you disassemble your bow.
Terminology
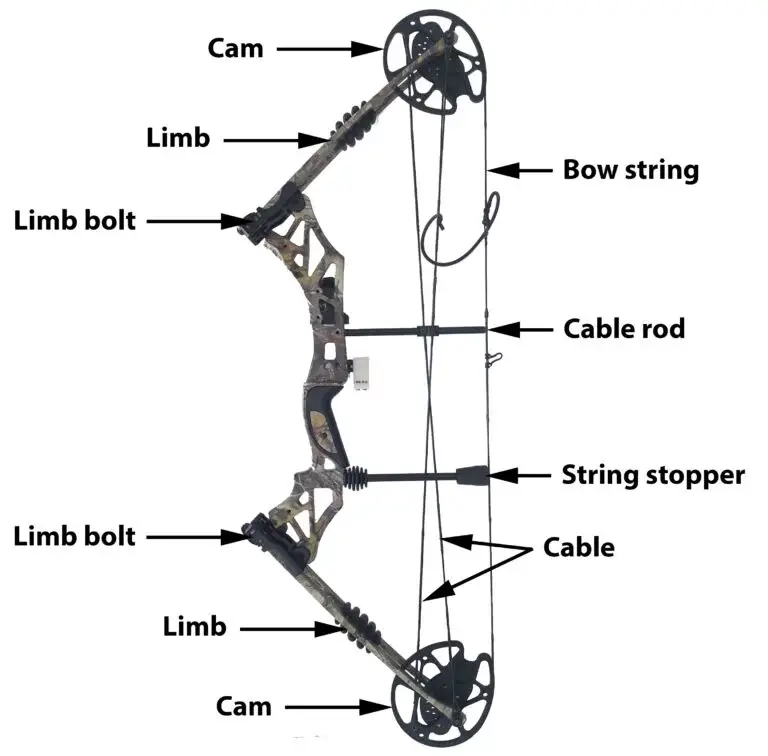
Since this article is quite technical, I will discuss a lot of different bow parts. Therefore, I have made an image indicating what all these different parts are called.
Disassembling a compound bow with a bow press
Most compound bows need to be disassembled with a bow press. Therefore, I will discuss this method first. If you don’t have a bow press, I recommend buying the bow press I discuss later in this article.
With some rare exceptions, all modern compound bows can be disassembled with this method. You do need to have a bow press, but it’s relatively straightforward. It will take up to 10 minutes to complete all the steps. The step-by-step guide is based on the bow press I discuss below, but it will also work about the same with other bow presses.
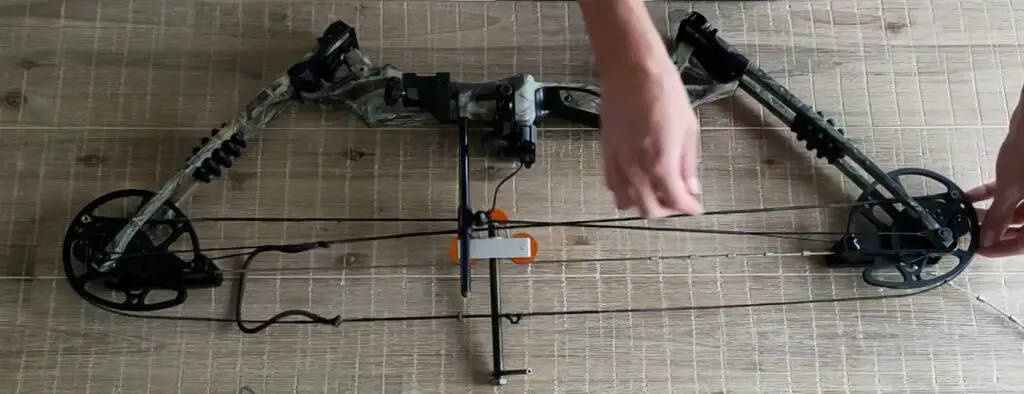
Step 1: Place the bow in the bow press
The first step is to unwind the bow press tensioning device. Next, adjust the bow press hooks to the length of your bow. Now you are ready to place the press onto the bow and start winding the tensioning device. Make sure that the hooks stay in place on the end of the limb tips while winding.
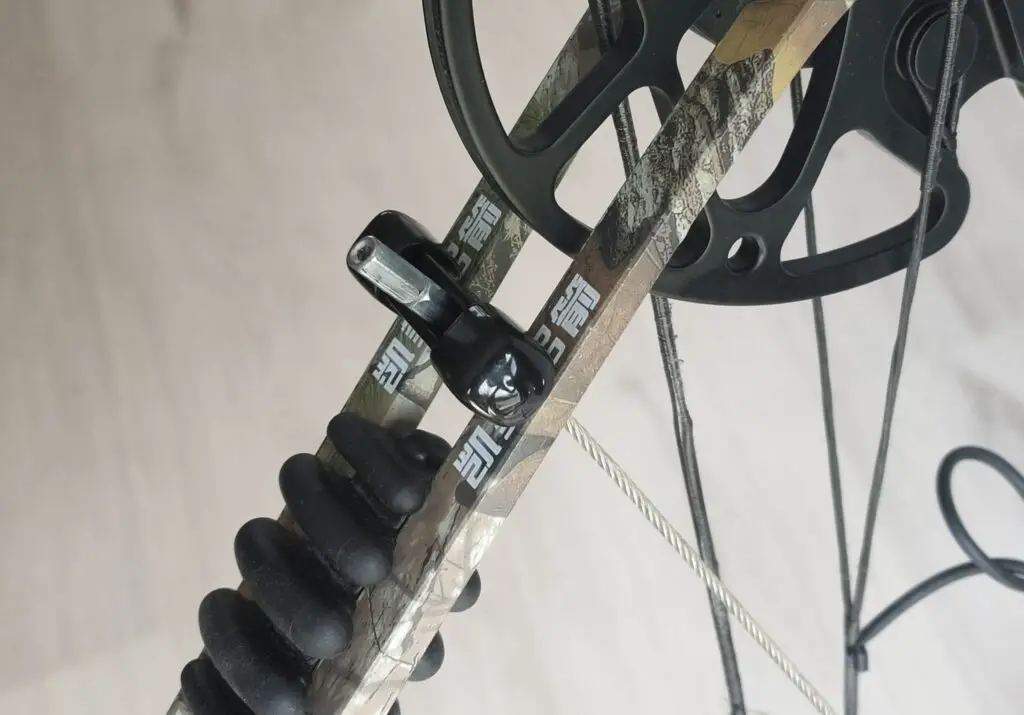
On my bow, I must remove the dampener when using the bow press, but that may not be necessary on your bow. On some bows, you might also need to remove the cable rod. You can see how this works in the video below:
Tip: on some compound bows, the hooks my not fit on the limb. But you can also remove the hooks and use the bar. You then feed the bar through the gap of the limbs and place it on top. This works best if you have parallel limbs.
It might take a while to figure out how this works, but once you figured it out it’s relatively straightforward.
Step 2: remove the tensions from the string and cables
Keep twisting the tensioning screw until you see that the string starts to relax. The last few twists might require quite some effort. Make sure that the bow press is securely on the limbs before going to the next step. If the bow snaps back without the string, the limbs might get damaged.
Step 3: remove the string and the cables
Once the cables and strings are relaxed you should remove both from the bow. If you don’t intend of changing the cables or string, you should try to retain the twists. Otherwise, you will have to completely retune your bow when you disassemble it.
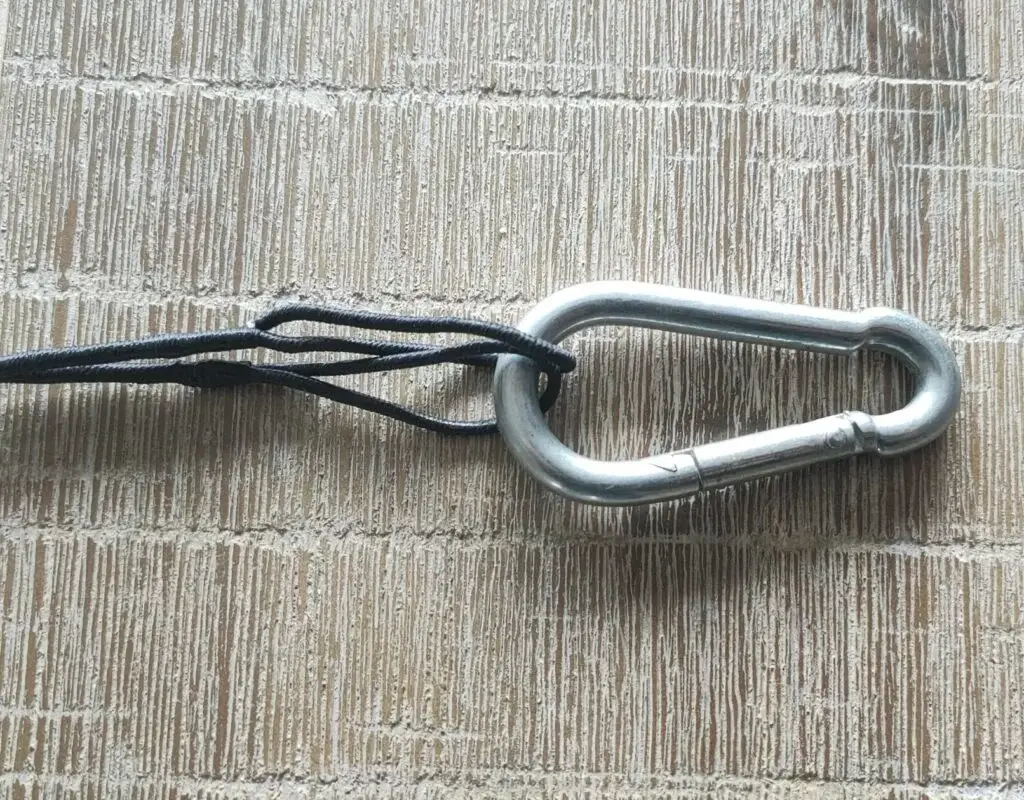
To store the string, you can use the loops of the cables and string and place them on a carabiner. This makes sure that they can’t unwind while stored. If you don’t have a carabiner you can also use the trick you see in the video below.
Step 4: remove the bow press of the bow
Once you have the string and the cables of the bow, you can start to unwind the tensioning device. Again, make sure that the hooks stay in place while unwinding. While the tension decreases the hooks might start to slide. When all tension is removed from the limbs, the hooks will fall off the limbs and you can continue to the next step.
Step 5: remove the limbs
Once the bow press is removed from the bow, the limbs will still be attached to the riser. To remove the limbs, you fully untwist the tiller adjustment. Normally you won’t untwist this screw all the way, but since all tension is removed you can safely do this.
If you want to reassemble the bow with the same tiller height, you should count the number of twists it takes to remove both limbs. Write this number down and use this while reassembling your bow.
Step 6: remove all other parts
Alright, the hard part is over. Depending on your situation you might also want to remove the cable rod and the dampener. In most cases, these parts are screwed in with hex screws. If you also want to remove the cams you need to remove the axle of both limbs. Not all cams are removable though. This video will give you additional guidance.
Disassembling a compound bow without a bow press
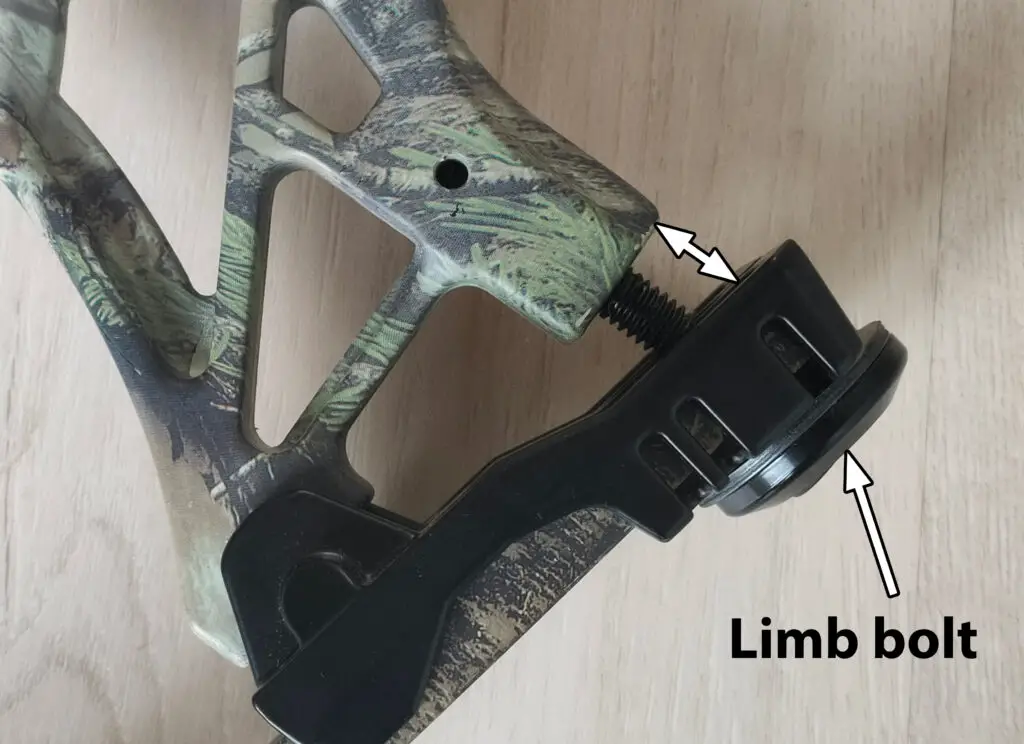
Some compound bows can be disassembled without a bow press. These compound bows have longer limb bolts which allow you to remove the tension with this screw. This is most often the case on cheap beginner’s bows. In some cases when you order the bow online, you even have to assemble the bow yourself.
If you are not sure whether this is the case, you should use a bow press. Otherwise, the limbs will fly off the bow which can cause serious harm to both you and the bow.
Disassembling a compound bow without a bow press is relatively straightforward. It should take at most 3 minutes.
Step 1: check the limb bolts
Before you start using the limb bolts, you should make sure that they are both in roughly the same position. You don’t want one limb bolt to be out almost all the way and the other tightened all the way. This shouldn’t be the case anyway, but it’s better to check this to be sure.
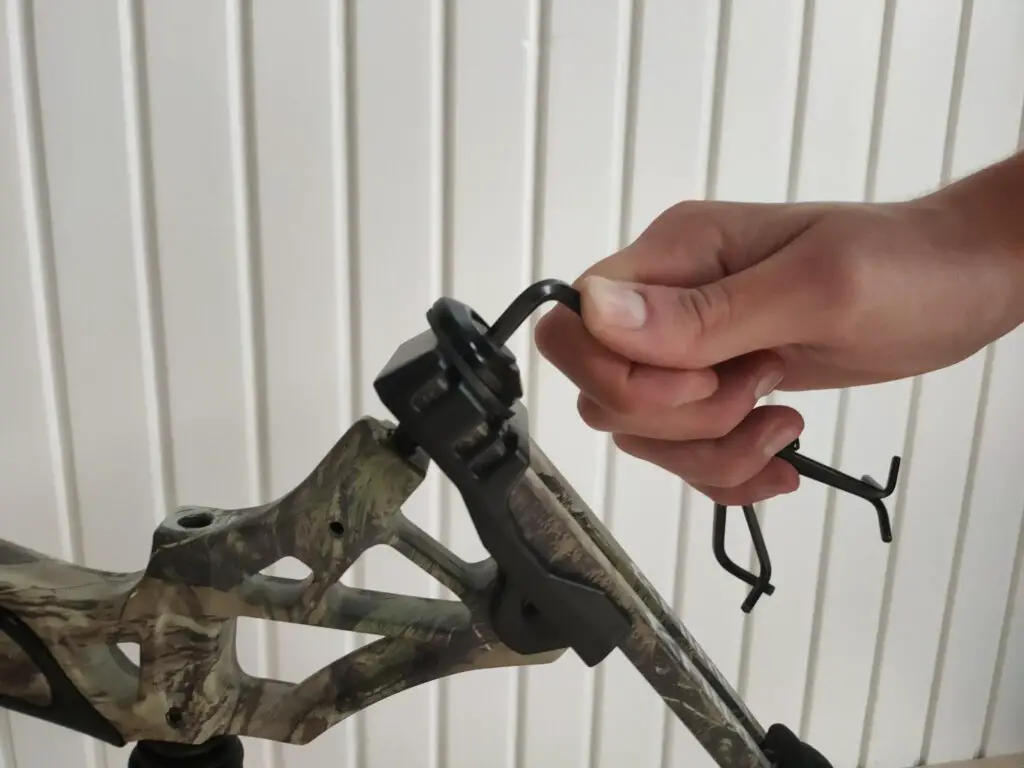
Step 2: start unscrewing the limb bolts
You can now start unscrewing the limb bolts. You don’t want to unscrew one limb bolt all the way if the other one is still fully tightened. Therefore, you should turn both screws one or two turns per round.
Once the string and the cables are no longer under tension, you can remove both limb bolts all the way. Once the screws are fully loosened you can remove the limbs from the riser.
Step 3: remove all other parts
You can now remove all other parts of your compound bow. As mentioned earlier these parts are often attached with hex screws.
Recommended bow press
A lot of compound archers don’t have a bow press. But as we discussed if you ever want to disassemble your bow you need this device. Also, if you want to change your string, micro-adjust your draw length, or change your peep sight you need this device. Those are just a few use cases for this device, I discuss more use cases in this article.
Therefore, I do recommend getting this device even if you have a bow that can be disassembled without a bow press. If you use the limb bolts to get the tension of the string, you also change the tiller height which influences your shot. That’s why I often use my bow press, even though I can remove the tension with the limb bolts.
Archery shops have professional bow presses which are fixed to a workbench. This allows staff to quickly remove the tension from the bow and change parts. This is very expensive equipment, therefore almost no archers have this device at home.
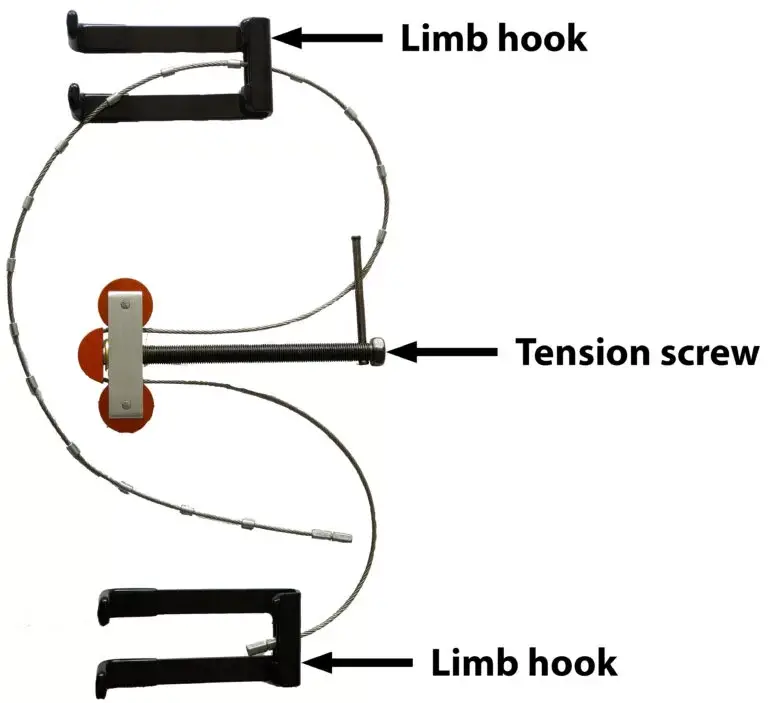
Luckily, there are cheaper and more portable alternatives. I especially like this cheap bow press. It’s a generic Chinese bow press, but it works great on any compound bow.

Reassembling your bow
When you want to reassemble the bow, you just do everything in reverse. Screw the limb bolts back in place and use either of the two methods to get the string and cables back under tension. Make sure that you check if both are in the correct position before you put them under tension. If they are not in the correct place, they might twist the bow and cause erratic behavior.
A word of caution
Before you start disassembling your bow, I want to give you the following warnings.
Disassembling a compound bow is not for beginners
Although it might seem rather straightforward there is little room for error. If you do something wrong, you can cause major damage to your bow. A compound bow is a complicated device therefore I shouldn’t start playing with it if you don’t understand how it works.
If you want to learn more about how a compound bow works, I highly recommend reading the article below. Once you understand how a compound bow works it will be much easier to work on it and you will make fewer mistakes.
How does a compound bow work – the full explanation
Reassembly is more difficult
Like a lot of complicated mechanical devices, disassembly is easier than reassembly. Therefore, don’t be too hasty while disassembling your bow, and make sure to label where each part belongs. When everything is in the right place it might make a lot of sense, but when everything is removed it might be difficult to reassemble it correctly.
You will have to retune your bow
Even if you use my tips, you probably must do some tuning after you reassembled the bow. The bolt might be quarter-turn less or more and you might accidentally add or remove a twist from your string and cables.
These differences might seem minor, but on long distances, they can make a big difference. Therefore, I always recommend retuning your bow after you have reassembled it.
Consider whether disassembling your bow is necessary
Almost all replacements or tuning can be done without disassembling your bow. You only need to disassemble the bow if you need to replace the limbs. Tuning or replacement of the string, cam, or mod can all be done with a bow press. Therefore, it’s worth considering whether you need and want to completely remove the limb bolts.
Safely store all screws and pieces
If you lose one of your limb bolts, you won’t be able to use your bow until you find replacements. Therefore, you must be careful to store all screws and pieces you disassemble from the bow. Some parts are very difficult to buy separately, and you don’t want to buy a new bow just because you lost one part. Since I have multiple bows, I put all screws in bags and clearly label from what bow and part they are.
Final words
I hope you found this article helpful. In most cases, a full disassembly of your bow isn’t necessary or recommended. For me, the only reason to disassemble my bow would be for shipping purposes.
Some archers believe that it’s better to disassemble a compound bow if you don’t intend to use it for a while. But I don’t think that is necessary. A compound bow is under relatively little stress when the bow is not drawn. Since compound bow limbs are made of modern materials, they also tend to maintain their flexibility even when they are kept strung for years.
If you have any questions, comments, or suggestions please leave them down below. I will reply to your comment as soon as possible. You will receive an email notification once I replied!

Tim van Rooijen
For as long as I can remember, I have always been fascinated by archery. First due to its historic significance but later because I like being outdoors. With this blog, I share my knowledge about Archery and how you can improve your shot. More about author…