If you are just getting started with archery, choosing a bow is extremely difficult. There are so many different bows available. From the cheap bows sold below $100, to the expensive bows, that retail for more than $2000. There is just so much to choose from that you need to narrow down your search.
In this article, I will do just that. I will give you some great options for bows that have a solid price-quality ratio. You will see that these bows are all quite different because I searched for the best in each class. Which makes it easier for you to choose!
1. Best beginner recurve bow
If you are just getting started and you want a high-quality bow for a decent price, the Samick Sage is one of the best choices. The Sage has gained a reputation for being a high-quality bow and is very reliable.
Due to this popularity, it will also be very easy to get replacement parts. This is an issue with other beginners’ bows. If, for example, a limb breaks, it can be rather difficult to find replacement limbs that fit the bow.
This is a true beginner’s bow, it’s extremely easy to set up and start shooting the first arrows. With this package, you will have all the basic things you need to get started. Just note that if you want to practice target archery with a sight and stabilizer, you might want to look at the next product I recommend.
2. Best budget target recurve bow
A target bow is more complex than a beginner’s bow. The adjustable limb pockets and tiller height are something that makes the bow more difficult to set up. But it also gives you options to tune the bow, which gives you more flexibility.
Another benefit of this bow is that they have an ILF limb fitting. This means that you can use limbs from different brands on this bow, which also gives you a lot of flexibility.
The bow is available in many different sizes and draw weights, so you can choose exactly what you need!
Overall, this bow gives you a lot of advanced features for a low price. The only thing I would replace on the bow is the finger protection. Shooting with a tab or glove is much better than a finger guard you attach to the string.
3. Best premium recurve bow
If you have some more money to spend, I highly recommend the Sanlida Olympic archery pack. This package includes everything you need to shoot the Olympic recurve style. This means that you get some of the best equipment for an affordable price.
The set is available in different bow lengths, draw weights, and colors. If you want to find the other colors just type in ’’Sanlida Archery Miracle X10’’ in the search bar on Amazon to find all the other colors.
The bow comes in two different limb fitting styles: Block Adjustment System and Bolt Adjustment System. I recommend going for the Block Adjustment System, as it’s easier to use than the Bolt Adjustment System.
You will have to buy your arrows separately. To fully enjoy the full potential of this bow, you will need to select arrows that are spined correctly. So, make sure to read my detailed article about how to select the right arrows here.
4. Best hunting recurve bow
If you want to use your bow for target practice the previous bows would be perfect. But if you intend to hunt with your bow, this bow will be much better. This hunting bow has a more compact design and a secure bristle arrow rest, which makes hunting in the woods much easier.
The set includes everything you need to get your first catch. It is a very generous package with 12 arrows and some additional tools (such as the allen key, bowstring wax, and arrow puller) you don’t get in a lot of other packages.
Make sure to check your regulations before you start hunting. Many regions have specific rules for the draw weight of the bow, and what kind of bows are allowed.
5. Traditional recurve bow
If you prefer a more traditional shooting experience, without a sight, stabilizers, and other doodads; a traditional recurve bow might be more up your alley. These bows are made from one piece and cannot be taken apart.
You might think that these bows would be cheaper, as there is less material, and they are simpler. But the opposite is true, traditional bows are much more difficult to make than simple beginner bows. Expensive traditional bows can go upwards to $1000.
Traditional bows are truly a work of art. But finding a bow that is affordable can be rather difficult. Luckily, I can suggest the Deerace Traditional bow. I have used many products from Deerace, and thus far, they have never failed me.
The package includes some of the basics you need, such as the bow string, bow stringer, arm guard and arrow rest pads. You will have to buy the arrows yourself. Make sure to read my detailed guide on arrows, before your buy your arrows.
What you should consider while choosing a recurve bow
When you are buying a recurve bow, there is a lot to consider. I tried to make this easy by providing you with some solid options. But even then, you still must select the size of the bow and the draw length. In this section, I will discuss in more detail how you make the right choice!
Draw weight
The number one mistake new archers make is choosing a too heavy bow. When your draw weight is too high, all sorts of issues can happen. For example, you might start to shake, your muscles can cramp, or your posture deteriorates. This will all negatively affect your accuracy. So, if you don’t have to shoot a high draw weight (because you don’t hunt with your bow), I recommend going on the low side.
In the figure below you see the draw weight that I recommend based on your age and gender.
| Archers profile | Draw weight |
| Small children | 16 LBS or less |
| Larger children | 16 till 18 LBS |
| Teenage female | 18 till 22 LBS |
| Teenage male | 20 till 24 LBS |
| Female | 20 till 26 LBS |
| Male | 22 till 30 LBS |
If you are tall, I recommend going for a lower draw weight. Because you have a longer draw length you will have a higher draw weight with the same limbs. This is quite confusing, a lot of people think that 20 LBS limbs are the same draw weight for everyone, but that is not the case. This is just the standard measurement taken at a draw of 28 inches.
In some cases, a child and an adult can even shoot with the same limbs. But since the adult has a longer draw, he/she will shoot the arrow much faster.
If you are still unsure about what draw weight fits you best, make sure to read my detailed article below:
How to choose the right draw weight for your recurve bow
Bow length – draw length
The length of your bow is determined by your draw length. This is how far you draw the bow back. So, to know the ideal length of the bow, we first need to measure or estimate our draw length.
The official way to measure draw length is quite complicated to measure without a bow. Therefore, I will explain the arm-span method which very accurately estimates the draw length. You can read this article if you want to know the official way to measure draw length.
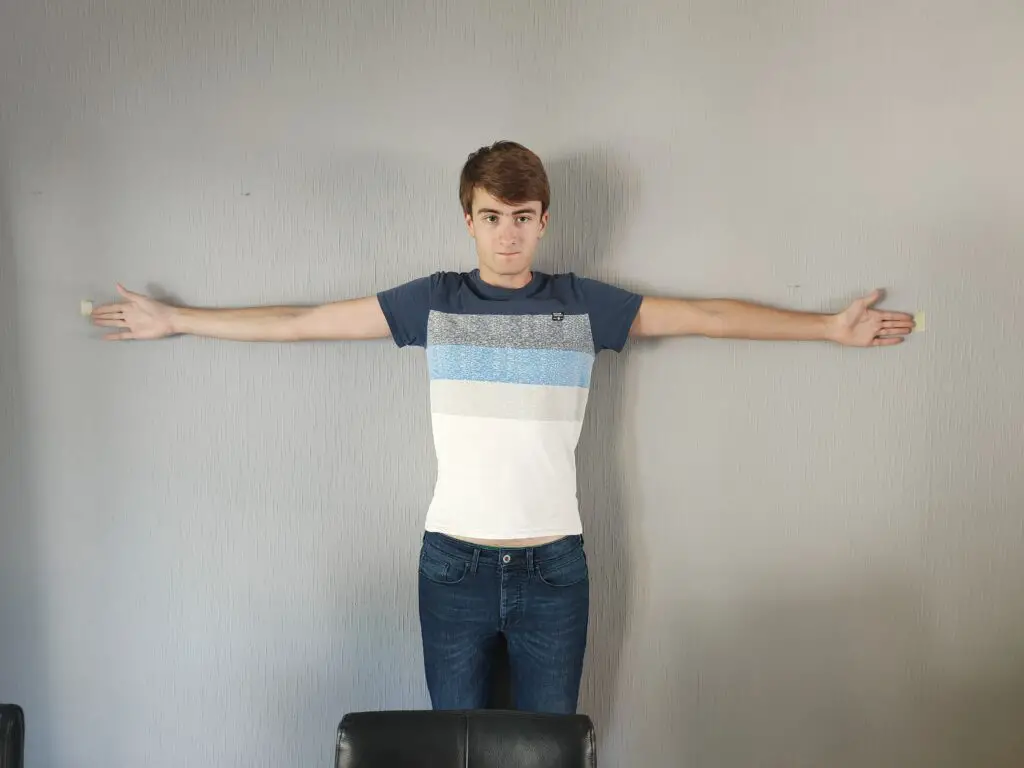
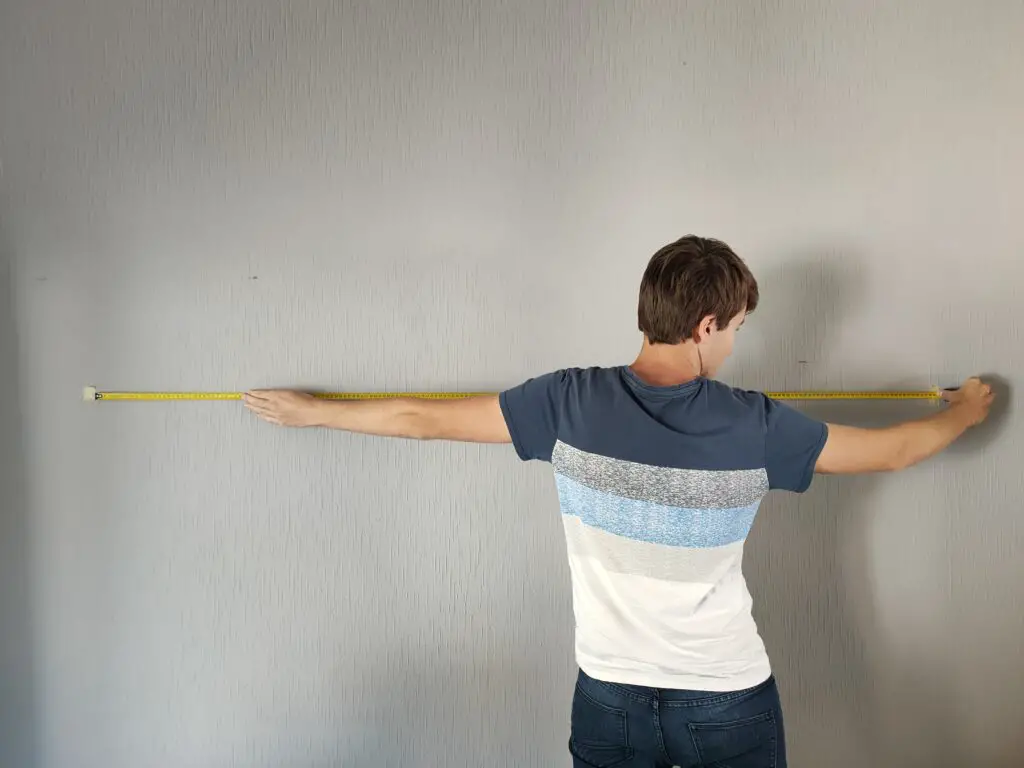
Step 1: hold your arms horizontal and let someone measure your arm-span from finger to finger. Make sure that you are not stretching during this measurement. In most cases, you will need two friends to keep either side of the measuring tape in the right place.
Step 1 (one friend alternative): stand against a wall with your arms horizontal. Let your friend mark both ends and measure the space between the two points.
Step 2: make sure that the measurement is in inches. If you use centimeters make sure to first convert it to inches by dividing with 2.54 or using this tool.
Step 3: divide your final measurement with 2.5. The resulting number is your draw length estimation.
Since this method is not measuring the draw length, it isn’t all that accurate. But it provides a reasonable estimation for your actual draw length.


If the bow you want to purchase comes in one size, make sure to check the maximum draw length. Make sure that your calculated draw length doesn’t exceed that.
| Max draw length | Limbs | Bow length |
| 26 inch | Short | 66 inch |
| 29 inch | Medium | 68 inch |
| 31 inch | Long | 70 inch |
When in doubt, always take the longer bow. There is no real harm in shooting with a longer bow than necessary. Even a small child can shoot with a long adult bow, it will just be a bit more difficult to wield.
Limb fitting
The second and third product that I recommend in this article have an ILF limb fitting. This means that you can fit any ILF limb onto that riser (the middle part of the bow). This gives you a lot of flexibility to replace the limbs if they break or if you want to increase the draw weight.
So, paying a bit more to get a bow that has an ILF fitting makes a lot of sense. If you go with a proprietary limb fitting, make sure to buy a popular brand. That’s why I recommend the Samick Sage as a beginner’s bow because it is reliable and replacement limbs are readily available.
Another limb fitting is Formula, which is mostly found on Hoyt bows. I do not recommend buying a bow with Formula limb fittings. The issue is that only Hoyt, and a few archery manufacturers, sell limbs for this type of fitting. Also, there is no real benefit over the default ILF fitting. If you want to know more about ILF vs Formula limb fittings, you can read my detailed article here.
Q&A
Buying your first bow is exciting, but also complicated. That’s why I often get questions from archers about it. In this section, I will answer the most common questions.
What exactly is a recurve bow?
A recurve bow is a bow where the tips of the limbs are curved forward. This design has multiple benefits over straight bows. The biggest benefit is that recurve bows tend to shoot their arrows faster than a straight bow. If you want to know more about the benefits of a recurve bow, you can read this article.
Apart from this technical definition, we also often use the word recurve or recurve archery, for the category Olympic recurve and Free Style Recurve (FSR) archery. These terms refer to shooting a modern recurve bow with a sight and stabilizer. This is all quite complicated, so if you want to read all the ins and outs, you can read the detailed article here.
What is the difference between cheap and expensive bows?
The biggest difference between cheap and expensive bows are the materials and tuning features. Expensive bows tend to be made of higher quality materials, which are more durable. Also, most expensive bows have more features which allow you to tune the bow, such as a tiller and limb alignment. Beginners’ bows often miss these features.
In my experience, the difference in materials used is not a big deal. Even cheap bows are designed well and will withstand some abuse. Therefore, I wouldn’t pay just to get a bow made of high-grade aluminum or carbon fiber. It will not have a big impact on your performance.
But tuning features are worth paying for. These help you to configure the bow to you and your arrows which will help you to be more accurate. Luckily, these features are also available on cheaper alternatives, so always compare the features before you buy. The products I recommended earlier all have a great selection of features for a fair price.
Of course, you can also go too cheap. If you buy a toy, shooting accurately will be very difficult. So, if you are looking for a cheap bow on your own. Please read this article for more information to distinguish between a cheap bow and a toy.
How to set up and tune a bow?
If you bought a simple bow setting it up will be very easy. You attach the limbs, string the bow, and stick on the arrow rest. That is all you need to do to get started.
But if you bought a target recurve bow (the second or third bow I recommended), you will also have to tune it. Tuning the bow is like tuning an instrument. You want the arrows to fly as straight as possible. To achieve that you must set the limbs straight, configure the tiller and put your sight center shot.
This is too much to discuss in this article, so if you need to tune your bow, make sure to read my visual tuning guide listed below:
Final words
On this website, I often write very detailed guides. But some feedback I got from my readers is that they get overwhelmed by the amount of information. The problem is that there is so much to learn that you seem to get deeper and deeper down the rabbit hole.
That’s exactly why I have written this article. In this article, I will try to give you clear advice, while sparing you all the details. But if you are interested, you can always read my more detailed articles.
For example, if you want to buy a beginner’s bow, you might want to read my guide on buying a beginners bow. If you want to buy a target recurve bow, you can read my guide on buying a target recurve bow.
If you have any comments or suggestions, please leave them in the comment section down below. I will answer as soon as possible and send you an email with my reply.
Tim van Rooijen
For as long as I can remember, I have always been fascinated by archery. First due to its historic significance but later because I like being outdoors. With this blog, I share my knowledge about Archery and how you can improve your shot. More about author…


