Although arrows seem relatively simple, there are a lot of choices you have to make. What should the weight of my point be? How stiff should my arrow be? And what fletching do I need? These are all important questions and getting them wrong will hurt your accuracy. Especially, for new archers, this might be overwhelming. Therefore, we will answer all these questions in this article.
When you buy arrows, the most important thing to consider is the spine weight. You can find the correct arrow spine by using a spine chart that recommends a certain spine weight based on your draw weight, arrow length, and point weight. Additionally, you should make sure that the nock fits your string.
Before I get into the details on how to choose the right arrows, we first must discuss some basics. Therefore, I will first discuss the different parts of the arrow one by one. Next up, I will discuss the different arrow shaft materials and some important specs. Then, we will discuss whether you should choose premade arrows or compile your own arrows. At the end of this article, I will also answer some commonly asked questions and what you need to assemble an arrow.
The anatomy of the arrow
Alright, let’s first discuss the different parts that make an arrow work. We will start at the front and work our way back.
Point/ tip
Depending on your location, you might call it the tip or point. But since I always called it the point, I will use this term.
When people think about points, they mainly think that archers attach them for penetration purposes. It is indeed true that points help increase the penetration of the arrow. And that certain point designs can limit or increase the amount of penetration. But the point has a more important role in archery.
If you have ever fired an arrow without a point, you will notice that it will not fly accurately. It might not even hit the target. The weight of the point stabilizes the arrow. Therefore, you need a point to make sure that your arrow doesn’t flop around in mid-air.
Important specs (click for more info):
Click the link below, for my dedicated article on points:

Arrow shaft
The arrow shaft connects the point to the fletching and is often made of the following materials: wood, carbon, aluminum, fiberglass, or a combination of these materials. These materials mainly differ in their durability, weight, and cost.
Arrow shafts are made in different diameters. Some target archers like to use larger diameter arrows because this gives a minor advantage in scoring. If you buy a set of arrow shafts, they will typically be 32 inches. You can then either cut the shafts down to your draw length or use them as is.
Important specs:

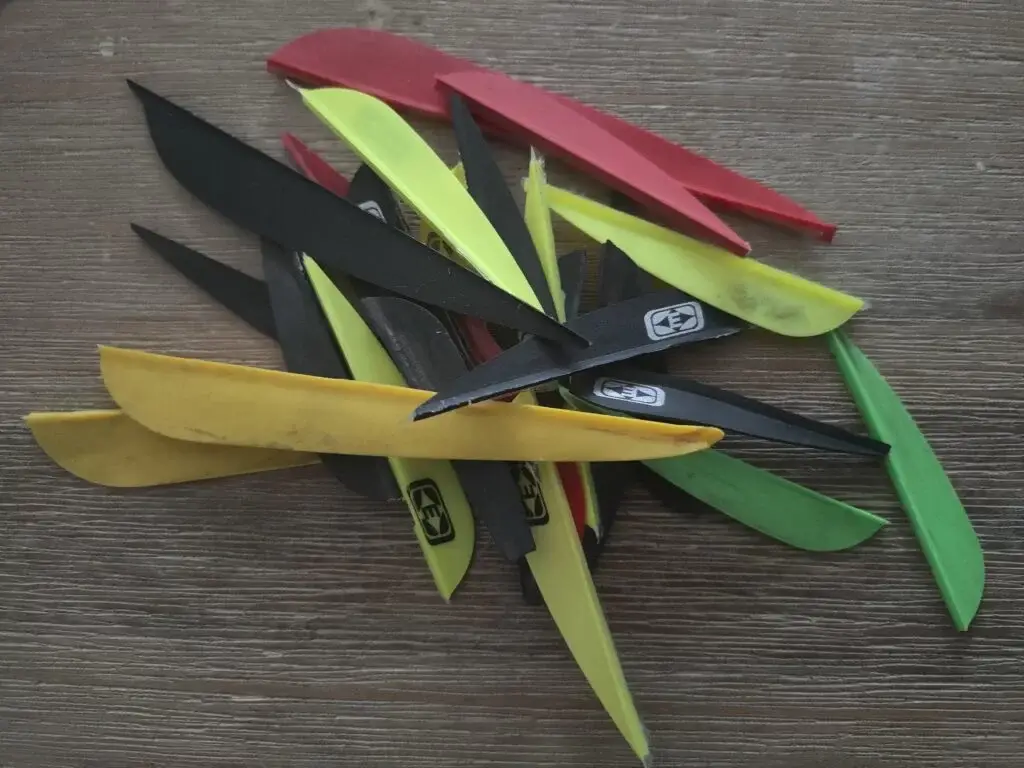
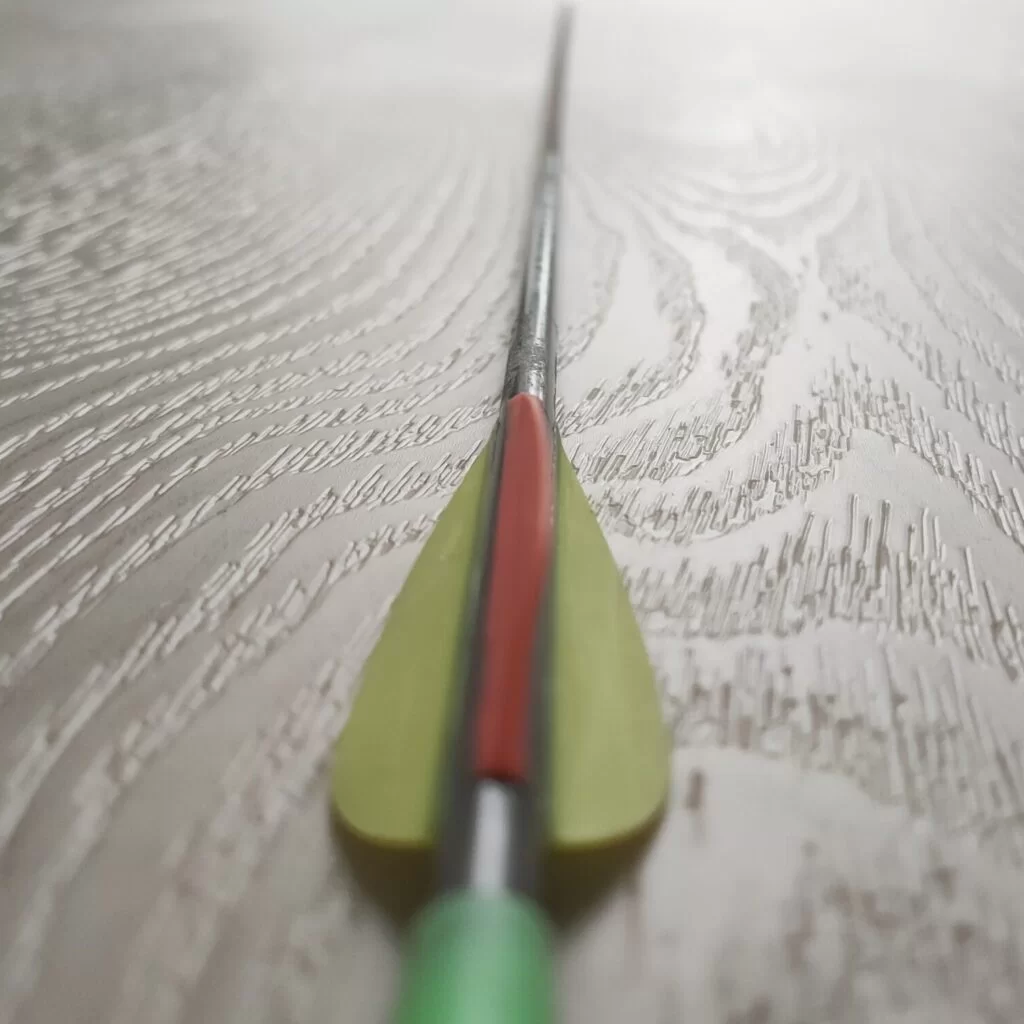
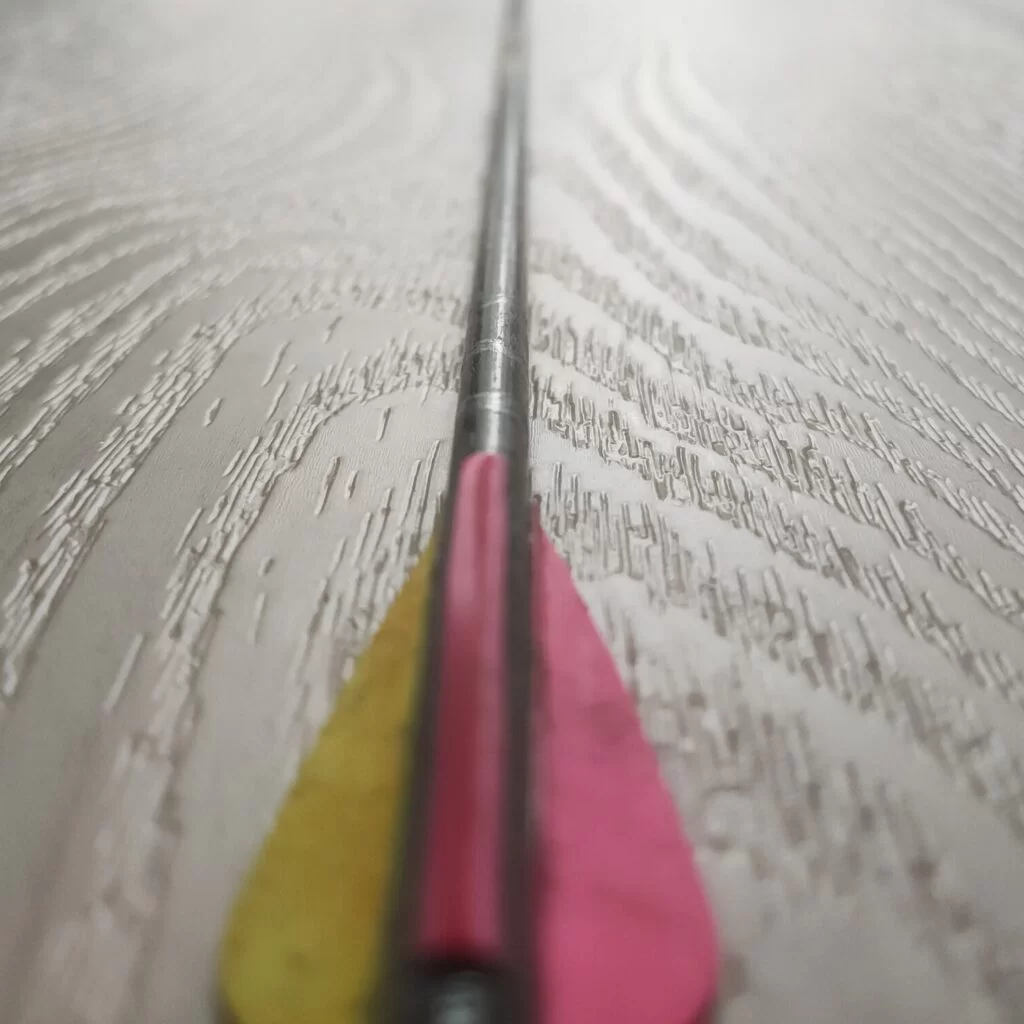
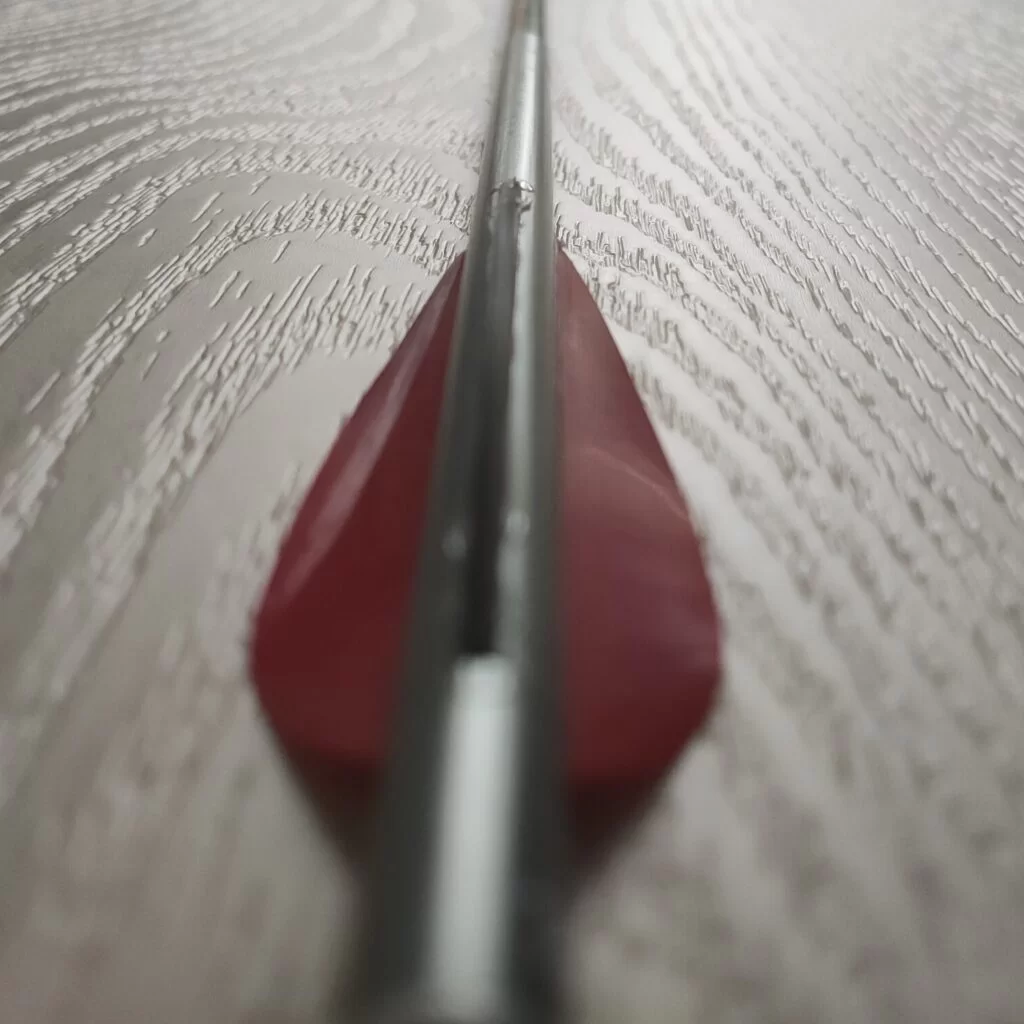
Fletching
In general, the part of the arrow that requires the least attention is the fletching. The fletching stabilizes the flight of the arrow. But in general, the exact fletching you choose doesn’t matter that much. A well-tuned bow should be able to shoot a bare arrow (without fletching) just as accurate as a fletched arrow.
Therefore, in most cases, going with the default fletching is the easiest and best option. For some special occasions switching the fletching can solve some instability option, but that relies most often purely on trial and error.
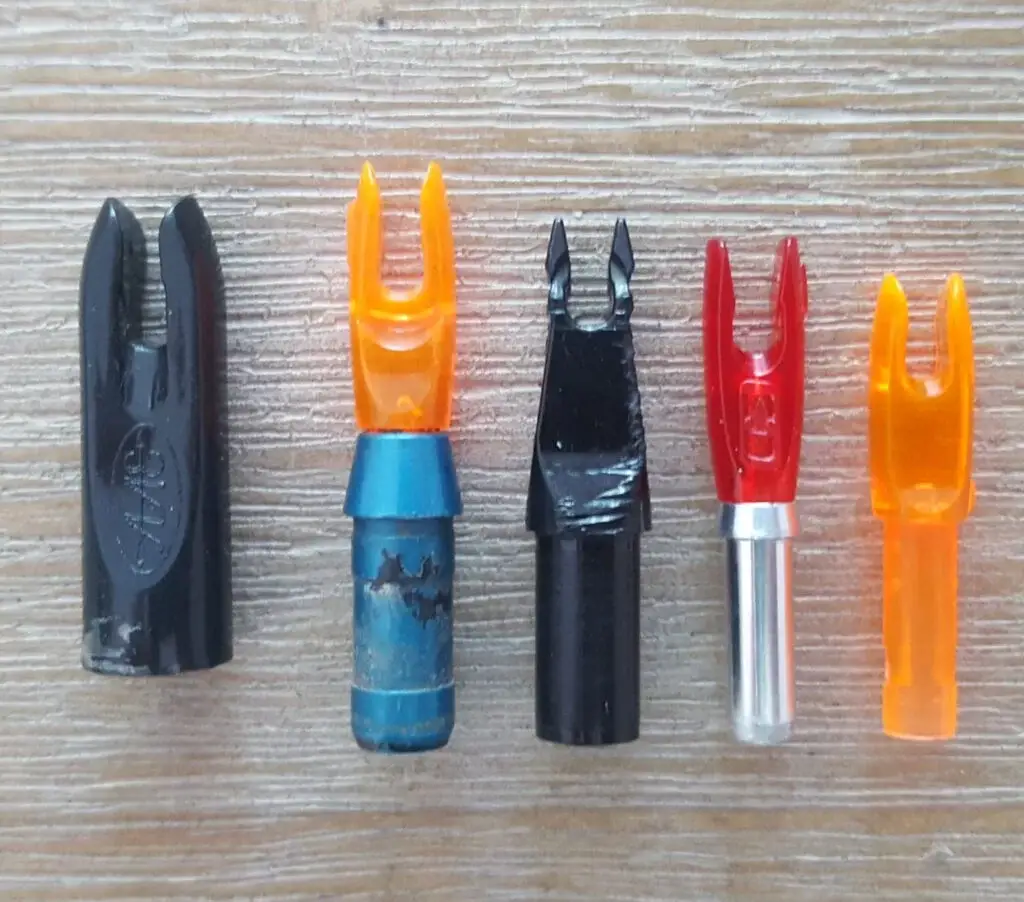
Nocks
The nock keeps the arrow on the string until it’s fired. Although all nocks seem very similar, there are minor differences in both the fitting and the throat size. Therefore, it’s very important to make sure that these measurements work with both your shafts as your string.
Important specs:
Click on the link below, to read my dedicated article about nocks:

Arrow wraps (optional)
On tournaments, you must mark your arrows with either your initials or your full name. This is to prevent confusion on the target about who shot what arrow. Therefore, these arrow wraps are not essential pieces of an arrow, especially for beginners. But now you know at least what their purpose is, besides looking cool :).
Arrow materials
Now you know the basics of an arrow, let’s dive into the details, starting with the materials arrow shafts are made of. We discuss both pros and cons of each material.
Pros and cons of the arrow materials
| Wood | Fiberglass | Carbon | Aluminum | Mixed | |
| Price | Very Cheap | Cheap | Average | Expensive | Very expensive |
| Durability | Low | High | High | Low | Depends |
| Spine weight consistency | Low | High | High | High | High |
| Weight | Average | Heavy | Average | Light | Depends |
Suitable for:
| Wood | Fiberglass | Carbon | Aluminum | Composite | |
| Beginners bows* | X | X | X | ||
| Traditional bows | X | X | |||
| Recurve bows | X | X | X | ||
| Compound bows | X | X | X |
With a beginner’s bow, I mean a take-down recurve bow, with a wooden riser and proprietary limb fittings. Read this article, if you are unsure whether you have a beginner’s bow.
Wood
The oldest arrows are made from is wood. For this reason, most traditional archers are still shooting with wooden arrows. The major advantage of wood is that it’s generally quite cheap. Experienced traditional archers, however, might use more expensive types of wood. But beginner arrows tend to be dirt cheap.
The major disadvantage of wood is that it can easily be damaged. Therefore, it’s quite common for wooden arrows to break or warp. Additionally, the flex of the arrow isn’t all that consistent, due to natural variations in the wood. Therefore, the spine weight between each arrow can differ significantly which influences your accuracy.
Therefore, most traditional archers use more expensive wood types, which are both more durable and consistent in their spine weight measurement. But even with high-quality wood, traditional archers often throw away a few arrows, because the spine weight doesn’t match the other arrows.
Traditional archers should pick other, more modern materials. Wooden arrows are only suitable for traditional and beginner’s recurve bows. Shooting wooden arrows with an Olympic recurve bow or a compound bow just doesn’t make a lot of sense.

Fiberglass
A step up from wood is fiberglass. This material is almost as cheap as a wooden arrow but is much more consistent in terms of their spine weight measurement. Fiberglass arrows are also more durable than their wooden counterparts. Therefore, these arrows are commonly used for beginner’s bows.
The con of this material is that it can be quite dangerous when the shaft breaks. Since the fiberglass has sharp splinters, you can end up with nasty cuts when a piece of the arrow is damaged. For this reason, you can’t shorten the shaft yourself. Therefore, you must buy arrows made of this material premade. It’s also quite a heavy material and can’t be used to shoot at long distances.
Fiberglass arrows are a cheap option for new archers that want to experience archery before investing in better arrows. More serious archers might want to use carbon or aluminum arrows instead.
Carbon
By far, most serious archers use carbon arrows. This material is quite light, very durable, and creates very consistent spine weight measurements. Although they are more expensive than wooden and fiberglass arrows, they are a lot cheaper than aluminum arrows. Additionally, since they last so long, they might even be the most cost-effect arrows. Provided of course that you don’t lose them.
The major con of carbon arrows is that they are more expensive than fiberglass or wooden arrows. This might be a deterrence for new archers to buy carbon arrows, but you must know that can essentially last a lifetime.
Aluminum
If you want the lightest arrows available, you should pick aluminum arrows. These arrows are extremely light and therefore fly in a very straight line even at long distances. Most archers use aluminum arrows indoor, however, because they are more likely to be influenced by wind.
Aluminum arrows are quite expensive and bend quite quickly. Therefore, these arrows are not great if you have a tight budget. Therefore, these arrows are mainly used by archers that take the sport very seriously and want the additional weight reduction.
I wouldn’t recommend aluminum arrows to anyone, to be honest. They are expensive to own because you have to replace them almost every year.
Composite
What if you could combine the strengths of two or three types of materials? Well, you would get the modern composite arrows. These arrows are made of a combination of different materials and are sometimes called ACEs.
Because they are a composite, the behavior of the arrow depends on the exact materials used, and the manufacturing process. It’s very hard to recommend or not, because of this reason. I heard great stories about composite arrows, but also some issues.
Shafts made from composite tend to be more expensive than aluminum because the technology is still relatively new. The future will tell whether composite arrows are the future or just a gimmick.
Arrow specs
In the first section, we already discussed some arrow specs. In this section, I discuss these specs in a lot more detail and explain why they are important.
Length of the arrow
Most experienced archers shorten their arrow to their draw length. Although it’s possible to shoot with a full-length arrow it comes with a few drawbacks:
- The extra weight of the arrow increases the arrow drop
- For recurve archers: you can’t use a clicker
For new archers, using a full-length arrow isn’t much of an issue. Since only more experienced archers start using the clicker and shoot at long distances, where arrow drop is an important issue.
The length of the arrow is an important metric because it determines the dynamic spine weight of the arrow and therefore the flight pattern. We will discuss dynamic spine weight later in this section.
Point weight
With the weight of the point, we mean the entire arrow including the insert and any other way added at the front of the arrow. Thus, not only the part that sticks out of the shaft.
Together with the length of the arrow, the draw weight of the bow, and the weight of your point, you choose a shaft for your arrow. Therefore, you should consider the weight of your point before you make a purchase.
Spine weight
The word spine weight refers to the amount of flex of the arrows. An arrow with a high spine weight is considered flexible, while an arrow with a low spine weight is considered stiff. Spine weight is quite a confusing topic since there are essentially two types of spine concepts you must understand. I will briefly discuss them both, but if you want more information, you might want to read the article I have listed below:
Spine weight, what it is and why it matters
Static spine weight
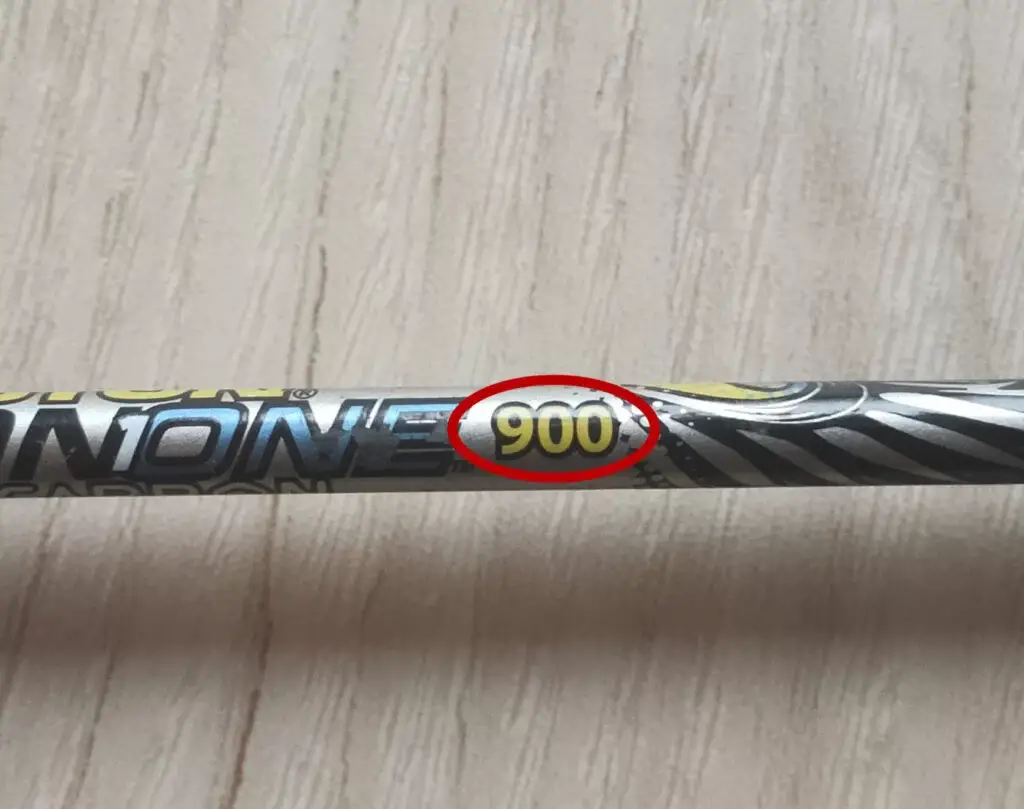
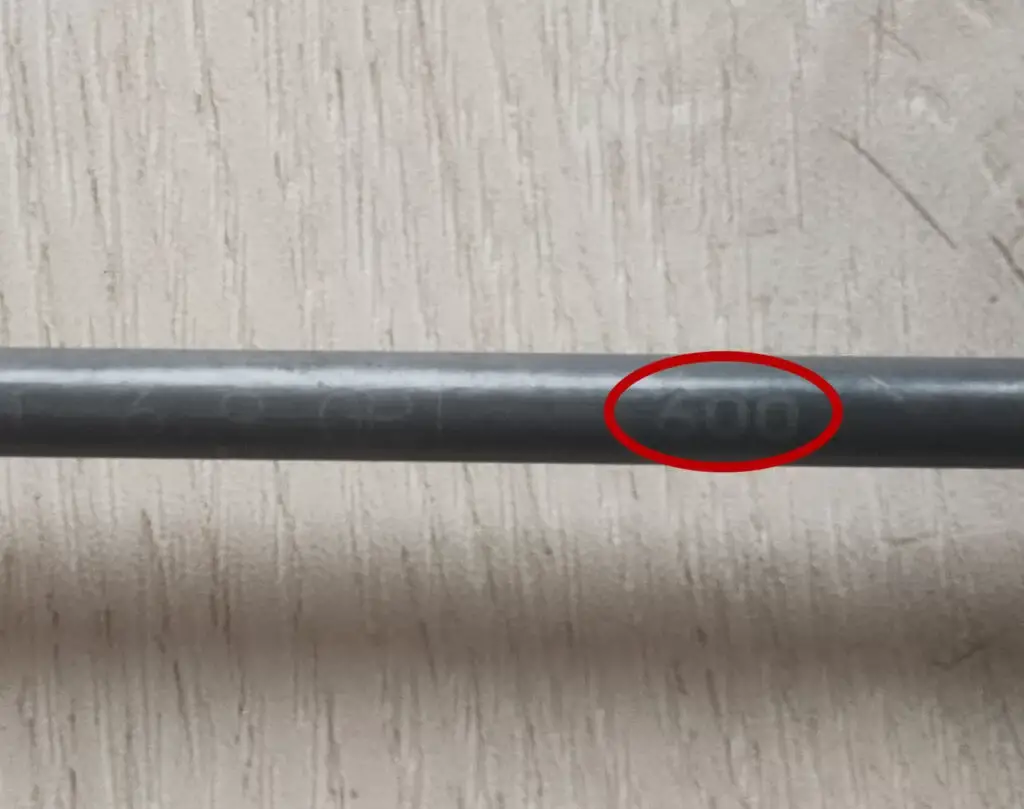
The first is what I call ‘’static spine weight’’, which is the value you read on the arrow. This value is tested by the manufacturer and most often indicated in a value between 0 and 1000.
This measurement doesn’t consider any other aspects of the arrow than material and the thickness of the shaft itself. We use this value to make sure that the arrow we choose is not too stiff nor too flexible. If the arrow is too flexible, it will not fly stable. If the arrow is to stiff you are likely to experience clearance issues.
Static spine weight describes how much the arrow bends one a standard length in laboratory conditions
Dynamic spine
The second metric is dynamic spine. This metric does consider other aspects of the arrow such as the length of the arrow, the weight of the point, the weight of the full arrow, and a lot more. Therefore, some people call this the ‘’actual spine’’, because this describes the amount of flex when the arrow is being shot.
Dynamic spine describes how much the arrow bends when the arrow is fired from a bow, considering all aspects that can influence the flex of the arrow.
When we use the arrow chart (which we discuss later) we are estimating the dynamic spine of the arrow. Essentially, the dynamic spine is the amount of flex we are actually after. But since this isn’t a standard measurement, we can’t use this to compare arrows.
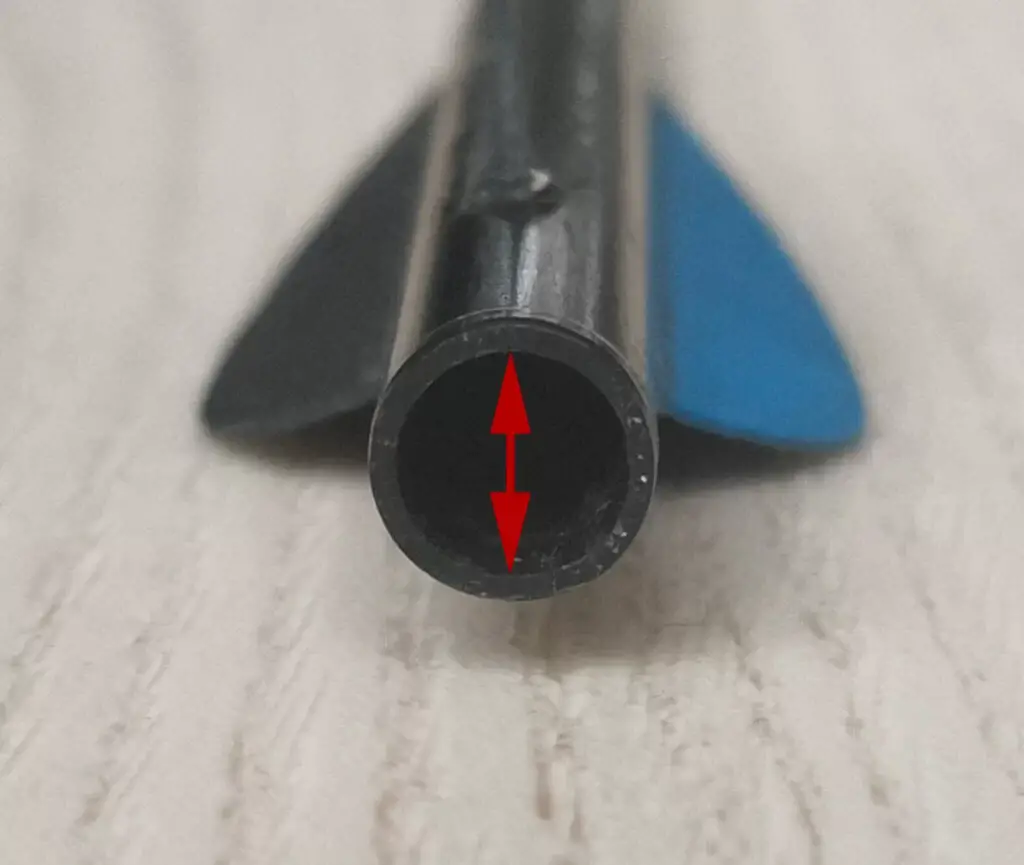
Inner diameter of the shaft
The inner diameter is primarily important for finding the right nocks and points for your arrows. Since archery manufacturers all have their own standards, it’s often the best idea to buy the points, shafts, and nocks from the same brand. It will require a lot of work to find a matching set of nocks, points, and shafts from different brands.
Nock size
When you use a nock that is too loose the arrow will fall of the string. When you use a nock that is too tight your accuracy will suffer, or the nock might get stuck on the string. Therefore, it’s important to get the throat of the nock in the correct size
Luckily, most target archers use very similar string thicknesses and, therefore, use similar nocks. But especially hunting and traditional bows often use thicker strings. Therefore, it’s always important to check whether the string fits your nocks and vice versa.
If you want to know more about finding the right nocks, read the article below:
Premade versus compiling your arrows
When you buy your arrows, you have two options: you can buy premade arrows or compile your own. Luckily, a lot of webshops offer assistance with compiling your arrows and sometimes even assemble them for you.
The major advantage of compiling your arrows is that you can buy the exact spine weight you need. When you buy premade arrows, you have to stick with the options they offer you.
If you decide to buy premade arrows, make sure that you check whether the spine of the arrow roughly meets the spine you need for your bow. For new archers, it might not be a bad idea to choose premade arrows if they are a decent fit with your bow.
Experienced archers should compile their arrows. It doesn’t matter if you buy them assembled or not, but most archers do this themselves. The big advantage of assembling your arrows is that you can also repair them when needed. Therefore, it tends to be cheaper in the long run, to assemble your own arrows.
Compiling your arrow – step by step
If you want to compile your arrows, you must follow 5 steps to make sure that the arrow has the correct specifics for your bow. Go to the next section, if you want to buy premade arrows.
Step 1: measure the draw weight
To make sure that the arrow fits your bow, we need to measure the actual draw weight. I say actual draw weight because I don’t mean the draw weight which is printed on the limbs or advertised by the bow. You need to test the peak draw weight of your bow. You can use a luggage scale as an alternative to a bow scale.
For a recurve and traditional archers: draw your bow back until you are at your default anchoring position. And measure at this point.

For compound archers: draw the bow and find the point where the draw is at it heaviest. Do this multiple times, to make sure that you measured the heaviest point. Your highest draw weight is the draw weight we use.
Read the article below, for more information on how to measure your draw weight:
How to measure your draw weight
When you are just getting started, you might not have a bow yet to measure the draw weight. Luckily, you can also predict your actual draw weight, as I discuss in this article.
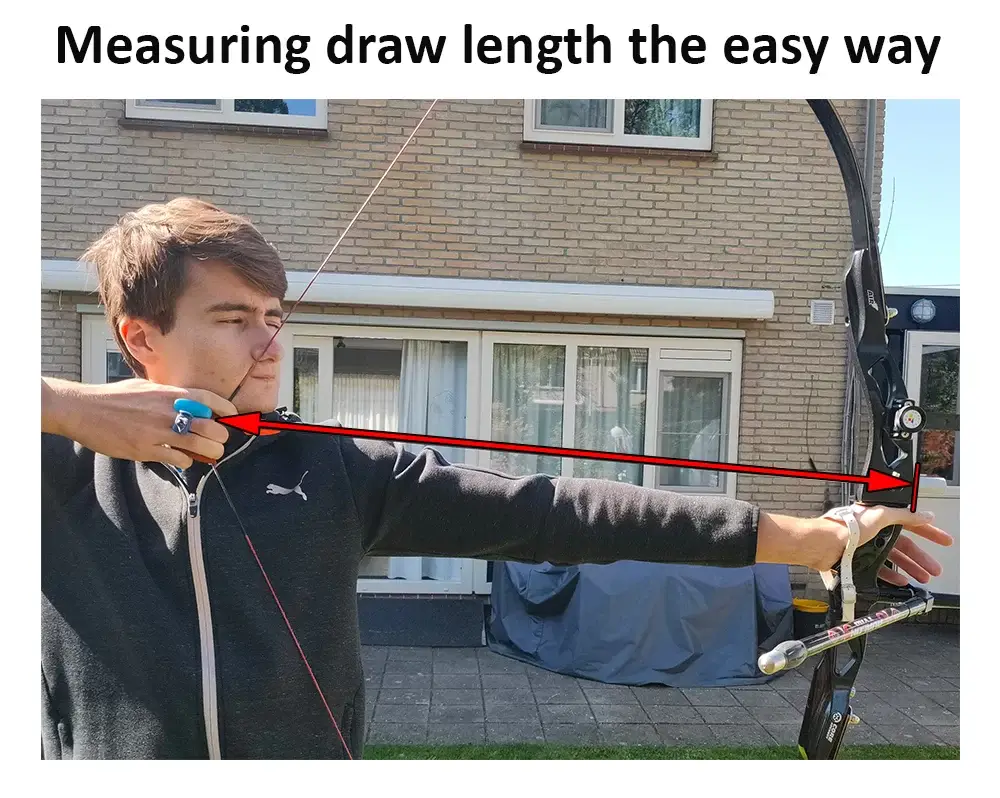
Step 2: measure the draw length
In the next step, you will have to measure your draw length. Draw length is the distance between the string and the deepest point of the grip. Since this is difficult to measure, you can simply measure from the string to the outer edge of the riser.
For more information on how to measure draw length, read the article below:
How to measure your draw length
Again, this might seem impossible to measure this without a bow. Although that is true, some methods can measure your draw length quite accurately without needing a bow. I will discuss three such methods in this article.
Step 3: determine the length of the arrow
Alright, that was the hardest part, since we have measured the draw length and draw weight, we can start determining what specs our arrow should have. We will start with the length of the arrow. You can determine the minimum length of your arrow by using the graph below.
| Archer’s profile | Arrow length |
| Experienced | Draw length = arrow length |
| Some experience archery experience | Draw length + 1 inch = arrow length |
| No archery experience | Draw length + 2 or 3 inches = arrow length |
Almost all new archers increase their draw length in the first year. Most new archers start shooting with a bent back, which shortens the draw length. Once their form improves, they increase their draw length by 1 or 2 inches. Therefore, you should make sure that you have some additional arrow length which allows you to draw your bow further.
There is nothing wrong to shoot with full-length arrow shafts as we discussed earlier. Especially if you are uncertain about your technique, it might be a good idea to keep the shafts at full length. You must consider this in the next step because it changes your ideal spine weight.
Step 4: determine the point weight
For the arrow chart, we need one final piece of information, the weight of your point. Use the table below to find the point, that fits your draw weight best. Using a heavier point than recommended isn’t an issue, it will only slightly slow down your arrow.
Using a lighter point can cause issues with your bow limbs. The bow limbs need a certain amount of resistance from the arrows. Otherwise, it would be like you are dry firing your bow, which can cause damage to your bow in the long run.
| Archers profile | Draw weight | Point weight |
| Compound or recurve archer | 20 LBS or less | 75 grains or less |
| Compound or recurve archer | 20 – 30 LBS | 75-100 grains |
| Compound or recurve archer | 30 – 50 LBS | 100 – 125 grains |
| Compound or recurve archer | 50 LBS or more | 125 – 150 grains |
| Traditional archer | 25 LBS or less | 75 – 100 grains |
| Traditional archer | 25 – 50 LBS | 100 – 150 grains |
| Traditional archer | 50 – 70 LBS | 150 – 200 grains |
| Traditional archer | 70 LBS or more | 200 grains |
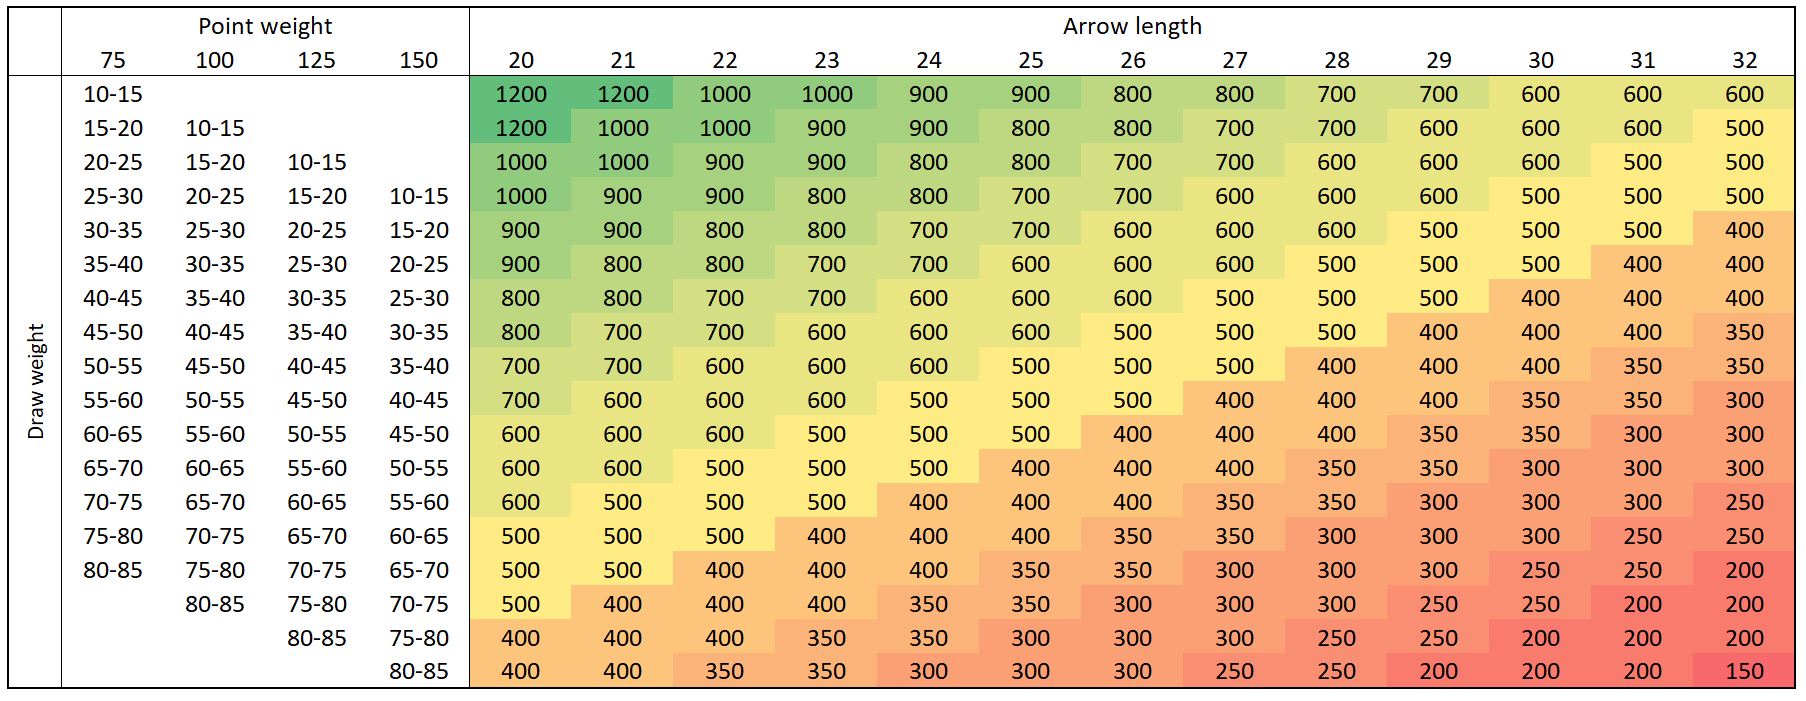
Step 5: find the ideal spine weight
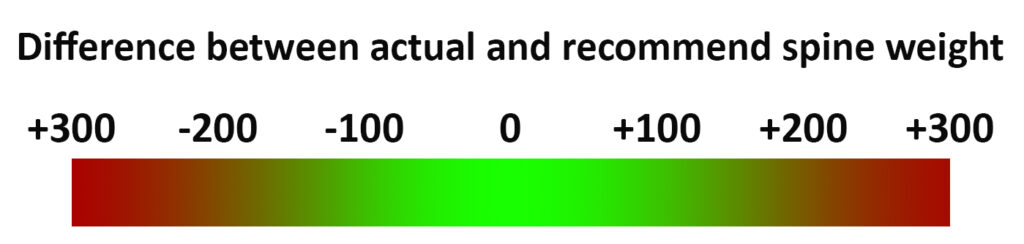
We now have all our information to find the ideal spine weight: arrow length, draw weight, and point weight. Simply look up your arrow length in the upper bar to find the right row. Then look up the draw weight in combination with the point weight to find the right line. Read the article for more information on how to find the right spine weight.
In general, it isn’t a problem if your arrow spine doesn’t match 100%, it’s more of a recommendation. If your spine weight is 100 more or less, it isn’t an issue in most cases. But 300 more or less than the recommend spine weight, can cause significant issues.
Tip: click on the charts to zoom
Compound
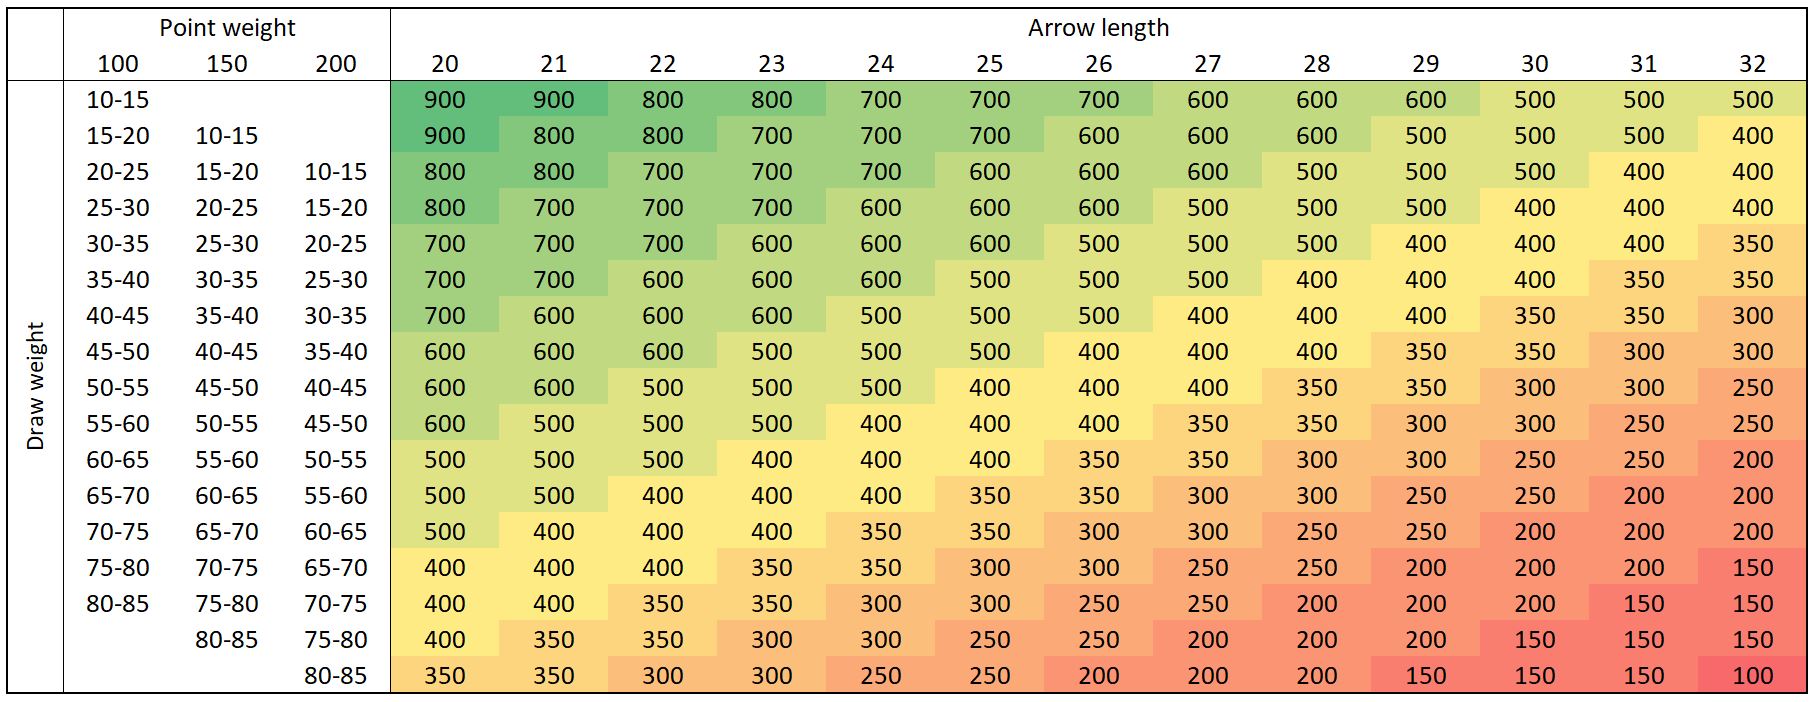
Recurve

Traditional
Step 6: choose your fletching and nock
The hard part is over now, we only must choose a nock and fletching. Don’t worry about fletching at all, just make sure that you buy fletching that matches your bow. If you shoot traditional use feathers, if you shoot recurve or compound use plastic vanes. The different vane sizes don’t influence your arrow all that much. It’s only important that you have fletching on your arrow since it stabilizes your shot.
Buying the right nocks might be a bit more difficult because the nock must fit both your arrow shaft as your bowstring. Most manufacturers or sellers have recommended sets of nocks that fit on their arrow shaft. Choosing one of these options will fix your first fitting issue.
To fix the second fitting issue, make sure that you buy nocks that are made for your shooting style. If you have a target archery string, you should buy a target archery nocks. It’s a good idea to contact the seller if you are worried that your nock doesn’t fit your string correctly. Because if your nock doesn’t fit your string it will either decrease your accuracy or not attach at all. For more information about nocks, read the article below:
How to choose the correct nock size and fitting
Step 7: order your arrow
You can now order all your parts for your arrow. Some sellers offer the option to assemble your arrow. If you are just getting started this is a pretty good idea since assembling an arrow requires some additional tools. We will discuss how to assemble an arrow and the tools you need in more detail, in this section.
Recommended arrow parts
Do you want to make assemble your arrows yourself but don’t want to spend hours to find the right parts? I got you covered, below I will discuss the arrow parts I would buy when making new arrows.
Shafts
I recommend the Accmos Carbon arrow shafts. These arrow shafts are one of the cheaper carbon shafts available on the market. That is mainly because these shafts are from a relatively unknown brand, but in my experience, that isn’t an issue. Carbon is very strong and relatively lightweight, so in my opinion, they are the best material for an arrow shaft.
These shafts are available in 300 till 1800 spine, so there should there is a huge range in stiffness. By default, the arrows are either 32 or 31 inches, but you can also order them to your draw length.

Points
For arrow points, I recommend these points from NMCPY. These points have a bullet head, which makes them easier to retrieve from the target. The points are available in 100, 120, 150, and 200 grain. You can also break off part of the insert to reduce the weight if needed.
These arrow points have an insert diameter of 4.2 mm and will therefore fit the previous recommend arrow shafts. You will need some hot-melt-glue to fit the arrows in your shafts.

Nocks
I have been using these generic 4.2 mm nocks for quite some years now and I have been very happy with them. In general, nocks are very simple pieces, and they don’t have to be expensive.
One thing I like about these nocks is that they are made of firm plastic. This means that the nock will deflect the arrow when it’s hit in the rear. When this happens, you only must replace the nock, instead of the entire arrow. This happened to me multiple times and saved me a lot of money!

Vanes
I like to run my arrows with these cheap generic vanes. Spending a lot of money on vanes doesn’t make a lot of sense in my opinion. They get easily damaged, and they don’t need to be high quality.
I choose these vanes because they are relatively low profile. Some vanes are quite large which can cause clearance issues and slows down the arrow. If you shoot with a traditional bow, you should pick some vanes made of feathers, like these.

How to choose a premade arrow
You might want to bypass the entire arrow selection process as discussed above. But these steps are important to choose the right arrow. If you choose a premade arrow, without looking at the specs you need, you won’t know whether it will even shoot right. If you just want to plink in your back yard it might work, but if you are taking the sport seriously you must follow the steps below.
Step 1: measure the draw weight
The first step is the same as the previous one. You first must measure your draw weight, because this significantly influences your spine weight. You don’t need to measure your draw length or determine your point weight, because you can’t configure your point or arrow length.
You have to make sure though that the arrow is long enough. Most arrows will be because they are often made from full-length shafts. But if you are unsure it’s better to check this by measuring your draw length and comparing it to your arrow. For more information on how to measure your draw length read:
How to measure your draw length
Step 2: use the spine chart to find ‘’the perfect spine’’
Use the arrow chart, from step five of the previous guide, to find the perfect spine. First look at the draw length of the arrow you want to buy. Most full-length arrows are 32 inches long, so in most cases, you have to look at the last row.
Next, find the weight of your point and use this information in conjunction with your draw weight to find the right line. You can now find what the perfect spine would be for this combination. Of course, we can’t configure the spine because the arrow is premade, but we need this info for the next step.
What if the point weight is unknown: ask the seller for the point weight if you can’t find the info. We need the point weight to follow these steps.
Step 3: compare the spine with your arrow
In step two we found what the perfect spine weight for your arrow would be. We can now compare this perfect spine weight to the actual spine weight of the arrow you would like to buy.
As mentioned earlier, in most cases if the spine is just off by 100 it isn’t a big deal. Therefore, anything 100 above or below the perfect spine is a good arrow. When it’s off by 200 you have to be more careful, it can still shoot fine, but it’s less ideal. I wouldn’t buy an arrow that is off by 300 or more.
Step 4: final checks
Before you buy the arrow make sure to check what type of shooter the arrow is intended for. If the arrow is meant for target archers, the nock will fit with any target bowstring (compound or recurve). But if you buy traditional arrows, they will not fit most target bows and vice versa. If you are concerned about the nock size, it’s a good idea to contact the seller for more information.
Recommended premade arrows
If you are looking for some good inexpensive arrows, I recommend the Pinals Archery Carbon arrows. The arrows are available with both turkey feathers as plastic vanes. I recommend plastic vanes except if you shoot with a traditional bow.
The arrow shafts are fitted with inserts that allow you to add different points. Therefore, these arrows are great for hunters who want to use broadheads. This also allows you to change the dynamic spine of these arrows. By default, the arrows come with field tips which are excellent for outdoor use. Read this article for more information about these different arrow points.

How to assemble an arrow
Assembling your own arrows has multiple benefits. The first benefit is that you can order your gear from any seller without having to worry about assembly. The second benefit is that you can easily repair your own arrows and that you don’t have to pay for assembling the arrow.
But you will need to invest in some gear before you can assemble your arrows. You will need the following:
Click on any of the links to see the gear I use.
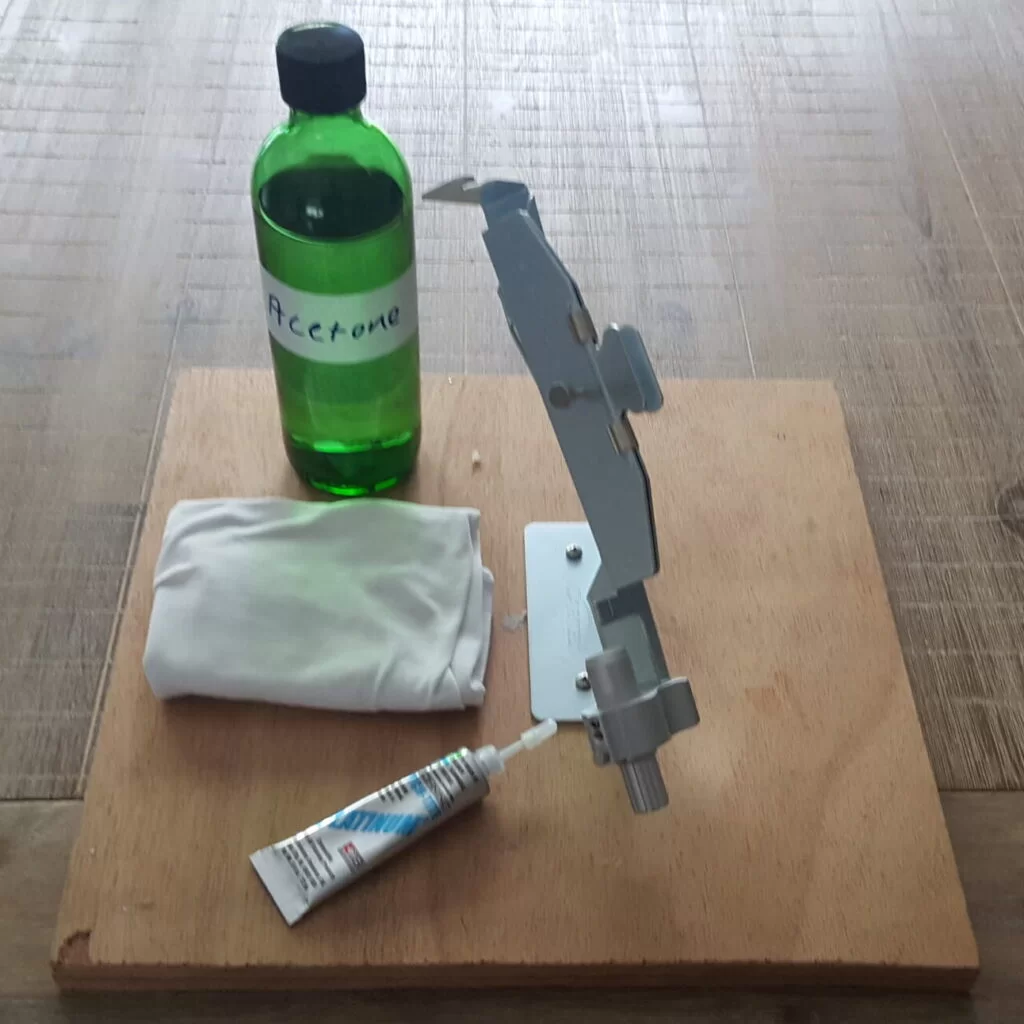
This will set will cost you about $25 to $40. In the long run, you will easily get your money out of it, because you can easily repair your arrows and don’t have to pay assembly fees. Especially repairing your arrows can save a lot of money. Nocks and vanes easily get damaged and you sometimes lose a point if you shoot an arrow in a tree.
In the video below you can see how an arrow is assembled. You can skip 3:15 till 3:38 because in that part he is attaching an arrow wrap and as we discussed earlier that isn’t necessary.
FAQ
I understand that you might still have some questions about how you choose the right arrows. Therefore, I will discuss some frequently asked ones below. If you have a question that I didn’t discuss, please let me know in the comment section down below.
Does the quality difference of arrows mater?
You might wonder whether there is a difference in the quality of different arrows. Although there probably is, I can’t say that you notice anything. If you have a high-quality arrow that gets shot in the rear, it will break like any other arrow. So, in most cases, I don’t think you have to worry about the durability of the materials.
In general, I wouldn’t choose pure aluminum arrows, because they bend a lot. I have seen this multiple times at my club and most have switched to carbon arrows. Aluminum arrows are lighter, but they make the sport a lot more expensive.
Does it matter if my arrow doesn’t match the chart?
No, it isn’t a big deal if it’s in acceptable margins. The spine recommendation chart is just a that – a recommendation. Therefore, in some cases, a difference of 300 works fine. But the closer you are to the ideal spine weight the better.
In some cases, the spine chart doesn’t even recommend the ideal spine weight. Because there are so many things that influence the flex of the arrow, that are not included in the spine chart. Therefore, it’s more a rough estimation. Professional archers often use high-speed cameras or try different arrows to find the ideal spine. But for most archers, the spine chart works well enough.
If you want to know more about spine weight, I would highly recommend reading the article below:
Spine weight: what it is and why it matters
Should I start with cheap or expensive arrows?
I have shot with both cheap and expensive arrows and I don’t think it matters too much. In most cases, cheap arrows tend to have low spine weight. Additionally, some cheap arrows don’t even list their spine or point weights.
I always buy cheap arrows from arrow brands such as Easton. But there are some great cheaper alternatives out there. $10 might seem a lot of money to you, but the shaft of the arrows can last you a decade if you don’t lose them. The things that often break on arrows are the points, vanes, and nocks.
Does the shape of the point matter?
The shape of the point slightly changes the aerodynamics of the arrow. But I wouldn’t worry too much about it. Some points have some other advantages. For example, most traditional archers use special points that make it easier to get out of a tree. But most target archers use a simple bullet-shaped point. If you want to know more about point shapes, this article is worth a read.
More buyer’s guides
Choosing the right archery gear is very important, therefore I have written a lot of buyer’s guides on all kinds of archery equipment. Learn more by clicking on any of the articles below.
Bows
Bow parts
Archery equipment
Final words
To finish this article, I want to mention that you shouldn’t be afraid to buy the wrong arrows. We will all have a bad buy on our archery journey. Sadly, it’s inevitable and a learning process. I have had many things that I thought were a great addition to my bow but turned out to not work at all. We only know when something works when we try it. If you have followed this guide, you are already doing better than 99% of new archers.
If you have any questions or comments, please let me know in the comments. I will send you an email once I replied to your comment. I would love to help you with your archery journey!

Tim van Rooijen
For as long as I can remember, I have always been fascinated by archery. First due to its historic significance but later because I like being outdoors. With this blog, I share my knowledge about Archery and how you can improve your shot. More about author…