The plunger, also known as button, is a device that many archers forget to buy. Although some cheap plastic arrow rests have a build in button, most archers prefer to use a ‘’proper’’ plunger. This device allows you to configure the archer’s paradox and minimize interference. Build in buttons are not customizable, which is quite a big deal. Therefore all serious recurve archers use a separate plunger on their bow. In a hurry and just looking for some quick tips? I’ve got you covered:
There are a lot of different plungers available, but they all tend to have a similar design. Some plungers are adjusted with a screw and the plunger cap, while others are only adjusted with the plunger cap. Both allow you to fine-tune the tension of the button; therefore both options will do the job just fine.
If you are seriously looking for a button, I would highly recommend reading the remainder of this article. I will first discuss the important parts of the button. Followed by the differences between cheap and expensive buttons and what you should consider. I will also answer some frequently asked questions and give some tips.
The anatomy of the plunger
Both cheap and expensive plungers look quite similar. Over the years manufacturers have settled on one design that gives you the most adjustability and is the easiest to manufacture. Therefore, the components I discuss below are present in any modern plunger.
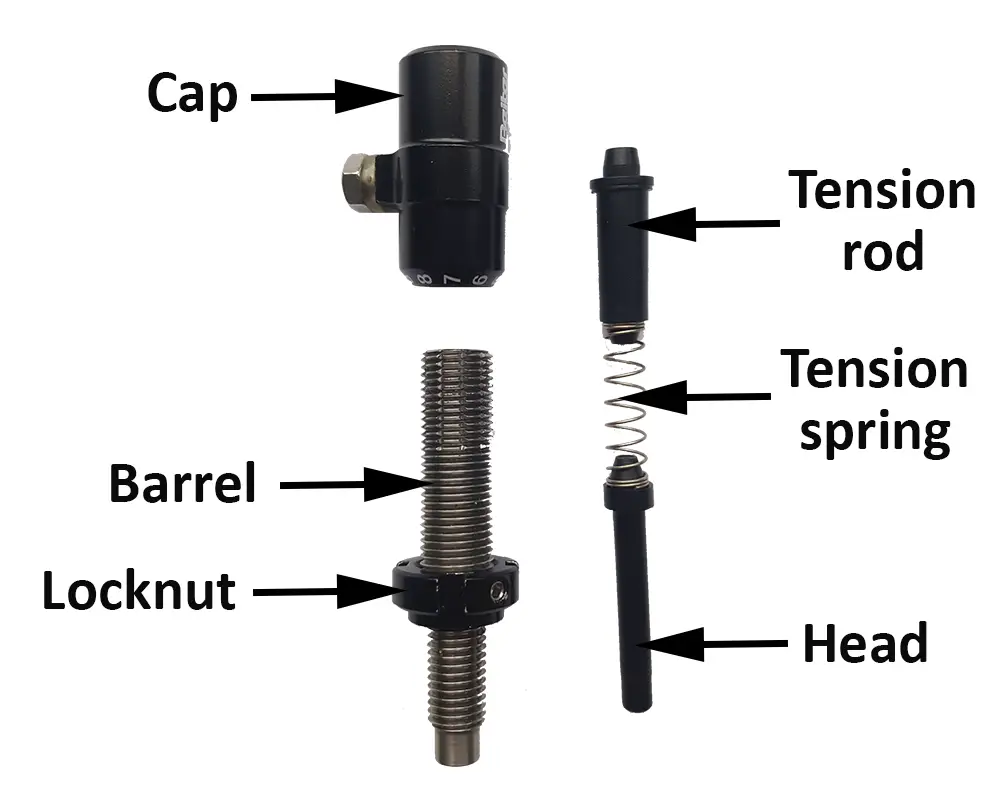
Barrel
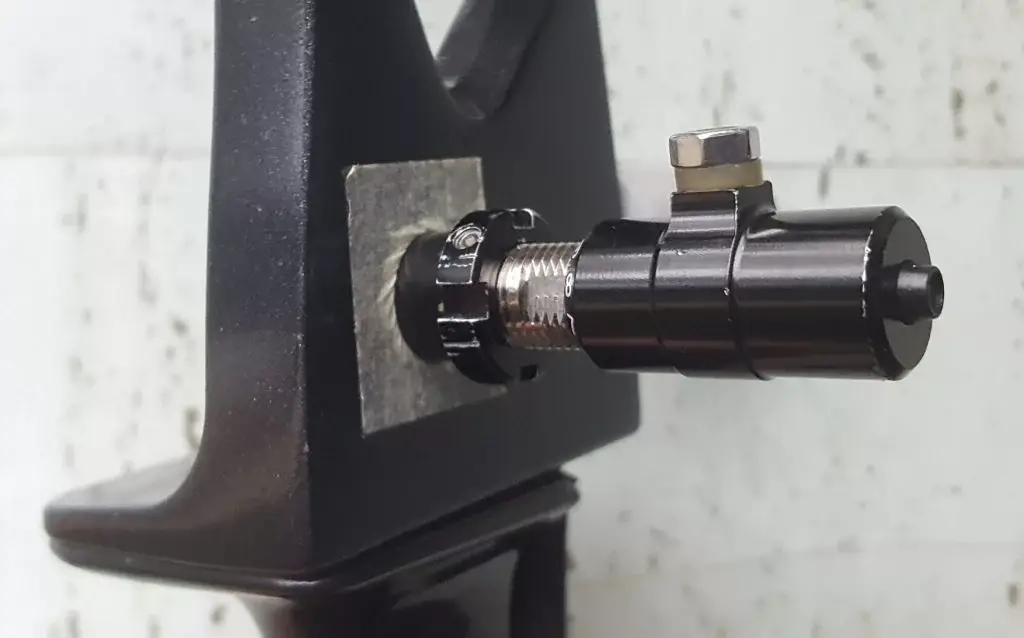
The plunger barrel is the biggest part of the plunger that holds the plunger head in place and retains the plunger spring. The outside of the barrel is threaded, allowing you to attach it to the riser. If you have two threaded holes, you use the one that is closest to you when you are shooting. The second hole in the riser is for a screw-on arrow rest. All manufacturers use the same threading for plungers; therefore you don’t have to worry about compatibility. Even very old plungers will work fine on any riser you buy.
Head
The plunger head is the very tip of the plunger that sticks through the riser when you attach it to your bow. Only this part contacts the arrow when properly installed. To prevent scratching, the plunger head is made out of soft materials, like plastics. Therefore, plunger heads sometimes get damaged, that’s why some manufacturers include replacements.
Spring
The plunger spring is not visible when you haven’t disassembled the plunger. The spring is inside the plunger barrel and provides resistance to the plunger head. If you push the plunger head, you can feel the resistance of the plunger spring. Some manufacturers include replacement springs, since springs can get damaged after long use. It’s also not uncommon to find different spring strengths included, this gives you some additional flexibility.
Tension screw/rod
This device is housed in the plunger barrel and cap. The purpose of this screw is to apply and regulate the pressure on the other side of the spring. Therefore the plunger screw allows you to configure the amount of pretension on the spring. When the tension screw is completely screwed inward, the spring will be under a lot of pretension. This in turn makes it harder to push the plunger tip inwards, which is important when you shoot a high draw weight.
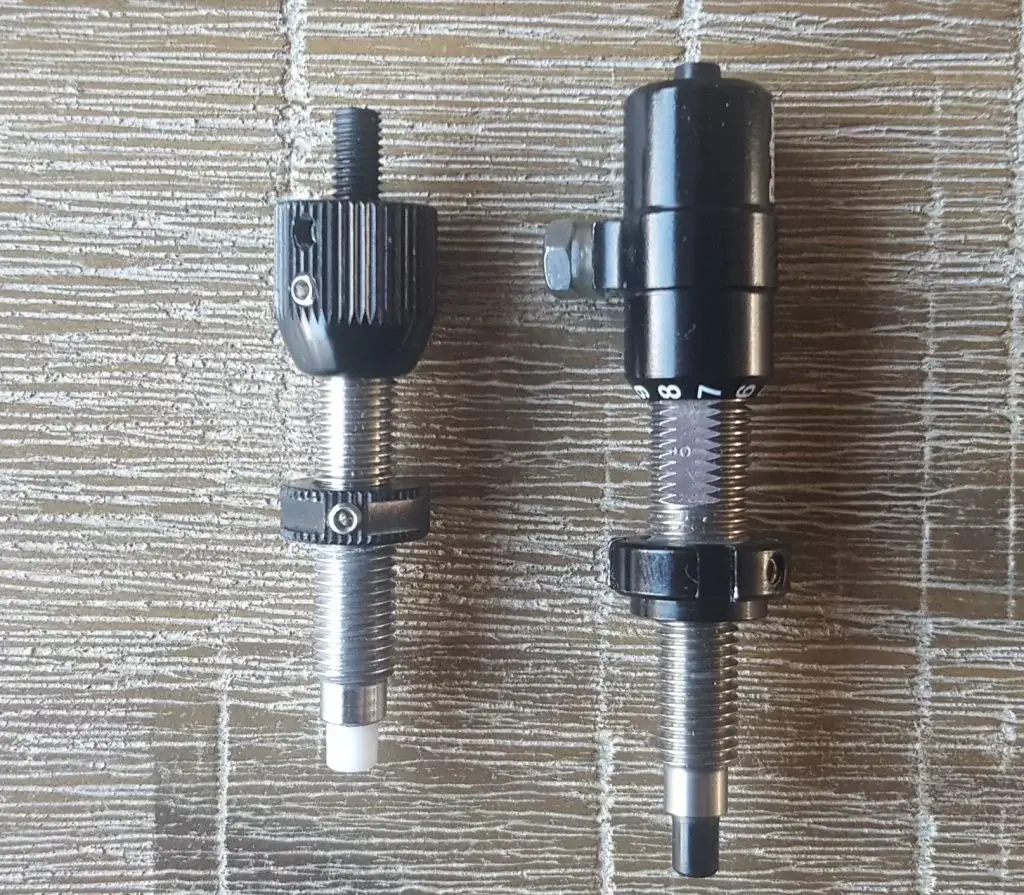
Some more advanced plungers don’t have a tension screw, but a device that more closely resembles a rod. This rod has no threading and thus doesn’t allow you to change the tension. The idea behind this system is that you can only change the tension with the plunger cap. These plungers often have a larger plunger cap to allow you to do so. In the next section we will discuss the differences between these two systems in more detail.
Cap
The plunger cap has two major tasks. The first task is to retain the entire assembly of the plunger head, spring and tension screw/rod within the plunger barrel. If you completely unscrew the plunger cap you can access and change these parts.
The second task is to regulate the pressure of the tensioning screw/rod on the spring. Both plungers with a tensioning rod as plungers with a tensioning screw both allow you to change the tension with the plunger cap. Most plungers with a tension screw, however, have a larger head since all the tuning is only done by twisting the cap.
Plungers with a tension screw have two locking hex screws on the side. The hex screw closest to the tip of the cap is to lock the tensioning screw. The other hex screw is to lock the plunger head to the plunger barrel. If these plungers wouldn’t have these screws, the cap and tension screw would loosen due to the vibration of the bow. Plungers with a tensioning rod don’t have these hex screws. Since the rod isn’t adjustable you don’t need to lock it down.

Ratcheting ball system
If you look at a plunger with a tensioning rod, you will see that there is a rather large screw sticking out. You might think that this is the locking screw for the plunger cap, you would be mistaken. This screw holds the ratcheting ball system. When you unscrew the device you will see that at the very end of the screw, there is a small ball. If you push really hard on the ball, it will go inwards a few millimeters.
This system provides resistance when you turn the plunger head. There are small groves in the end of the plunger barrel where this device interacts with. This means that you never have to lock the plunger head and that you can change the plunger pressure on the fly.
Locknut
The last part of the plunger I am going to discuss is the locknut. This is the ring that is screwed half way on the barrel of the plunger. When you screw on the plunger you tighten the plunger until it gets caught by the locknut. Therefore, the locknut keeps the plunger in place and determines how much of the plunger head is sticking out.
Locknuts from old plungers are sometimes literal nuts, which means that you can use a wrench to adjust it. All modern plungers have at least one hex screw in the side of the locknut. This locks the locknut in place, making sure that you don’t lose the tuning of the plunger. This was a major issue with old plungers, which often didn’t have such a locknut.
If your bow vibrates a lot the hex screw might come loose. Therefore some advanced plungers have two locking hex screws, which make it more secure.
The difference between a cheap and expensive plunger
When you are searching a plunger, you will find that there are huge price differences. Cheap plungers are available below $10 while there are also expensive options which cost more than $100. So you might wonder whether it’s really necessary to buy an expensive plunger, or if you can also opt for the cheaper option.
Materials
The biggest difference I noticed between cheap and expensive plungers are the materials and the build quality. Expensive plungers are often made out of hard metals and are very durable. Cheaper plungers, on the other hand, are often made out of cheaper alloys. Therefore the plunger is less durable but also a bit lighter. In general, a plunger doesn’t have to be very strong, since it won’t suffer much abuse.
The only annoying thing I experienced with cheap plungers is that the locking screw in the lock nut tends to come loose once in a while. This happens because the weaker metal doesn’t retain the locking screw that well, which comes loose due to vibration of the bow. When this happens you have to completely tune the locknut again, which can be quite frustrating.
Micro adjustments
Most expensive plungers use a tension rod instead of a tension screw. In the previous section we already discussed what the mechanical difference is, but there is also an important benefit to both systems.
A tension rod makes the entire tuning process a lot easier. Since you only have to turn the plunger cap, the process is very straight forward. If you want more tension you turn the plunger cap to the right, if you want less you turn it to the left. Although this works the same for plungers with a tension screw, you can’t do all the tuning with the plunger cap. Since the plunger cap is smaller, you can only make smaller adjustments with the cap. Therefore you should do major adjustments with the tension screw and only use the plunger cap for minor adjustments.
Another advantage of plunger with a tension rod is the ratcheting ball system. Because of this system, you don’t have to loosen the screw of the plunger cap. Therefore it is really easy to change the plunger tension on the fly.
You might wonder, why don’t all plunger manufacturers switch to the tension rod design? The main reason is cost saving. Making the plunger head larger will increase the amount of materials needed. The ball ratchet system is also quite expensive to make, since this involves micromachining.
Multiple locking screws in the locknut
In the previous section, I discussed how annoying it can be when the locknut comes loose. Since this is a common frustration among archers, some manufacturers install two locking screws in the locknut. The two plungers I have with two locking screws never came loose, so this really helps.
The tightening tool
Another common annoyance among archers is when the plunger comes loose from the riser. Since the plunger is screwed into the plunger bushing, it can come loose due to vibration. Therefore some manufacturers include a special wrench that you can use to tighten the plunger to the riser. This will prevent the plunger from coming loose.
Another reason why most expensive plungers include a tool is because you can’t use the plunger cap when tightening the plunger. This makes it more difficult to tighten the plunger by hand, since you can only grip the locknut. Plungers without the ratcheting ball system, have a tightening screw. Therefore you can use the plunger cap to screw the plunger in place.

The verdict
Let’s consider all these disadvantages and advantages. In general I don’t believe buying a cheap plunger is a bad idea. Although the materials and build quality tends to be less impressive, your plunger doesn’t suffer much abuse. The micro adjustments are a nice feature, but since you only tune the plunger when you change the arrows, limbs or riser; it might not be worth the investment for you.
If I would buy a new plunger, I would find it most important that the locknut doesn’t come loose too often. Therefore, I would opt for a plunger with two locking screws. All other features are nice, but not necessarily something I would pay big money for. I don’t believe the entire plunger coming loose is that much of an issue either. It doesn’t happen to me that often and there are some easy fixes which are discussed in the next section.
Whenever an archer asks which plunger I recommend, I always mention the NIKA Archery plunger. This plunger is inspired by the high-end product from Beiter. Just like the plunger from Beiter this product has the following benefits:
- You can adjust the plunger tension without tools: due to the ratched ball system which we discussed earlier.
- The tightening ring is held in place with two screws: most cheaper plungers have only one hex screw on the tightening ring. This can cause the tightening ring to come loose, which means that you have to retune the plunger.
- Tightening tools: with this plunger, you get two tightening tools to attach the plunger securely to your riser.
Since this plunger is only a fraction of the price compared to the Beiter plunger, it is a great deal.

Q&A
Probably I have already answered a lot of questions regarding plungers in the previous sections. In this section I wanted to focus on a few additional questions I often hear regarding plungers.
Do I really need a plunger?
In this article, I assumed that you wanted to buy a plunger. But you might wonder whether you really need one. The good news is that you don’t necessarily need one, in certain conditions. But there are some caveats to this answer.
If you have a plastic arrowrest, you might notice that there is a little tab above the arrow shelf. This little tab is a built-in plunger. Although this piece is not adjustable it functions in a similar fashion to the plunger. If you have such an arrow rest, you don’t necessarily need a button. When you are just getting started, this might be sufficient, but most archers want to adjust the plunger when their groups improve.
Some archers might clearance issues with the build in plunger. Since the plunger isn’t adjustable it might be too stiff or too flexible. This may mess up the flight of the arrow, which can cause major issues. If you experience issues with clearance or the arrow flight, you should try using a dedicated plunger instead.
What can I do if my plunger is to stiff?
If you notice that your arrows are going far to the left you might have issues with the stiffness of the plunger (for right handed archers). For left-handed archers, a bow with a too stiff plunger would shoot to the right. The solution for most archers is easy; just reduce the plunger pressure until the issue is resolved.
Some archers, however, will experience that the plunger spring is still too stiff even at the lowest setting. This is especially the case for archers that shoot with long arrows and a low draw weight. Buying another plunger wouldn’t resolve the issue either, since most plungers have very similar springs. A quick and easy fix, however, is to use a spring from an old pen and use this as the plunger spring.
To access the spring, you have to untwist the plunger cap. You might have to try a few different pens to find the right spring. If the spring doesn’t fit you can just cut off a piece, with some pliers. I used to do this for my plungers when I was just getting started with archery. I have long arms and I wasn’t all that strong, so I had major issues with the springs of standard plungers.
The reverse is rarely the case; most plungers are made to work on bows between 20 to 40 lbs. But if you shoot a heavy draw weight with short arrows, you might need a stronger spring. You can of course swap out the spring, but you can’t use pen springs, since they tend to be quite weak.
The locknut keeps coming loose, what should I do?
When the locknut comes loose the most common issue is the locking screw on the side of the locknut. Due to vibrations, low quality locknuts tend to have this issue. The more your bow vibrates, the bigger this issue gets. So there are a few solutions:
- Reduce the amount of vibration of the bow (for example with a dampener)
- Replace the locknut or locking screw
- Buy a more high quality plunger
A plunger with two locking screws, don’t tend to have this issue. So you might want to consider switching to such a plunger.
Another common issue is that the locknut comes loose when you untwist the plunger to store the bow. If this happens, the locking screws don’t necessarily have to be the culprit. This happens when twist the plunger to hard into the plunger bushing. Due to friction the locknut stays in the same place, while the remainder of the plunger assembly gets loose. If you have this issue, you might have to tighten the plunger a little bit less. But then, of course, your plunger might come loose during the shot. Sometimes an O ring can help to reduce the friction, while still being able to tighten the plunger.
The plunger keeps coming loose, what should I do?
If the entire plunger assembly keeps coming loose, while the locknut stays in place, your locking screws aren’t the issue. Due to vibration almost everything on your bow can come loose once in a while. But if this happens very frequently there are some simple things that you can try to resolve the issue.
The first is to tighten the plunger a bit more. You shouldn’t, however, do this too forcefully. Otherwise you might experience the issues discussed in the previous question. Another thing you can try is to remove vibration, by using a stabilizer with a dampener, or only a dampener. Dampening your vibration is better for all your gear, so if you experience this issue, it might be worth a try.
The easiest solution, however, is to use an O ring between the plunger and the riser. You can also stick a piece of tape over the plunger bushing. You have to first cut a small hole in the tape for the button, but then it basically functions as a makeshift O ring. I have did this with a bow that has major vibrations issues and it works like a charm.
More buyer’s guides
Choosing the right archery gear is very important, therefore I have written a lot of buyer’s guides on all kind of archery equipment. Learn more by clicking on any of the articles below.
Bows
Bow parts
Archery equipment
Final words
I hope this article was helpful for you to decide what plunger you want to buy. In general I don’t think you should worry too much about it. I have a bunch of plungers and I wouldn’t say that there is a huge difference between them. You don’t often manipulate the plunger so the micro adjustments aren’t a big deal to me. For example, I haven’t touched the settings of my plunger for at least a year.
Most issues I had with the plungers I bought were easily fixable, with the techniques I told in the previous section. So you can even make it work with the cheapest plunger available. It might involve a bit more frustration and DIY, however.
If you have any questions or comments, please leave them down below. I will respond as soon as possible.

Tim van Rooijen
For as long as I can remember, I have always been fascinated by archery. First due to its historic significance but later because I like being outdoors. With this blog, I share my knowledge about Archery and how you can improve your shot. More about author…