The sight is one of the most important components of a modern recurve bow. Without a sight you will have to aim either with the arrow or instinctively. Both options are quite difficult to learn which makes shooting really accurate very difficult. A modern sight has many features that allow you to aim like you are shooting a crossbow or firearm. This makes archery a lot easier for starting archers and allows you to shoot very accurately.
A sight is quite a complicated product. Therefore, choosing a new sight is both for new as experienced archers quite difficult. In this article, I will therefore explain all the important features of a sight and give recommendations. Don’t like reading? I got you covered just watch the video below:
In the remainder of this article, I will discuss how to buy a sight in much more detail. So, keep reading for more information. Also, don’t forget to check out the recommended sights, at the end of this article.
The anatomy of a sight
The sight is one of the most complex devices on your bow. Modern high quality sights allow you to change the sight distance, orientation, elevation, windage, aperture and pin. This allows you to completely customize the sight to your liking, but this also makes it a very complex device. In this section I will discuss all these different parts in more detail, starting from the right to the left.
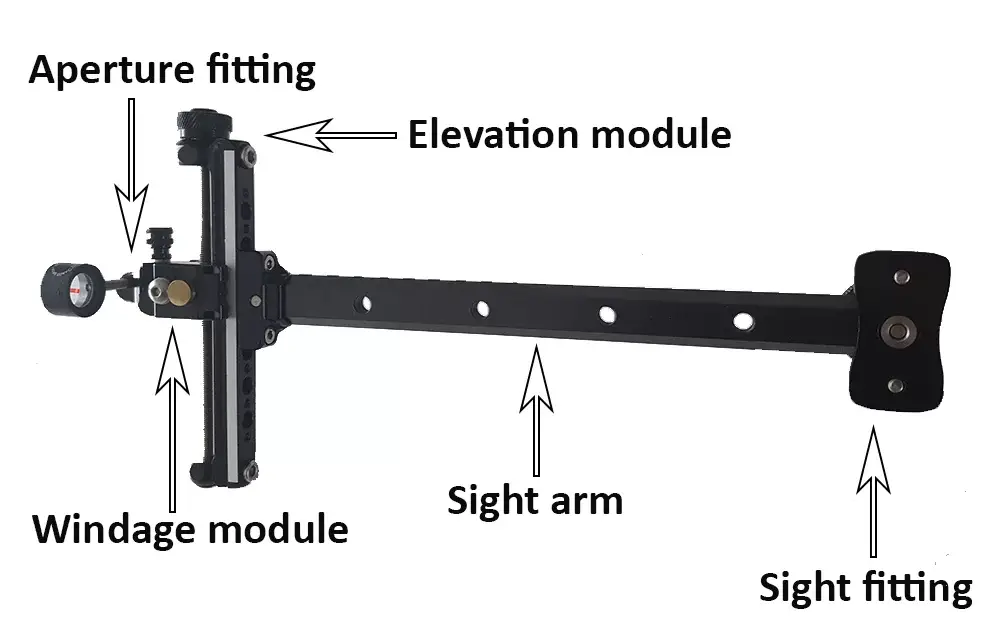
Sight fitting
One of the most straight forward parts of the sight is the sight fitting. This block connects the sight to the riser by means of two screws. All recurve manufacturers have adopted this standard, which allow you to connect your sight to any modern bow. Once the sight fitting is screwed on the bow you easily attach and remove the sight with a large screw knob. Therefore you don’t have to tighten/loosen the screws with tools to assemble/disassemble the bow for storage or transport.
Sight arm
The largest part of a sight is the sight arm. This arm extends the sight forward to keep it farther away from your bow. Most sight arms allow you to change how far the sight is extended forward. With some sights you have multiple pre-drilled holes and others have a sliding rail, to allow you to do so.
Extending the sight farther forward will make your sight aperture smaller. It also makes the adjustments you make to your less extreme. Some archers like to keep the sight far away from the bow, because this makes you able to make finer adjustment. Other archers like to keep it closer to the bow since this allows you to shoot at longer distances.
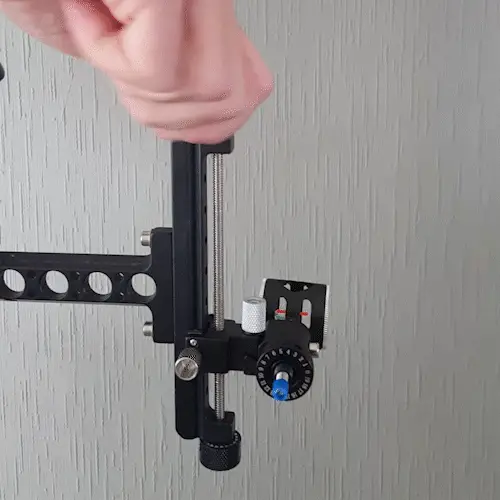
The sight arm is attached to the elevation module with two screws. You can remove the two screws to either move the elevation module up or down via pre-drilled holes. This may come in handy if you want to shoot at long distances, if your elevation module is too high. The two screws also allow you to change the left and right orientation of the elevation module. This is to make sure that the sight is skewed to either the right or left, if you move your sight elevation up or down.
Elevation module
The elevation module allows you to change the elevation of the sight. This allows you to shoot at different distances to account for arrow drop. On the sight of the elevation module numbers are printed to make you able to write down the different configurations. Since most archers often switch between different distances, the elevation module is often used.
Advanced sights often have a large exposed thread; this thread allows you to make micro adjustments. The dial on either the bottom or top of the sight allow you to change the elevation very slowly. To make major changes, most sights have a button on the side of the windage module to make major adjustments. By pressing the button, you are able to slide the windage module up or down by hand.
Windage module
The windage module is connected to elevation module and can often not be removed. This part allows you to adjust the left and right orientation, for wind on the field or to fine tune your sight. The dial on the sight just like the elevation module allows you to make micro-adjustments. Most windage modules also have markings on the top of the device to remember your usual settings.
Aperture fitting
Most high-tech sights have a separate aperture fitting which can easily be removed. The aperture is a very fragile part of the bow, and should therefore always be stored safely. Less high-tech options have the aperture directly connected to the windage module. Therefore you have to remove the entire module in order to safely store your aperture. Therefore you have to reconfigure the elevation of your sight every time you reassemble your bow.
Aperture
The aperture is the ring with the threading at the very tip of the sight. This is the part where you aim with. The treading on the aperture allows you to make larger adjustments to the right or left. You can also completely remove the aperture to switch is out for a different option.
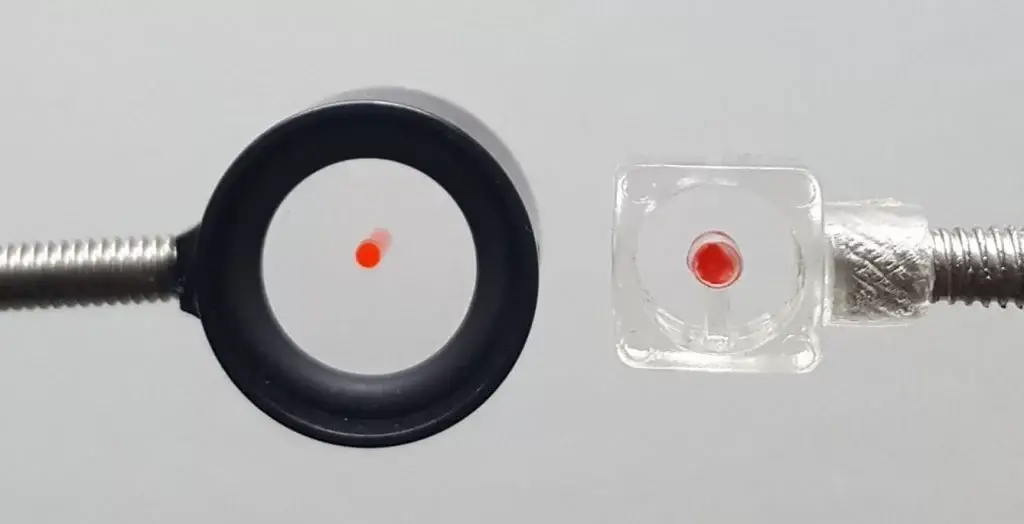
Apertures can either have glass or an open design. An aperture with an open design holds the sight pin with a small extension in the middle of the ring. A glass aperture has the advantage that it can hold the sight pin without interfering the sight within the ring. The ring size of differs between apertures, which is just a matter of preference.
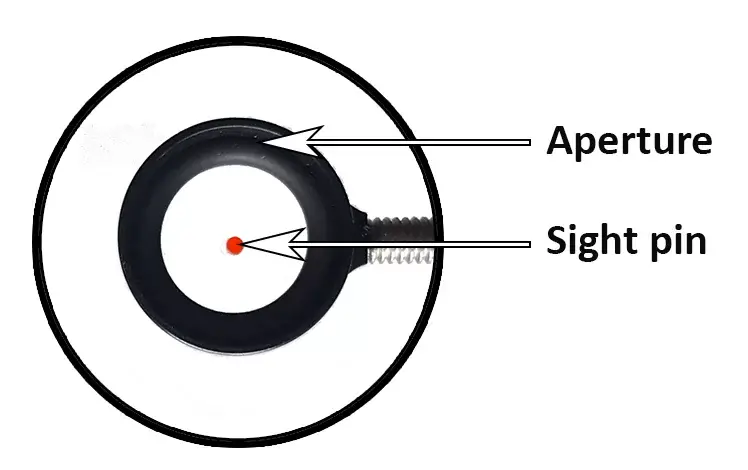
Sight pin
The smallest part of a sight is the sight pin. This small pin is the dot you aim at the middle of the target. Some apertures have a build in sight pins, but there are also a few options that allow you to change it. Some archers use a fiber optic wire as a sight pin. This helps make the sight pin more bright which is especially useful if you have bad eyesight.
The differences between a cheap and expensive sight
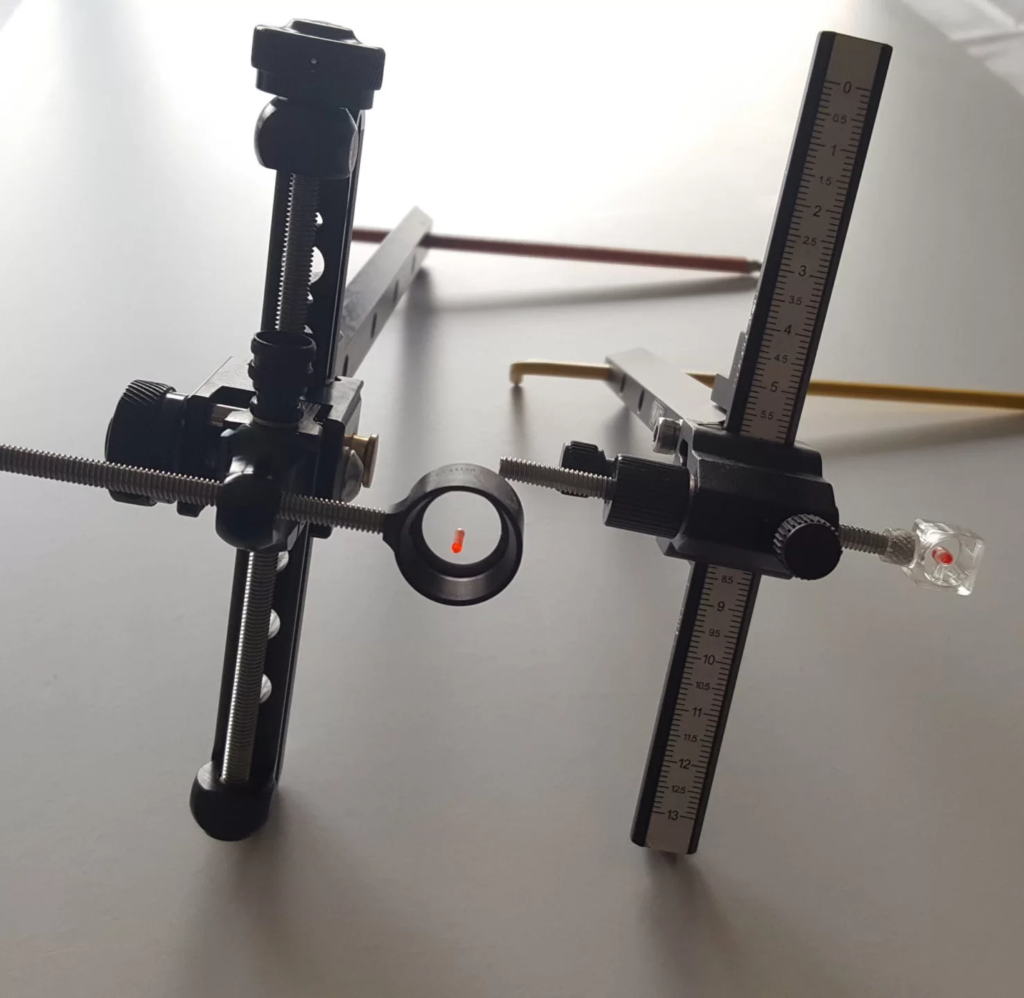
If you would lay a cheap beginners sight next to an expensive sight, the most differentiating factor would be the size. Not only the aperture and elevation module will be bigger, but almost the entire device will also be a tad bigger. The expensive sight has more features that make the sight heavier and larger. Also the sight arm will be longer, since this allows you to make finer adjustments. An expensive sight can easily cost around $200 while a cheap sight cost around $10.
So what does an expensive ‘’high tech’’ sight have more than a cheap sight. I already discussed a few in the previous section, but let’s discuss them one by one.
Longer sight arm
A longer sight arm gives you more flexibility. It enables you to extend the sight further away from the bow, which makes it easier to make small adjustments. The closer the sight is to the bow, the bigger the changes in the sight will be down range. For very accurate shooting archers, it’s therefore a big plus to have the sight further away from the bow. This will, however, also make the bow a bit more top heavy.
Micro adjustments
Both the elevation module and the windage module of most ‘’high tech’’ sights have micro adjustment dials. This means that you can easily make small adjustments by turning either of the two dials. Most cheap sights have a micro adjustment option for the windage. This feature is cheap to integrate since the sight pin has threading. To also make the elevation micro adjustable, the manufacturers have to add additional thread along the elevation module. This makes the sight not only more expensive but also more complex and heavy
Quick removable aperture
If you mainly shoot at set distance, you will really like this feature. When you are assembling a cheap sight, you will have to check your elevation every time. Since the windage module is directly connected to the aperture, you cannot ‘’save’’ your elevation. A neat trick ‘’high tech’’ sights use is to make it a separate piece. Therefore you can simply remove the aperture fitting, without removing the entire windage module. When you place the fitting back on the sight, you will have the exact same elevation configuration.
Less distracting sight picture
Archers often talk about the sight picture, because it is arguably the most important aspect of the sight. If you have a fussy sight picture, aiming will be a lot more difficult. Cheap sights often have a small ring with a big sight pin. This can make it more difficult to aim, since more of your field of view is obstructed. Therefore the most noticeable difference when I upgraded was that I had a much clearer sight picture.
Luckily apertures tend to be cheaper than full sights, therefore you can always choose to replace your aperture if you experience issues.
Recommended sights
There are thousands of different sights available and all look quite similar while they are wildly differently priced. Therefore I will discuss a few options that I would recommend. I will also discuss the sight I currently have.
Beginner/starters sight
If you want a cheap and simple sight, I recommend the Soohupet Recurve sight. This sight is made of aluminum and is, therefore, more durable than cheaper plastic sights. It also has a decent aperture with a clear red sight pin, which makes for a clearer sight picture. This is a great starter sight, but if you want a bit more, I recommend considering one of the sights below.

Cheap target sight
If you want a sight that has a micro-adjustment system, the Soohupet recurve sight is worth considering. This sight can be micro adjusted in both the horizontal and vertical axis and has an all-aluminum construction. It is available in a lot of different colors, so you can choose one that fits your bow.

Aperture
Most sights will come with a plastic inexpensive aperture. Some archers like this style, but I prefer a floating sight pin. This means that the sight pin is held in place with glass. These sights obstruct less of your sight picture. Therefore, I recommend buying an aperture with a floating sight pin. If you are a recurve archer, recommend this aperture from Decut Archery.

Q&A
As I mentioned before, the sight is the most complex device on the bow. There are a lot of different doodads which can cause a lot of confusion. Therefore I will discuss the most common questions regarding sights
Does this sight also work for a left-handed bow, is this sight ambidextrous?
If you look at the picture of the sight, you might think that that you can’t use a right handed sight to a left-handed bow. If you would turn the sight, it would hang upside down, making reading the elevation numbers very awkward. All sights are fully ambidextrous however, with the exception of some specialty hunting sights.
All target sights enable you to remove the elevation module from the sight arm. I discussed earlier in the article that this makes you able to adjust the elevation bar. Another great feature of this design is that you can turn the entire elevation bar, up-side-down. Therefore the entire contraption will be rotated 180 degrees, making it suitable for left-handed archers. The only difference will be that the controls of the sight are not be mirrored.
This is not a fast process, so I wouldn’t switch between using it for a left-handed and right-handed archers. You will have to completely remove the aperture and elevation bar when switching the sight.
What is a good sight?
There are a lot of different opinions on what sight pin and aperture works best. But most archers agree that a sight should at least have the features I discussed in the section: ‘’The difference between a cheap and expensive sight’’. Those features make it much easier to fine tune your sight and improve your archery :).
Your choice for your aperture really depends on your own preference. Some archers use a smaller ring as an aiming guide and line this up with circles on the target. I only use the sight pin, so I want a big aperture, so this really depends on your shooting style. Most archers like a big aperture, but this doesn’t mean that this also works for you.
Should I start with an expensive sight?
In this blog, I often explain that you don’t need the most expensive gear to shoot well. If you are able, however, to invest a bit more, I would invest this in your sight. I bought a different sight the first year because I really noticed that the sight picture was distracting me. It was also the first piece of beginner gear I upgraded.
Although back invested back then in an expensive sight, you don’t really need to buy a sight over $100. There are a lot of options that offer the same features below $50. Although the tolerances and materials are less good, it works just as well in all other regards. So if you have the money, I would invest this in one of those options. This sight will last you a lot longer and improve your shots. In the next section, I will discuss a sight that I would recommend.
How should I tune my sight?
Completely tuning your sight is quite an ordeal, since there are so many things you can adjust. The first step when you are setting up your sight is centering it. From there you can make adjustments and finetune your sight. If you want to learn more about how to setup and tune a sight, make sure to read my in-depth article below:
How to adjust/tune a bow sight
More buyer’s guides
Choosing the right archery gear is very important, therefore I have written a lot of buyer’s guides on all kinds of archery equipment. Learn more by clicking on any of the articles below.
Bows
Bow parts
Archery equipment

Tim van Rooijen
For as long as I can remember, I have always been fascinated by archery. First due to its historic significance but later because I like being outdoors. With this blog, I share my knowledge about Archery and how you can improve your shot. More about author…