Most archers that start with archery, start with an Olympic recurve bow. The advantage of an Olympic recurve bow is that you can easily switch from Olympic to a barebow shooting. Archery coaches often say that it’s better to start with recurve shooting since the bows tend to be more forgiving than fully traditional wooden bows. But they are also less complex than compound bows. This basically makes Olympic recurve archery ‘’the middle option’’ of the 3 classes.
If you want to get started with Olympic recurve archery, you need the equipment to do so. There is quite a lot of gear that you need and you don’t want to find out on the range that you missed anything. Therefore I will provide you with a complete shopping list in this article. I will also mention important lessons that I learned while buying my first Olympic recurve bow, and I will give some quick tips to save money.
Short answer:
If you want to start with Olympic recurve archery, you will need the following products: riser, limbs, string, nocking points, arrow rest, sight, stabilizer, button, arrows, armguard, tab, bow stringer, bow case, string, and wax. If you choose cheaper unbranded products the total cost less than $400, if you want branded products the total will be about $650,-.
What is an Olympic recurve bow?
Before we start, you might wonder, what do I mean with ‘’Olympic’’ recurve bow. Most starting archers know what a recurve bow is, but for completeness, I will explain it shortly. The difference between a recurve bow and a ‘’standard bow’’ is that limbs of the bow are recurved, meaning they are bent forward when not under tension. I general the bow can be shorter because of these curves. There are other advantages but I won’t discuss those here. If you are interested, you might want to read the article below:
What are the benefits of a recurve bow?
So what does the word ‘’Olympic’’ mean? In short, Olympic stands for the shooting style that is used in the Olympic games. In Olympic recurve competitions you are for example allowed to use: a stabilizer, sight, and carbon arrows. These aids are not allowed in many more traditional classes. So if you want to shoot with a stabilizer and/or sight an Olympic recurve bow is the right choice for you. There are many nuanced differences between these classes which I can’t all discuss in this article. So I would recommend reading the article below, if you want to know more:
What is Olympic recurve archery?
Before you buy anything
You have a lot of flexibility with an Olympic recurve bow because you can remove all aids from your bow and start shooting in a more traditional sense. Still, it’s good to consider what class you really want to shoot in: compound, recurve, or traditional. For compound archery you really need a compound bow and for traditional archery, you need a traditional bow, so make sure that you want to focus on recurve.
I would advise you to try out recurve archery at least a few times if you can. Most archery clubs allow you to lend a bow and sometimes you can hire equipment. If you are still on the fence whether you want to shoot traditional you can always decide to buy only the essentials of your bow: the riser, limbs, string, arrow rest, and arrows (of course don’t forget to get finger and arm protection). This will allow you to get used to archery, before investing in the complete package.
Your shopping list
If you want to get started with Olympic recurve archery you need quite some equipment. I will talk about the equipment in more detail in this section. I will sometimes refer to Amazon product pages, not because I think that is the best product. It is more a suggestion so you know what to look for.
Your bow
As I mentioned before the essentials of your bow exists out of the riser, limbs, string and arrow rest. Without these components you can literally not fire your bow.
Riser
The riser is the part that connects the lower and upper parts together. It also connects to all your aids: sight, stabilizer, arrow rest, button and clicker. Therefore the most important thing to check is whether your riser has connections for all these ads. For example, there are many wooden risers that do not have a way to connect your stabilizer and sight. Most metal risers do have connections for these devices, but you should check it.
Another important point about the riser is with what type of connection your limbs attach to your riser. I would advise any starting archer to go for a bow with an ILF fitting (stands for International limb fitting). Most limb manufacturers use this type of fitting, which makes that you have a lot of flexibility. There are many proprietary fittings that are used by just one manufacturer and this can really limit your choice, which I think is a bad choice for a starting archer.
Risers come in two lengths, 23 and 25 inches. The length of your riser and the length of your limbs combine to make either a 64, 66, 68 or 70-inch bow. I would recommend any adult to buy a 25-inch riser since this is most common for adults and gives you the most flexibility. For small children, a 23-inch riser is more suitable.
| Riser length | Short limbs | Medium limbs | Long limbs |
| Short 23-inch riser | 64-inch bow | 66-inch bow | 68-inch bow |
| Long 25-inch riser | 66-inch bow | 68-inch bow | 70-inch bow |
Limbs
Another essential part are the limbs of your bow. The first important thing to take into account is that you of course buy the same fitting limbs as your riser. Again I would advise ILF limbs since these are most common and give you the most flexibility. Limbs are commonly made of wood, bamboo, and carbon. Although I generally like carbon limbs because they are less likely to break, I think a wood or bamboo limb will do just fine. Carbon limbs tend to be really expensive and I won’t recommend buying really expensive limbs when you just start.
The next important thing to decide is the length of your limbs. The length of your limbs decides how far you can safely draw back your bow, without potentially causing damage. In order to decide what limbs you need, you should measure your draw length and use the table below to find the right bow length. If you are unsure about your draw length and you are unsure whether to buy the longer or shorter limbs, I would advise the longer limbs. Having longer limbs doesn’t affect your bow negatively. If you however have a long draw length and shoot a to short bow, you might damage the limbs in the long run.
| Draw length | Bow length |
| 24 inch | 64 inch |
| 26 inch | 66 inch |
| 28 inch | 68 inch |
| 30 inch | 70 inch |
Your next decision is the poundage of the limbs, this tells you how hard the bow is to pull back and with how much force your bow shoots. You can buy limbs anywhere between 16 and 50 LBS. There are even some limbs that are heavier or weaker than is but they are quite rare for adults. This is the part where a lot of archers make a mistake. Most beginning archers want to have a heavy bow because the bow will shoot a lot harder. But your muscles are not trained when you are just starting and therefore the bow will be way too heavy, resulting in having to switch to weaker limbs. Therefore I would always advise buying weaker limbs if you are unsure about the draw weight. You can use the chart below for an estimate about what fits you. It really depends on your physical fitness, so if you are really fit you could decide to buy a little heavier bow. Just be sure to not overestimate your abilities, it can really kill the joy in archery if you start with a too heavy draw weight.
| Archers profile | Draw weight |
| Small children | 16 LBS or less |
| Larger children | 16 till 18 LBS |
| Teenage female | 18 till 22 LBS |
| Teenage male | 20 till 24 LBS |
| Female | 20 till 26 LBS |
| Male | 22 till 30 LBS |
Read the following in-depth article for a step by step process to choosing the right limbs and important features to consider:
Buying the right limbs for your bow
String
Although there are huge differences in the prices and quality of string, I would not buy an expensive string when you are just starting. Cheaper string tends to stretch more, which isn’t a big deal because you can just add more twists to keep the brace height consistent. Make sure though that the string fits your bow length and that the serving is not to thick for the nocks on your arrows. See the article below for some frequently asked questions regarding strings:
10 questions about bowstrings answered
Nocking points
Depending on where you buy your string, you might have no nocking points on your string. If you for example buy your string online, you will probably have no nocking points. If you however buy a complete package you probably will. If you go to an archery shop, the seller will always ask if you want nocking points.
If you need nocking points there are two options. You can for example use metal ones like this. But many archers prefer to use serving to make nocking points. If you want to learn how to tie nocking points, you can watch this video by MerlinArchery.
Arrow rest
There are metal and plastic arrow rests for Olympic recurve bows. Most arrow rests are attached to your bow with an adhesive tape There are also arrow rests that are screwed on, next to the button. I would advice to not buy a plastic arrow rest. There are quite some cheap arrow rests available so I would advise one of those.
Sight
The sight is one of the first components I upgraded when I was just started with archery. If you buy a cheap sight I will cost you around $10 – $20, while more expensive sights cost more than $100. Although I bought another sight in my first year I would not advise buying a really expensive sight when you are just starting. When you just start, you don’t know your preferences yet and therefore you will probably opt for another sight no matter whether you bought a cheap or an expensive one. I would however choose a sight with a thin black roundel because this makes aiming easier.
Stabilizer
Many rental bows or club bows don’t have a stabilizer, therefore you might think, do I even need one when I start. The answer is no, you don’t need a stabilizer when you are just starting. This is, however, one of the aids that really helpful, it removes a lot of vibration and really helps with aiming. I would at least buy the long stabilizer, the (little) stabilizers to the side also reduce vibration but those do not make a huge difference in my experience. In my opinion, you can buy a cheap stabilizer. I have tried expensive and cheap stabilizers but I don’t notice much difference.
Button
The button, which is also often called the plunger, screws in the side of the bow near the arrow rest. Depending on the type of arrow rest you chose you might need a button to be able to even safely fire your bow. Many plastic arrow rests have some sort of ‘’built-in button’’, which consists of a little plastic flap. Even though you don’t necessarily need a button when you have a plastic arrow rest, I would still advise it. A button allows you to provide you with control over your left and right orientation of your arrow, which is essential to optimally tune your bow. If you have a plastic arrow rest you can snip off the build-in button with some pliers, if you use a ‘’real’’ button. If you have a metal arrow rest you could technically shoot your bow, but it will be really inaccurate and dangerous. Metal arrow rests are build to be used in combination with a button.
Clicker (optional)
The clicker is not really essential when you start shooting. I would also not advise to start shooting with a clicker at least the first 3 months, because it makes the shooting process more demanding and you need to be really consistent to make it work. Therefore you could decide to skip the clicker when you just start and buy one later. Clickers are really cheap, and I don’t see any reason to buy an expensive one, because they all do the same thing.
Arrows
Before you can shoot your bow you of course need arrows. For someone who is just starting it might seem that any arrow will do, but this couldn’t be farther from the truth. Your arrow exists out of the point, arrow shaft, fletching, and nocks. All these components need to be a good fit together and with your bow. I would, therefore, suggest buying readymade arrows when you are just starting. Manufacturers select the components for these arrows that are most suitable for most archers. You can of course assemble your own arrows, but this is quite a complicated process and I believe it’s better to learn about that when you are already shooting for a while. The best way to make sure that your arrows fit your bow is to buy the arrows at the same shop where you bought the bow and ask for advice. You can also buy your arrows at a different shop, but they might not be familiar with the bow, and they will need more information about it. Sometimes sellers also explain what arrow fits with the bow on their listing, this could also be helpful when selecting the right arrow.
Protection
When you are firing your bow you need protection. Although not all archers need a chest guard, at least an armguard and a tab is mandatory in my opinion.
Armguard
If you are just starting at an archery club you might not see a lot of archers wearing an armguard. To be honest, I also often forget my armguard, because I don’t tend to hit it anymore. This was different however when I just started and this is different for most archers. When you are just starting, your movements are less controlled and you are more likely to over-stretch your arm, which results in the string hitting your arm. Therefore I believe every beginning archer should buy an armguard and honestly actually all archers should still wear theirs.
Tab
The armguard is really for protection, the tab is more for comfort and accuracy. There are many different tabs but the most distinctive feature it whether it has rest for your thumb. I like to have a place to rest my thumb, which makes that I can use my cheekbone as an anchor point. Some people also place the thumb rest in the most upper position and us that to anchor. This just depends on your preference.
Finger or arm sling
The finger and arm sling make sure that you don’t drop the bow when you shoot the arrow. You might think, I will just grip the bow firmly, then I don’t need a sling. That is however not a good idea, proper archery technique is to relax your hand and only grip the bow firmly when the arrow left the bow. Therefore you can either use a finger or arm sling to catch your bow, in case you are too late. Most people use the finger sling, but some prefer the arm sling. If you have sensitive fingers I would advise the arm sling, because with the finger sling the weight of the bow is entirely caught by two fingers. If you want to use a finger sling by using a piece of rope or shoelace. Click here if you want to see a tutorial on how you could do this.
Chestguard (optional)
The chest guard is a piece of equipment that I wouldn’t buy if you don’t notice any issues. Many archers shoot without a chest guard and never need it. If you however notice that your string scours your chest you could decide to use a chest guard. I honestly never needed it and I haven’t seen any archers at my local club that had major issues with it. But if you do, now you know how you can protect yourself.
Gear and accessories
Apart from your bow, arrows, and protective equipment you also need some accessories, depending on your situation. I will discuss these parts below.
Bow stringer
A bow stringer is used to string your bow. When you store your bow, you should always unstring your bow. Keeping your bow strung can harm your limbs in the long run. At clubs, there are often bow stringers or even tension benches that you can use to string your bow. If you, however, don’t have these options you need a bow stringer. I would go for the cheapest option here since they all do the exact same thing.
Quiver
Before you are shooting your arrows you need to keep them somewhere. Therefore most recurve archers use a quiver which is most often attached to a belt. There are many options and mainly differ in terms of storage compartments and how comfortable they are to wear. I am still using the old quiver that I bought when I just started, so you don’t really need an expensive one when you are just started.
A bag or case
This is only relevant if you are transporting your bow. If you shoot in your backyard, you won’t need a case or bag. I transported my bow a few times without a bag and I wouldn’t recommend it. Not only can you damage your bow, but it’s also impractical since you also have to carry all your gear in another bag. You can buy a really cheap or expensive bag or case, as long as it protects your bow decently.
Bow stand
I think it’s essential for every archer to buy a bow stand. If you don’t have a bow stand you will always have to put your bow on the ground, which could scratch your bow. If you shoot outside your bow could also get moist, which is bad for your string. The archery club I am a member of has hooks where you can hang your bow, but I wouldn’t recommend those either. Your bow could drop and it could damage your limbs.
String wax
In the first 3 months, you won’t need your string wax because a new string will take a while before it needs waxing. I would advise you to buy string wax and to regularly apply new wax to improve the lifetime of your string. If your string gets ‘’hairy’’ it’s in need of a new layer of wax.
Recommended gear
Do you want to get started as soon as possible, without spending hours finding the right gear? Well, I got you covered. Below I share some great options, both for a low and a high budget.
Low budget
Below, I will list down the gear I would buy to get new archers started that is on a tight budget. I can’t display the prices here because they can change anytime. So, you have to click the links to check the actual price of each product.
Recurve package
If you are on a budget, I would recommend buying the TOPoint recurve package. This package includes a riser, limbs, nocking points, string, and bow stringer. It also contains limb sleeves and a riser pouch to protect your gear from getting scratched. You will still need to buy some additional gear to get started, which we will discuss next.

Arrows
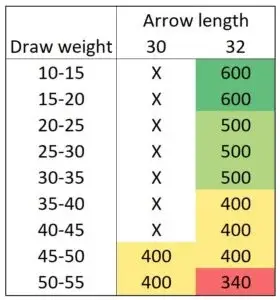
For arrows, I recommend the Pinals Carbon arrows. These arrows are one of the cheapest carbon arrows available on the market. You can choose both feather and plastic vanes. I recommend plastic vanes since they tend to last longer. To choose the right stiffness, use the spine chart below.

Arrow rest
For recurve archers, I always recommend getting a screw-on arrow rest. These arrow rests are more secure than stick-on arrow rests and allow you to adjust the height and angle of the rest. They are a bit more expensive, but they are a more solid long-term investment. If you are looking for a good screw-on arrow rest, I recommend this one from Dioche.

Plunger
If you want to buy a high-tech plunger, I recommend this plunger from Nika Archery. The main advantage of this plunger compared to other cheaper plungers are:
- Quick adjustment system: you don’t need to unscrew a hex screw to adjust the plunger tension, because of the ratcheting ball system.
- Securing tools: with this plunger, you get two tools to securely screw in the plunger to your riser.
- Two locking hex screws: most cheaper plungers only have one locking hex screw on the retainer ring. On these cheaper plungers, the retainer ring is more likely to come loose. When that happens, you must tune the plunger again.

Tab
There are a lot of high-end tabs available, but most of those are expensive. A cheaper alternative is the SAS Elite Finger tab. I have recommended this tab in a few articles already because it has all the features of more expensive tabs, but for a fraction of the cost.

Sight
Although there are cheaper sights available, I recommend the SOOHUPET recurve sight. This sight is basically the budget version of an advanced target sight. Therefore, this sight has all the feature which are found on high-end sights, such as:
- Micro adjustment nobs
- Clear aperture with a small and crisp sight pin
- Long sight arm (9 inches)
- Quick-release system for the aperture
Therefore, with this sight, you will have all these features which are often found $100+ sights for a fraction of the price.

Stabilizer
If you want to shoot your bow with a sight it also makes sense to buy a stabilizer. If you want to shoot with a full stabilizer setup, which I recommend, this set from NMCPY is one of the cheaper options. I also like that this set has dampeners which are often not available on cheaper stabilizers. Since the set also has an extender rod, it will fit on all recurve bows.

Quiver
Although there are a lot of great quivers available on the market. I would stay away from the extremely cheap ones. These often don’t include a belt, which is very inconvenient. They are often attached with a small clip to your belt or belt loop. Therefore, the quiver tends to be very unstable and flops around when walking.
I bought one of these XTacer Quivers and I am very happy with it. It allows you to store your tab in the upper pocket and other gear in the lower pocket. There are also a lot of other quivers available with this same setup.

Other gear
Depending on your situation, you might also want to buy the gear below. I won’t discuss these in detail because it largely depends on your preference. Some archers like a backpack because they walk or cycle towards their range. While others like a hard case for additional protection. Below I have linked to products which I would buy:
High budget
If you have more to spend, I highly recommend considering the Sanlida Archery Miracle kit. This kit has been composed for competition recurve archers, which you can see in some specific design features:
- More robust sight with dampeners for a steadier sight picture
- Limb savers which increase the lifespan of the bow
- Upper stand-alone dampener
- Continues clicker plate which makes for a more solid clicking sound while using the clicker
- Lifetime warranty
Overall, this package is a great option for archers that want to take the sport seriously. So, if you want to shoot in competitions, you might want to buy the right gear from the get-go!

You will need to buy some gear separately, such as your arrows, protection, and accessories from the previous section.
How much does an Olympic recurve bow cost?
If you want to get started as cheap as possible, you can probably get away with about $300. But that would mean that you make some serious trade-offs. You probably won’t buy a bag for your bow and only buy a few arrows. That might work if you only want to shoot in your garden, but if you want to shoot at an archery club this isn’t enough.
Most archers will spend anywhere from $600 to $1000 to buy their starting gear. This will include everything you need, from your bow to the accessories to maintain your bow. Spending much more doesn’t make much sense when you are just getting started. You have to learn your preferences by shooting first.
Once you get more experienced you might learn that you prefer to replace some of your gear. But if you bought some decent gear, this will take a few years. In the article below, I explain in more detail what you should expect to pay for each piece of your archery gear:
Buying a recurve bow – what you can expect to pay
More buyer’s guides
Choosing the right archery gear is very important, therefore I have written a lot of buyer’s guides on all kinds of archery equipment. Learn more by clicking on any of the articles below.
Bows
Bow parts
Archery equipment
Final words
Alright, you made it to the end of this article. You now know the basics of buying a recurve bow. Since recurve bows are quite complicated devices there is a lot more to learn about archery gear. If you want to know more, I recommend visiting this page to learn about these different parts of your archery gear. Also, check out my other articles about recurve archery.
If you have any questions, comments, or suggestions for this article, please leave it in the comment section down below. I will respond to any comments as soon as possible and I will send you an email once I replied.

Tim van Rooijen
For as long as I can remember, I have always been fascinated by archery. First due to its historic significance but later because I like being outdoors. With this blog, I share my knowledge about Archery and how you can improve your shot. More about author…
Just last Wednesday night, my brother came over for some drinks where he told me about how he has been interested in visiting an archery shop to pick up some supplies. He recently got into the sport and that’s why I wanted to help him out with some research. This led me to your incredible post here which has provided me with some valuable insight. I am most fond of where you highlighted that the best way to make sure that your arrows fit your bow is to buy the arrows at the same shop where you bought the bow and ask for advice. This is a good point you brought up here, one I’m sure anyone looking to get this equipment like my brother will be glad to have learnt of. I’ll make sure he gets this soon! Thank you for this!
Hi Dean,
I am happy to hear that my article was helpful!