No bow would be complete without a riser. This device does not only connect the upper to the lower limb, it basically functions as the motherboard of your bow. All your equipment is attached directly to the riser. Therefore, it’s essential to buy a riser that allows you to attach all the equipment you want. Since there are so many different risers available this can be quite an ordeal. Therefore, we will discuss this question in more detail. This is a long article; therefore, I have provided a summary below.
It’s recommended for any serious archer to buy an ‘’advanced riser’’. These metal risers allow you to connect all aids that are popular within the recurve discipline like a stabilizer, button, arrow rest, and clicker. These risers have an ILF limb fitting and a replaceable grip, providing you a lot of flexibility.
I would highly recommend reading the remainder of this article though. Although I capture the key points in the summary there is just so much you can discuss within 60 words. In this article, I will first discuss all the features of a modern riser. Next, the tuning of the tiller and limb alignment will be covered. Continued by the differences between a high and a low tech riser. And at the very end, I will discuss some recommendations.
The anatomy of the riser
As mentioned in the intro, the riser is the motherboard of your bow. Therefore there are a lot of bushings and fittings to attach your gear. In this section, I will discuss all these fittings and bushings, so you know what to look for. We will start at the very tip of the riser and work our way down towards the middle (most features are mirrored at the lower part of the riser).
The limb fitting
The most important task of the riser is to retain the two limbs. The limbs are placed in the limb fitting when you are making the bow ready to fire. When you are done with shooting, you can remove the limbs for ease of storage. Another great advantage of removable limbs is that you can switch between different limbs. Therefore, you can choose to increase or decrease the poundage of your bow by buying new limbs.
The limb fitting of your bow has to correspond to the fitting on your limb. Luckily most archery brands switched to the ILF fitting years ago, which give you a lot of flexibility regarding limbs. There are still some bows, especially beginner bows, which have a proprietary limb fitting. This severely limits your choose to just one or two manufacturers. If you want to know more about limb fittings, I would highly recommend reading this article:
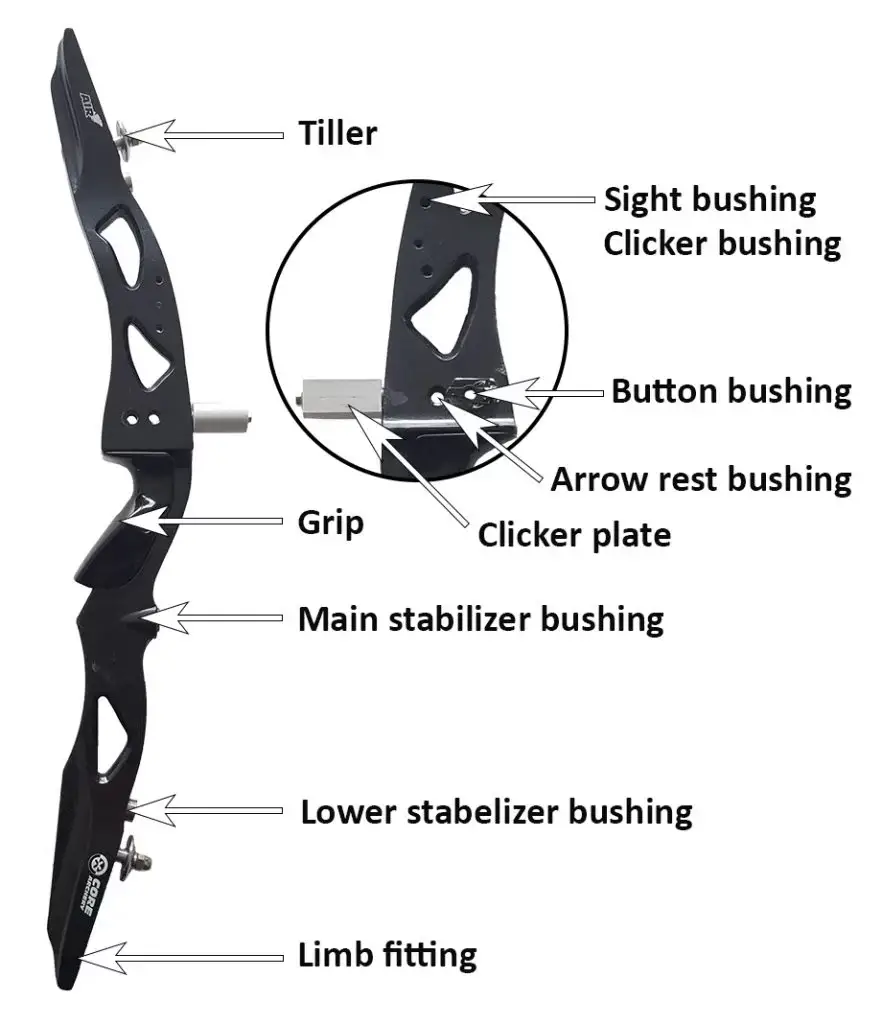
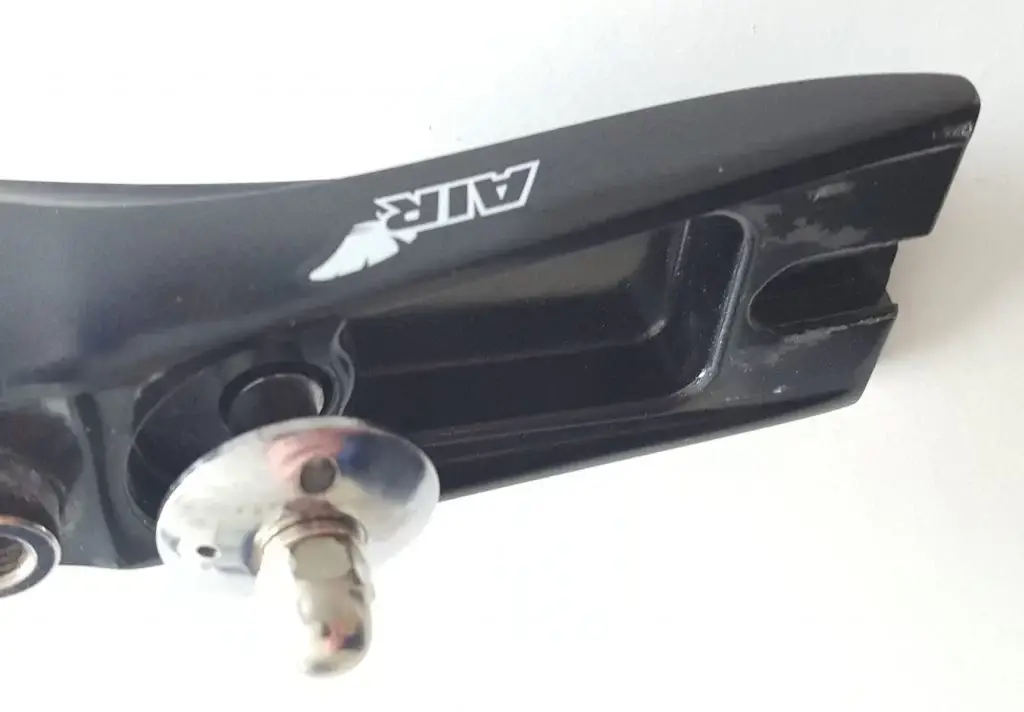
The tiller
The tiller is part of the limb fitting assembly and therefore also retains the limb. The tiller consists of a large disk and threading to attach it to the riser. When the bow is under tension the limb will press firmly on the tiller disk.
The task of the tiller assembly is twofold. The first task of the tiller is to retain the limb when the bow is under tension. Without the tiller disk, the limbs will fly off the riser, when the bow is put under tension. The tiller also allows you to change the ‘’tiller height’’. The tiller height is the distance between the bow limb and the string, closest to the riser. This allows you to tune the bow, to make it more accurate. I will discuss the tuning of the riser in the next section: ‘’How a modern bow is tuned’’
The upper and lower stabilizers bushings
Probably the least important feature of the modern riser is the upper and lower bushings near the limbs. In the early days of archery, these bushings were used for an upper and lower stabilizer. Most archers have ditched these stabilizers over the years, since they don’t offer that much of a benefit, while making the bow heavier. Some archers use these to attach weights or dampeners. The majority of archers, however, don’t use these bushings at all. But now you at least know why they are there :).
The sight bushing
Manufacturers of both sights and risers all adapted one standard to attach your bow sight. This allows you to attach any sight to your riser, without having to worry about compatibility. If your riser has two screw holes, you will be able to attach your sight.
Clicker bushing
The clicker bushing is just like the sight standardized between all archery manufacturers. As long as you have a screw hole for your clicker, you will be able to attach a clicker. Most cheap wooden beginner’s bows don’t have a clicker bushing, since only more experienced archers use the clicker. Since most archers switch to a more advanced bow before that time, there is no use for a clicker bushing.
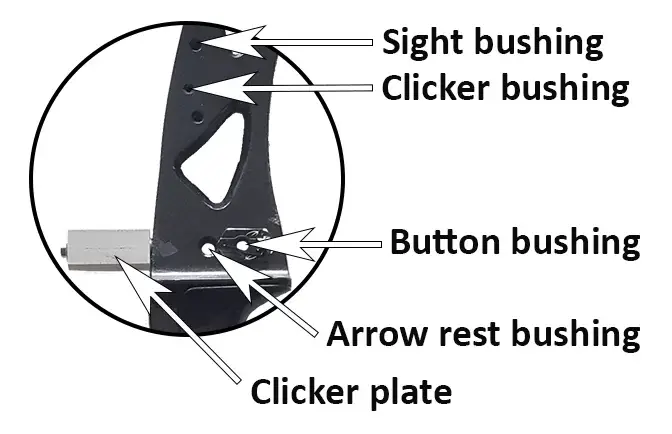
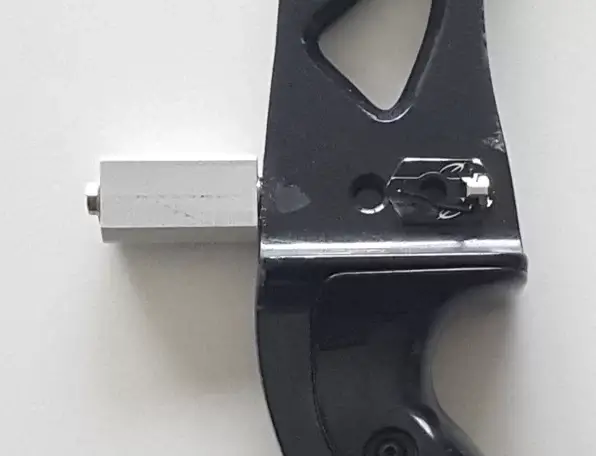
The clicker plate
The clicker plate is the small protruding plate, at the height of the arrow rest. If you are not shooting with a clicker, the clicker plate will have no purpose. When using a clicker, the clicker plate allows you to shoot with longer arrows than would normally be possible. The clicker has to hit a hard surface, preferably metal, to make a clicking sound. Without the clicker plate, the clicker wouldn’t hit anything and would therefore make no sound.
I would highly recommend getting a riser with a clicker bushing and clicker plate. Even if you don’t shoot with a clicker currently. Most archers eventually want to shoot with a clicker, since it helps you to stay consistent with your draw.
The button and arrow rest bushing
In the middle of the riser, there are two large see through screw hole. The screw hole closest to the archer is for the button. The other screw hole is used for screw on arrow rests. Almost all Olympic recurve archers use a button; therefore even the cheapest risers available often have a screw hole for the button.
Many cheap alternatives lack, however, the second screw hole for the arrow rest. Although there are also a lot of other alternatives, many archers like a screw on arrow rest. A screw on arrow rest is often more secure and gives you more flexibility. If you want to know more about the different types of arrow rests, I would recommend reading the following article:
How to choose an arrow rest for your recurve bow
The grip
Many starting archers decide the choice of their riser mostly on the grip of the bow. It is very easy to compare grips and you don’t need a lot of knowledge. All modern recurve bows have an exchangeable grip; therefore you shouldn’t base your judgment of the riser purely on the grip. Most archers use their first grip for many years since most manufacturers use very similar grip designs. Therefore, I wouldn’t worry about the grip too much, since you can always buy a replacement for about ten dollars.
The main stabilizer bushing
The final feature of Olympic recurve bows that we need to discuss is the main stabilizer bushing. This bushing is used to attach the front stabilizer and the backwards (counterweight) stabilizers. Stabilizers make aiming a lot easier by removing vibration from the bow. Therefore, this is an essential bushing that any modern recurve bow should have. Luckily all manufacturers adopted one standard for stabilizers; therefore you don’t have to worry about compatibility issues. Even cheap beginners bows have a main stabilizer bushing, since the front stabilizer is such an essential piece for a modern archer.
If you want to know more about stabilizers, their benefits and how they are configured, please read my in depth article about stabilizers:
Stabilizers – how they work and what to buy
Recommended risers
There are hundreds of different risers available, with this guide I give you a lot of tips that help you make a decision. Still considering all different risers can be rather time-consuming, which can be especially frustrating if you want to get started as soon as possible. Therefore, I have listed down three risers I recommend if you are just getting started.
Milaem Magnesium Riser – the budget option
If you don’t want to break the back the Mileam Magnesium Riser is a great option. It’s one of the cheapest risers available that have a side screw adjustment for the limb alignment. This mechanism is a lot easier to adjust as I discussed earlier. It also has a replaceable grip, stabilizer, dampener, and arrow rest bushings. Therefore, it can be classified as an advanced riser. Sadly, this riser is currently only available for right-handed archers.

Topoint Archery Unison
The riser I discuss above is a great value for the money, but it’s built to be as cheap as possible. If you want a riser that looks and feels a bit more upscale, I recommend the Topoint Archery Unison. Most archers use their riser for years on end, so it does make sense to get something that feels and looks good. Luckily, this riser is available for both left and righthanded archers.
I don’t think this riser will perform better than the Samick 25 Avante nor will any other more expensive risers. So, if you don’t care about the look and feel at all, the Samick 25 Avante is the better choice.

Sanlida Archery Miracle X10 set
If you are just getting started, it does make sense to buy all your gear in a set. Buying everything separately will be much more expensive. Therefore, I would recommend buying the Sanlida Archery Miracle X10. This set included all equipment of a modern recurve archer. It’s overall a great value for the money because it includes a lot of high-quality gear.

How a modern riser is tuned
One of the biggest advancements in recurve technology, are the tunable limbs. When bow limbs were directly attached to the riser, the limbs had to be perfectly installed by the manufacturer. Therefore, there was no room for manufacturing error and you couldn’t tune the bow to your liking. This wasn’t an issue since the limbs were specifically made for that bow.
When limbs became interchangeable with the introduction of the ILF fitting the first issues arose. Since the limbs were not specifically for a certain riser, some limbs were not suitable for some risers. You would be able to attach the limbs, but the limb alignment and the tiller would often be unacceptable. To fix this compatibility issue and to give the archer more control, manufacturers started to produce risers with an adjustable tiller and limb alignment.
We now still reap the benefits of these advancements in archery. Therefore you can basically attach any limb to your riser (if it has an ILF fitting) and tune it to perfection. In this section, I will discuss how modern bows are tuned and how this differs between risers.
The tiller
The tiller allows you to change the how far the limb is pointing forwards. This makes you able to put either put more of the draw force on the upper or lower limb. Some archers believe that the tiller allows you to change the draw weight of the bow. This is true, if you would tighten both tillers, you will increase the draw weight with about 5% till 10%. You lose, however, the ability to tune the tiller, which is a very important aspect of tuning your bow.
Tuning the tiller is such a big deal, since we have to compensate for the force we put on the string. When we draw a bow, we keep 2 or 3 fingers below the arrow, while keeping just one above the arrow. Since the arrow is centered in the string, we apply more pressure on the lower limb. Therefore we often make sure that the tiller of the lower limb is tighter than the upper limb, to compensate for the unequal forces on the bow.
All bow manufacturers have a quite simple tiller system. To make adjustments to the tiller, you first have to loosen the screw in the back. When this screw is loose, you can adjust the tiller by turning the tiller head, either with a special tool or an Allen wrench. I won’t discuss all the technicalities of tuning in this article. If you want to know how to tune your bow, I would highly recommend this document from Archersreference. It’s a long document, but the guide discusses all important aspects of tuning the bow.
Limb alignment
Limb alignment concerns the left/right alignment of the limbs. Since not all limbs are made exactly the same, there can be small differences between limbs. Therefore, a limb can be canted slightly more to the left or right, if you attach it to your riser. This is of course the same for your riser, due to minor errors, your limbs might not fit 100% straight. The limb alignment module corrects for this issue, by allowing you to slightly change the fitting to point to either the left or right.
Archery manufacturers have settled on one type of system for the tiller. Therefore changing the tiller of a bow tends to be quite straight forward. This isn’t the case for the limb alignment, there are many different systems developed, that allow you to change the limb alignment. In general, there are 3 systems that are often used; I will discuss these below in more detail.
Washers
One of the first limb alignment systems developed works with washers. Risers that have this system allow you to remove part of the limb fitting. By placing or removing a washer between the retaining screw and the limb fitting you would change the limb alignment. This system isn’t that popular anymore, since it’s quite difficult to use and less precise. Most of Hoyts Formula risers from the past had this system, but they recently switched to the side screw method.
These things are very difficult to explain properly; therefore I have added a video below, where you can see how the limb alignment is changed with this system.
Side screw
Most moderate-priced and expensive risers feature a limb alignment with a side screw. This system is more intuitive to use and it allows for more precise adjustments. You change the alignment by twisting two screws on the side of the riser. This changes the exact location of the limb fitting knob which also retains the spring-loaded retainment pin. This system is quite similar to the previous one; you only adjust the alignment with screws instead of the washers.
Integrated into the tiller
This system has the complete opposite approach to adjusting the alignment. The previous systems both manipulated the knob with the retainment pin of the limb fitting. This system, however, adjusts the alignment via the dovetail of the limb. The alignment of the limb is therefore integrated into the tiller mechanism.
The tillers of most bows have a symmetrical axle. Therefore if you turn the tiller, the alignment of your limbs will not change. Risers that have the limb alignment integrated into the tiller, however, have an asymmetrical tiller. When you change the tiller, the left/right alignment of the limb will change as well. The main advantage of this system is that it’s cheaper to manufacture. Therefore this system is most often found in cheaper risers.
This system is a lot less intuitive since you basically have to do everything in reverse. Since it’s often difficult to see the axle of the tiller, it might take a few tries, before you notice what way you should turn the tiller. If you know what to do, however, you can perfectly and precisely change the limb alignment with this system. The riser that I used as an example in this article, the Core Archery Air, has the limb alignment integrated into the tiller.
What you should consider
If you carefully read the article till this point, you know almost everything about risers. You know what features risers have and how your riser allows you to tune the bow. You might, however, still wonder what features are most important in a riser. Therefore I will briefly discuss the most important product features you should consider.
Beginner vs. advanced riser
Beginner risers tend to be cheaper but lack a lot of features in terms of adjustability and option. Therefore, I believe serious archers should buy an advanced riser from the get go. Most archers that opted for a beginner riser switch to an advanced riser within a year. Therefore it’s often just a better idea to get a cheap advanced riser when you are just starting. In the next section I will discuss the differences between these two riser types in more detail.
The differences I will discuss in this section are focused on advanced risers, since most serious archers will choose that option.
Materials/weight of the riser
Most advanced risers are made either fully out of metal or out of composite metal. If the bow is fully made out of metal, it will be really strong, but it also tends to be a lot heavier. In general having a heavy riser is beneficial for the stability of your shot, since heavy object vibrate less. Therefore, most experienced archers opt for heavy full metal risers.
On the other hand, the heavy riser will make handling the bow more strenuous for your muscles. Therefore, you have to choose between the lesser of these two evils, which depends on your own situation. If you are just getting started, you might not want to pick the heaviest riser. Most starting archers haven’t developed their back muscles yet; therefore picking heavy equipment might be a disadvantage.
Limb alignment tuning
In the previous section we already discussed that there are three different limb alignment mechanisms. Especially the side screw and the integrated option are very popular nowadays. The riser I am using has the limb alignment integrated in the tiller. Although the system works fine, it was very confusing and frustrating when I was just getting started. It took me about 3 hours to figure out, what steps I should take.
I also tuned a riser with a side screw limb alignment and this was a lot easier. You can immediately see what the limb is doing, and the entire process is just more convenient. Therefore I prefer the side screw method over the integrated tiller method. I wouldn’t necessarily avoid a riser with an integrated tiller limb alignment, since you only tune your bow when you switch limbs. But if there were two similar priced risers, I would easily pick the side screw riser over the integrated tiller.
Clicker plate
Most risers have some sort of clicker plate built in, but some cheaper options lack this feature. Although most archers don’t use the clicker their first year, the riser is a long term investment. I am still using the riser that I bought 4 years ago for example. Most archers eventually want to shoot with a clicker, to improve the consistency of your draw. Therefore, it would be beneficial if you have a decent clicker plate. Otherwise you will have to make your own clicker plate or use a sight mounted clicker. If you want to know more about clickers, I would highly recommend reading the following article:
The difference between a beginner and advanced riser
In the previous sections, I largely skimmed over the differences between beginner and advanced risers. Every year I see archers that bought a beginners riser that only use it for an about half a year. The lower price seems really attractive and when you are just getting started you don’t notice the major differences.
These risers are often seen at events, the design of the bow make it really easy for first time archers to understand how to shoot. Since these bows are a lot cheaper it’s also not that big of a deal if someone damages the bow. Therefore you can also often lend these bows from an archery club, when you want to experience archery for your first time.
In this section I will discuss the major differences between the two riser types. This allows you to make a solid choice on whether you want to buy a beginner or advanced riser. Once you know the differences you can also easily spot beginner risers and avoid them. If you want a quick summary and some history behind beginner bows, I would highly recommend reading this section of the ‘’are cheap recurve bows any good’’ article:
Materials
The easiest way to distinguish a beginner’s riser from an advanced riser is to look at the materials used. Most beginners’ risers are made out of wood, while most advanced risers are made out of metal. Wood is a lot lighter than metal, which is both a pro and a con as we discussed earlier. The disadvantage of wood, however, that it’s more prone to bending and breaking and is less resistant to moisture. Although this is a big drawback, the next point is more important.
ILF fitting vs. proprietary
Beginner bows almost always have a proprietary limb fitting. This means that you can only use the limb of that specific manufacturer. It’s common place that manufacturers switch between limb fittings, therefore it could be that you can’t even find replacement limbs a few years later. The ILF fitting is the USB in the world of archery and gives you a lot of flexibility. Having to replace your entire bow when your limbs broke, will be quite expensive. Therefore in the long run it’s often a better idea to pick a riser with an ILF fitting, since risers tend to outlast limbs.
Limb alignment
Beginner bows don’t allow you to change both the tiller and the limb alignment. Removing this mechanism makes manufacturing a lot easier and saves cost. Since you get the limbs and the riser from the same manufacturer it’s often not essential. So if you notice that the limbs are slightly misaligned or if you want to change the tiller, you are out of luck.
Lack of bushings
Beginner risers miss a lot of bushings, which are present in all advanced risers. Some bushings that are often missing are: arrow rest, clicker and upper /lower bushing. Most archers won’t really miss the last bushing, since most archers don’t use an upper and lower stabilizer. The arrow rest bushing and clicker bushing are a different story however. Since most archers eventually want to shoot with a clicker, they will have to use a sight mounted clicker, which is not ideal. The lack of an arrow rest bushing means that you can only use stick on arrow rests.
Low end beginner risers are sometimes even missing sight, button and the main stabilizer bushings. But this is getting more and more uncommon since most archers use these aids when they are just getting started with archery.
No replaceable grip
Beginner’s risers often miss the ability to replace the grip. Although most archers don’t replace their grip, beginner’s bows are notorious for having a bad design. They are often quite round, which means that you tent to grip the bow too tightly which can cause interference issues. Having a decent grip is essential to develop a good follow through; therefore it’s quite useful to try different grips when you experience issues.
Some final tips
I would like to end this article with some key takeaways:
- Don’t start with a beginner’s riser: beginner risers will limit you a lot in terms of choice and they tend to be more expensive in the long run. Most archers eventually want to switch to an advanced riser, so you might just want to invest a little bit more to save in the long run.
- Buy a riser without an ILF fitting: if you buy a proprietary or a formula fitting, you will be locked to one or two bow manufacturers. This not only limits your choice, but can again be more expensive in the long run. Click here if you would like to know more about limb fittings.
- Don’t buy an overly expensive riser: an ‘’advanced riser’’ doesn’t have to be expensive. Cheap options tend to be just $20 or $30 more expensive than beginner bows. There is nothing wrong with buying a cheap riser. The $100 riser I have still works fine, even though I have used it for years.
- You don’t need a riser and limbs from the same manufacturer: manufacturers often claim that their limbs are optimized for their riser, but this is only a marketing gimmick. If you have an ILF limb with an ILF riser, they will perfectly match. You only might have to change the tuning a bit.
- Learn how to tune the bow: some beginning archers expect that a bow is perfectly tuned when they buy a bow from an archery shop. Therefore they see no use in learning how to tune a bow. Although most archery shops tune your bow when you buy it, it is a good idea to learn how to do it yourself. Sometimes the screws that keep everything together get loose. Then your bow won’t be tuned correctly anymore, meaning that you have to get back to the archery store before you can shoot.
More buyer’s guides
Choosing the right archery gear is very important, therefore I have written a lot of buyer’s guides on all kinds of archery equipment. Learn more by clicking on any of the articles below.
Bows
Bow parts
Archery equipment
Final words
Wow, you made it, you have just read almost a 4000-word article about risers. You now know more about risers than most archers. I even recently got to an archery shop, where the staff wasn’t even aware of the integrated tiller mechanism. Therefore I always believe that you should do your research on what you need, before visiting an archery store.
I believe with this information you can make an educated decision on what you want to buy and how everything works. If you have any comments or questions about risers or archery, please leave them in the comments below. I will respond to any questions as soon as possible. If you want to continue to learn about archery, I would highly recommend my in-depth article about limbs:
Buying the right limbs for your bow

Tim van Rooijen
For as long as I can remember, I have always been fascinated by archery. First due to its historic significance but later because I like being outdoors. With this blog, I share my knowledge about Archery and how you can improve your shot. More about author…
Hello Tim,
I am new to archery and absolutely love it. There is a lot to know on how to chose one’s first bow. As I was informing myself I stumbled on your page which provided me with valuable synthesized information.
Thank you very much!
Hi Eric,
Thank you, I am happy that this article helped you!