One of the most difficult parts of bow tuning is aligning the bow limbs. It might seem rather intuitive since it’s easy to check whether something is straight. But it’s quite difficult to see which limb is skewed. Additionally, not all bows use the same system to configure the limb alignment. Therefore, it can be rather frustrating to figure this out on your own.
In this article, I will guide you through aligning your limbs from start to finish. First, I explain what limb alignment is and how you can check whether your limbs are correctly aligned. Next, I discuss the three systems to configure limb alignment and explain how to configure limb alignment. At the end of this article, I will discuss how important limb alignment is and how it affects your accuracy.
What limb alignment is
Limb alignment indicates whether the limbs are fitted straight onto the riser. If the limbs are not vertically aligned the limb alignment should be tuned to increase the performance of the bow.
There are multiple ways your limbs can be misaligned, such as:
- The upper limb is misaligned
- The lower limb is misaligned
- Both limbs are misaligned
In some cases, only one limb must be aligned, while in other cases both must be adjusted. Limbs will never be 100% straight, but the goal is to get the limbs as straight as possible.

How to check your limb alignment
Before you start configuring the limb alignment you need to check if it needs to be adjusted and how. For example, does the lower limb need to be aligned or the upper limb? But also, does the limb need to be turned to the right or the left, and how much?
I always recommend checking your limb alignment carefully before you make changes. In some cases, the limbs might already be aligned from the factory, or the seller might have done this step for you.
To check your limb alignment, follow these steps:
1. String your bow: to check your limb alignment, you must string your bow. If you haven’t done this before, check this video for a demonstration.
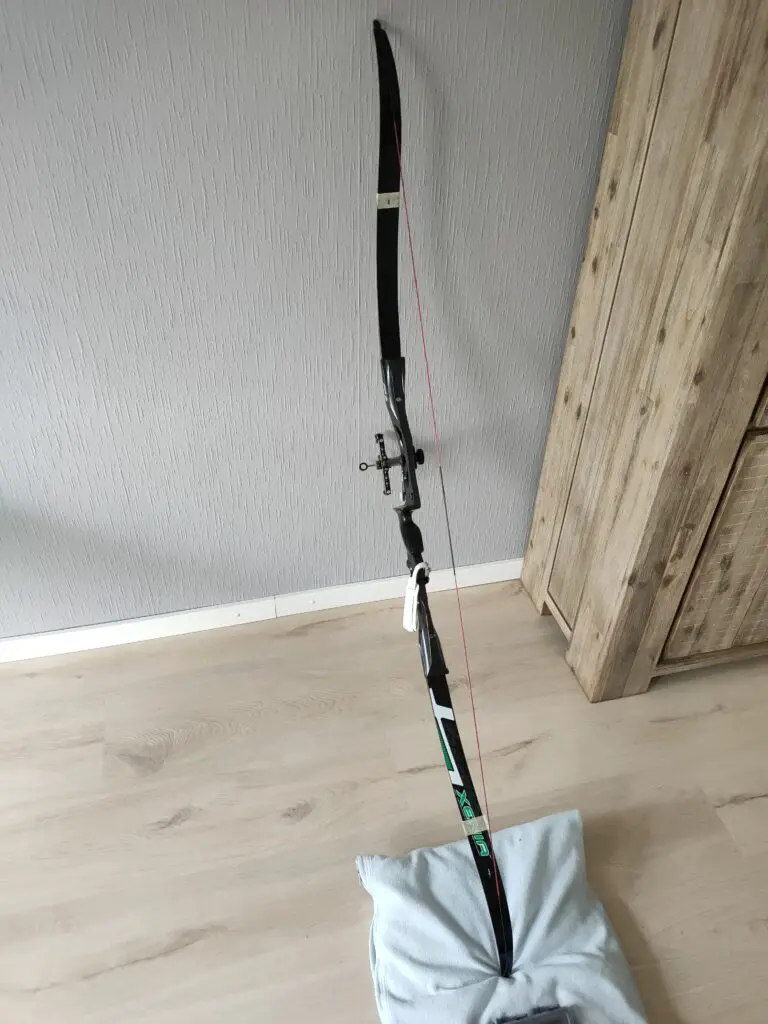
2. Place the bow in a bow vise: the bow needs to be propped vertically to check your limb alignment. The best way to do this is with a bow vise, which is a device that clamps to the table and holds your bow. You can also improvise a bow vise by taping the bow to a table by the stabilizer. Alternatively, you can also lean it against a wall. Make sure to use a cushion or anti-slip to prevent the bow from slipping.
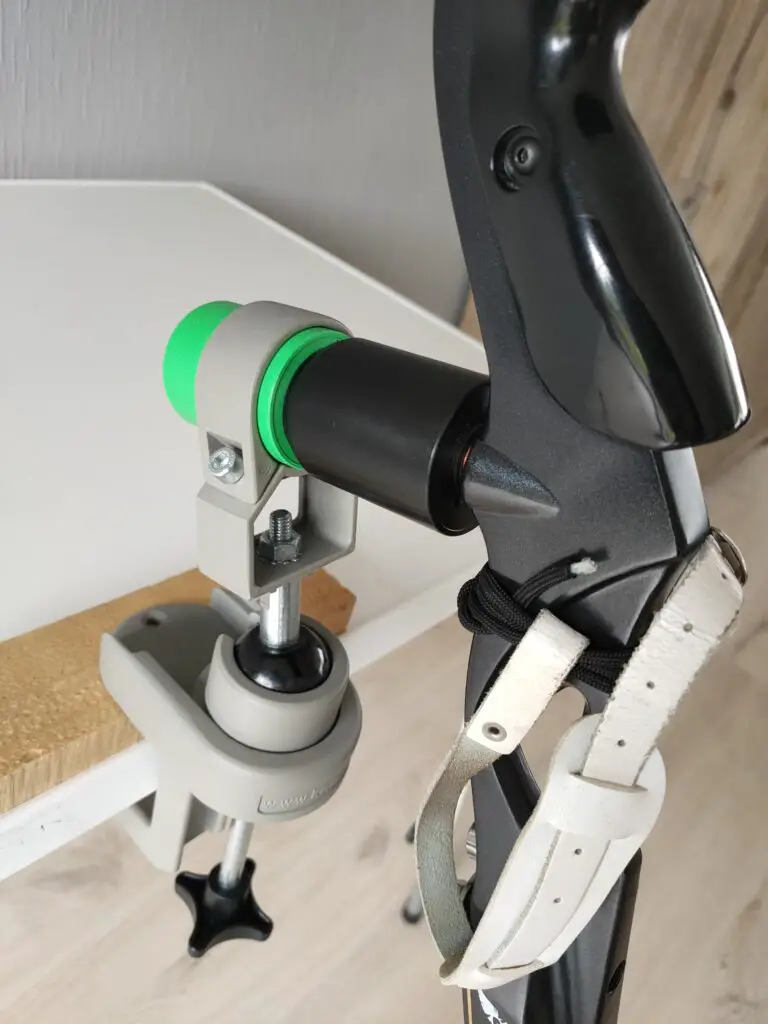
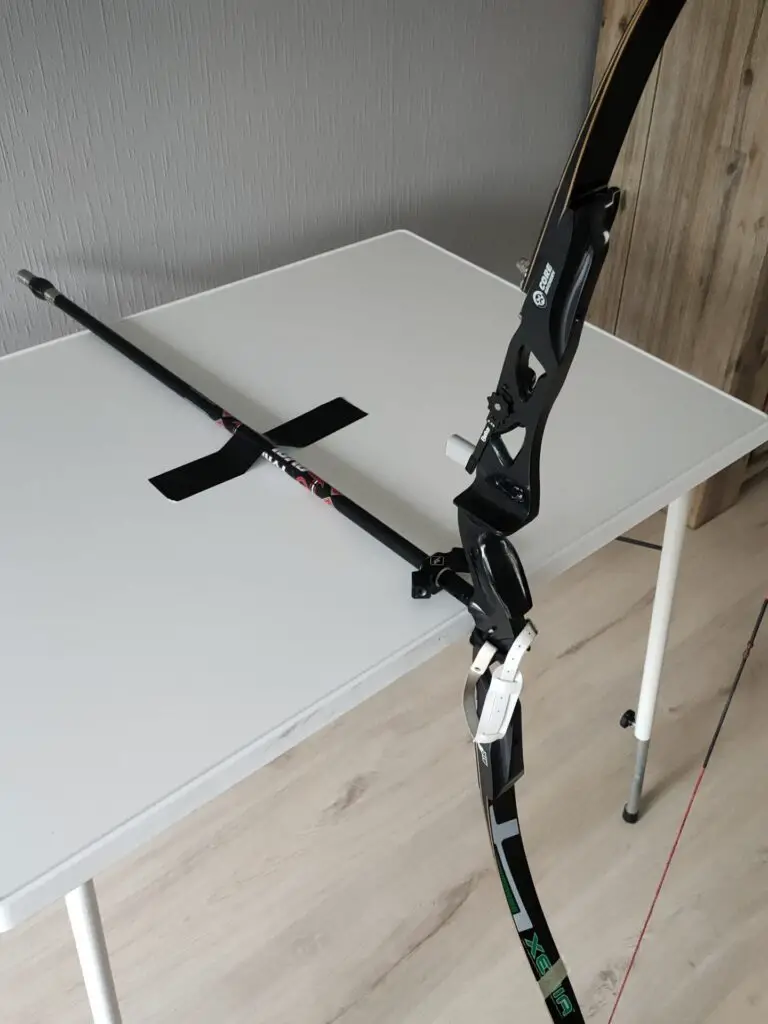
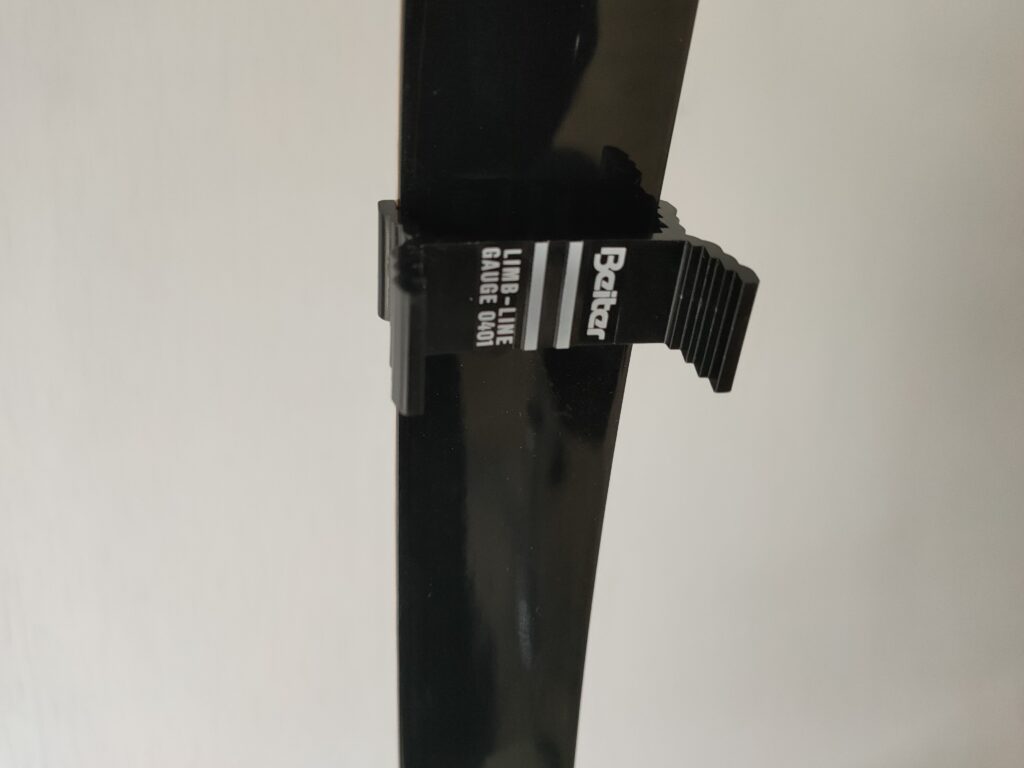
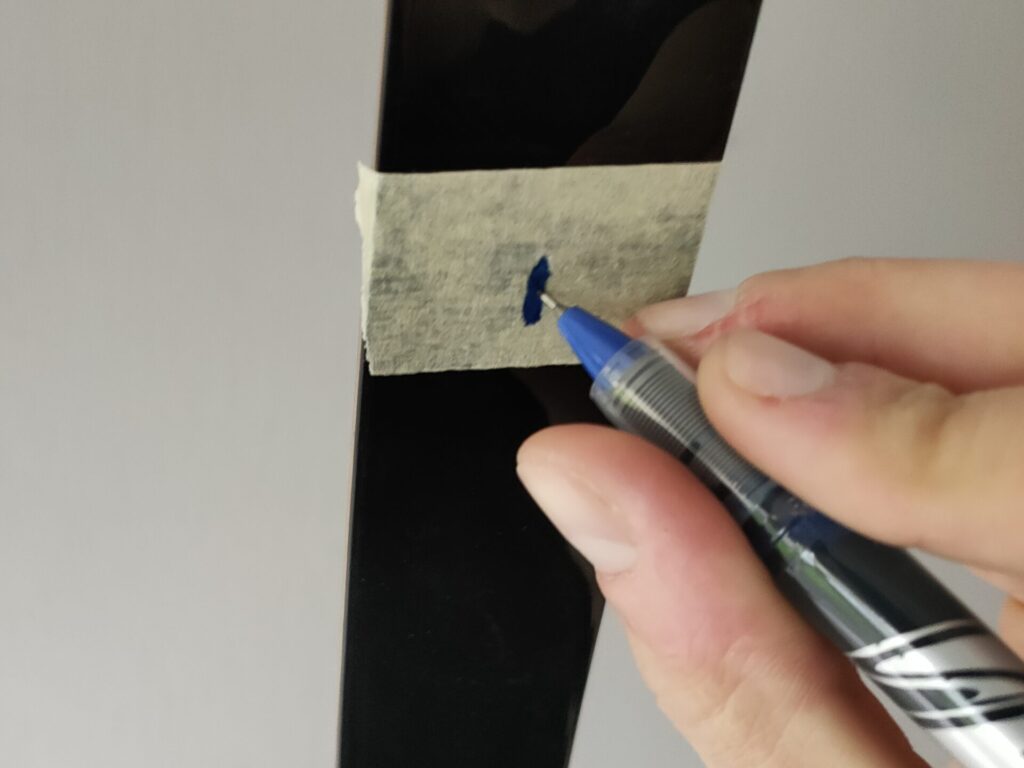
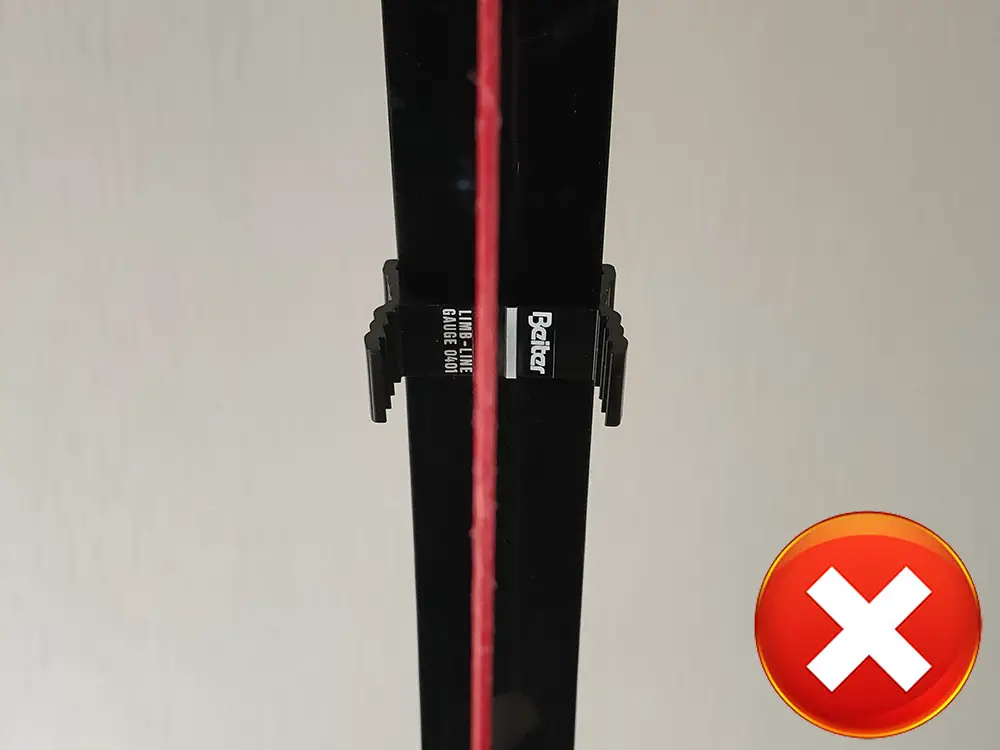
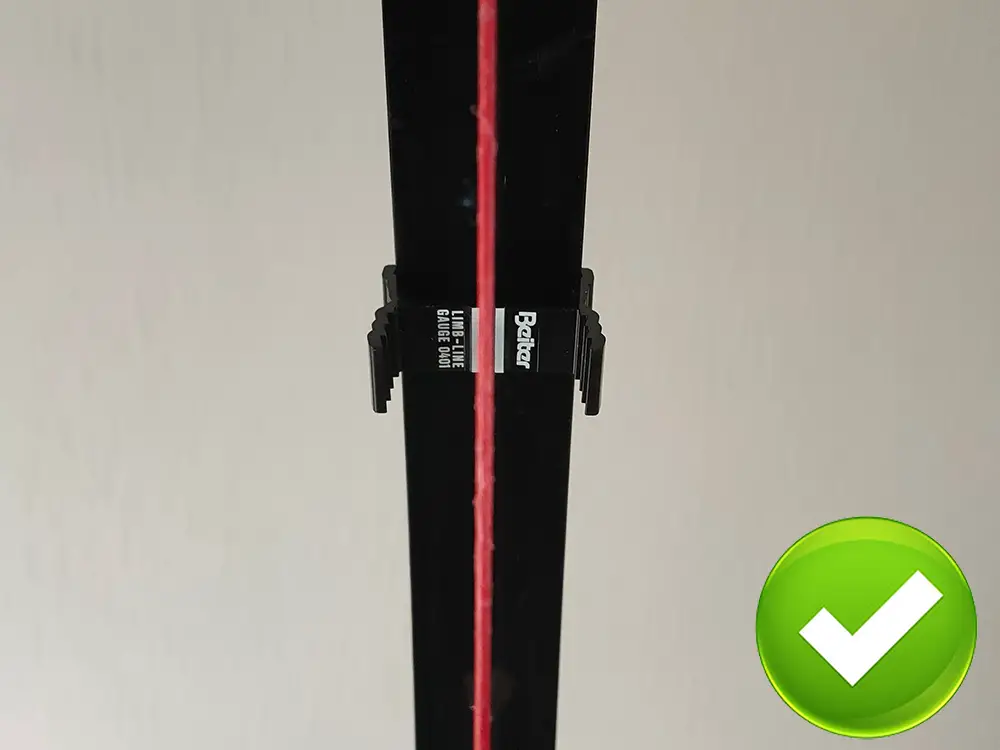
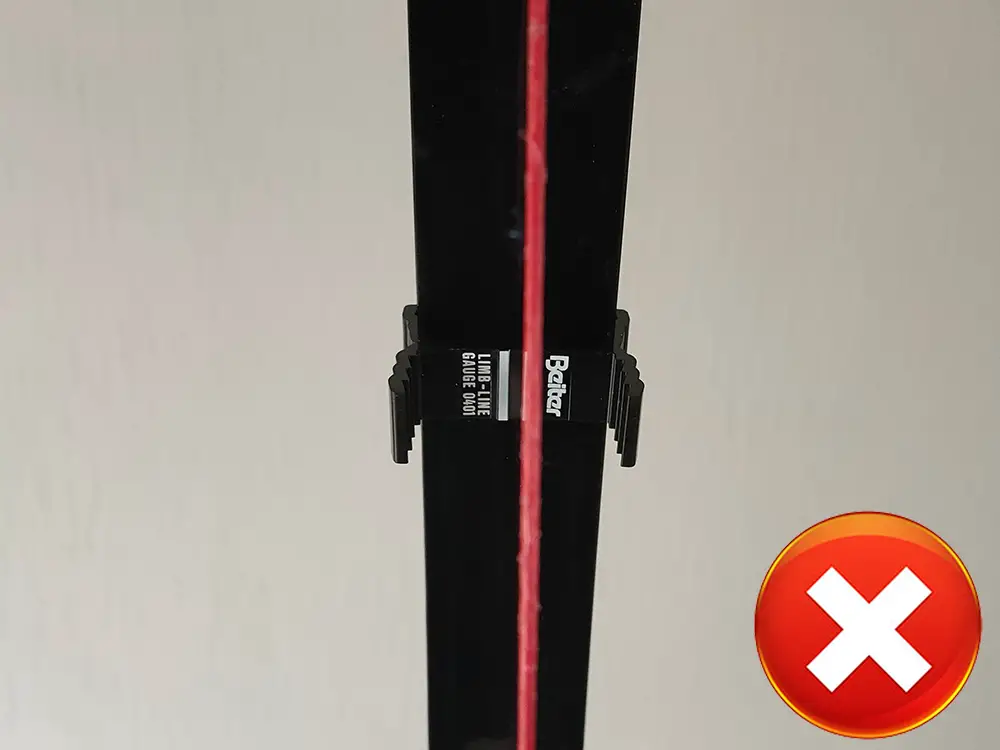
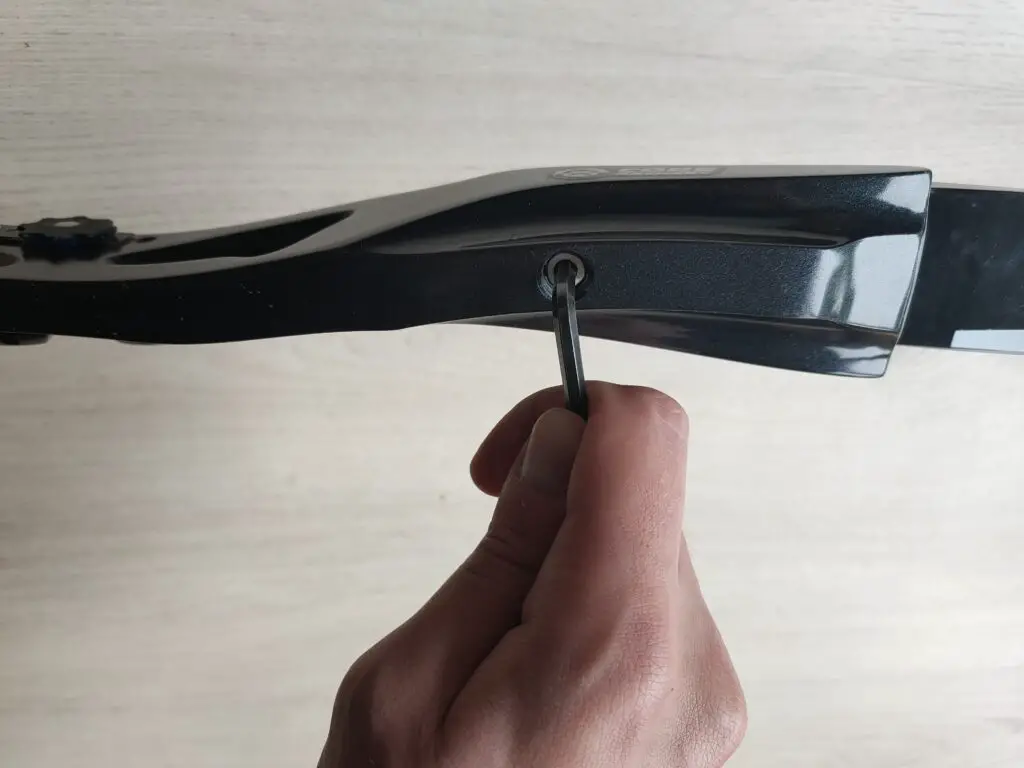
3. Install the bow gauges: to check limb alignment, we use a device called a bow gauge. If you don’t have bow gauges, you can also use a piece of tape and mark the center. I do recommend buying some bow gauges though because it’s much easier to see your alignment. Click here for the pair of bow gauges I use in this guide. You need to attach a bow gauge on both the upper and the lower limb.
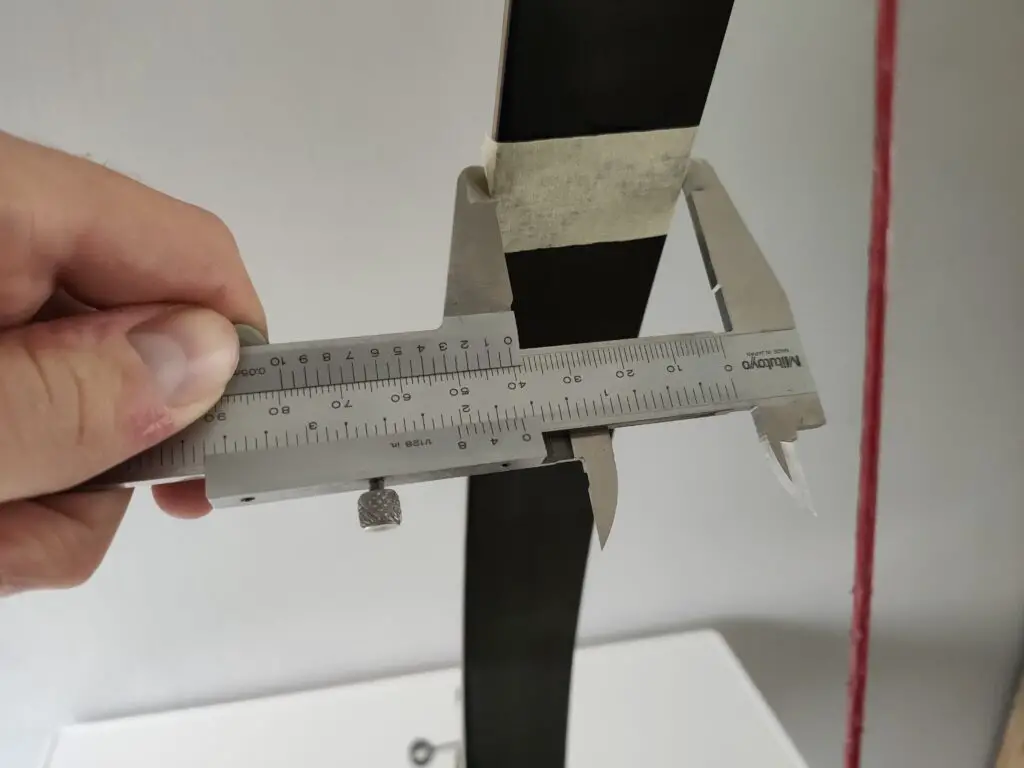
4. Look through the center of the string: take a few steps back and align the center of the string with the locking bolts of your riser. I recommend taking a seat because it can be difficult to keep your head still while standing. In some cases, you might notice that you can’t align the string on both bolts. That means that the limbs are not correctly aligned. Try to align it as best as possible and move to the next step.
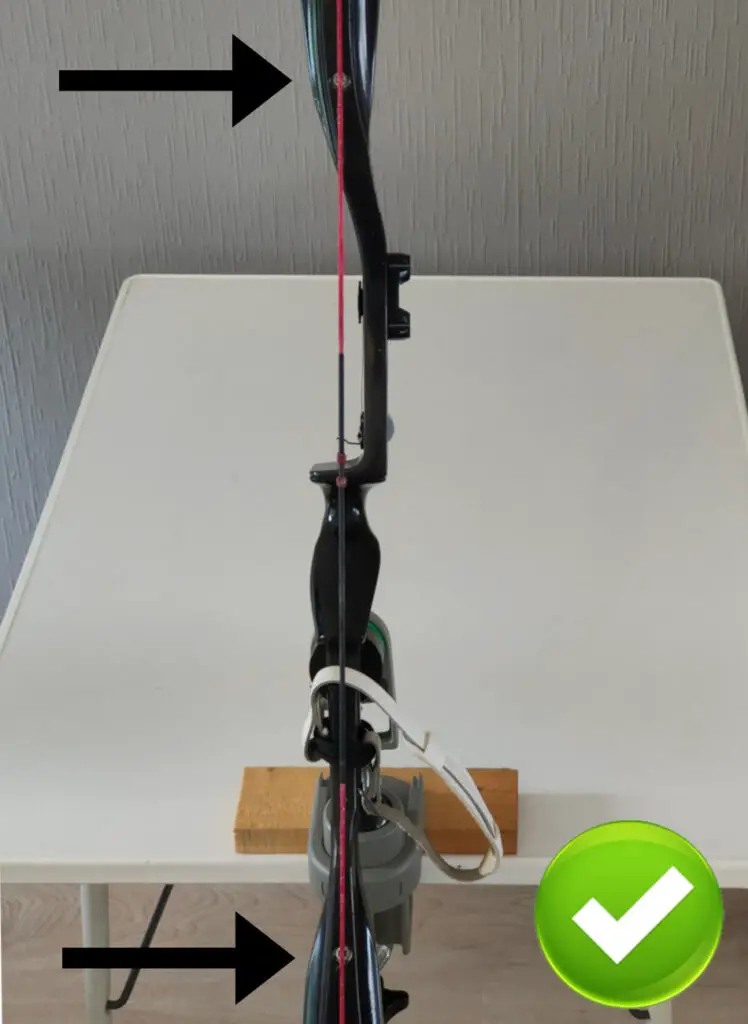
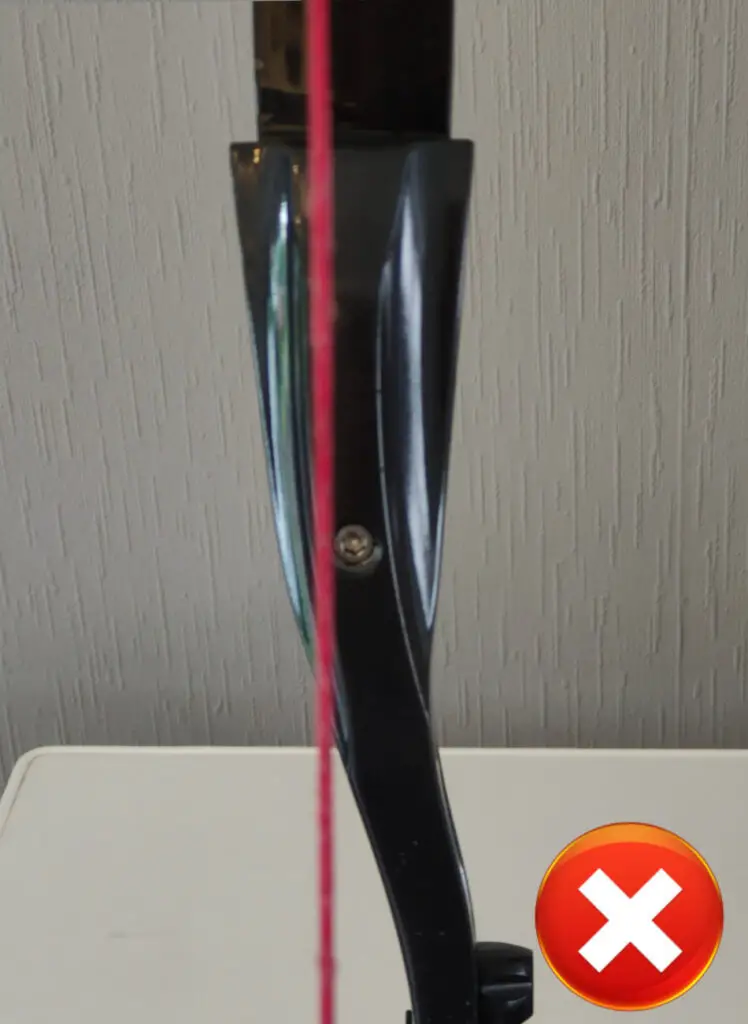
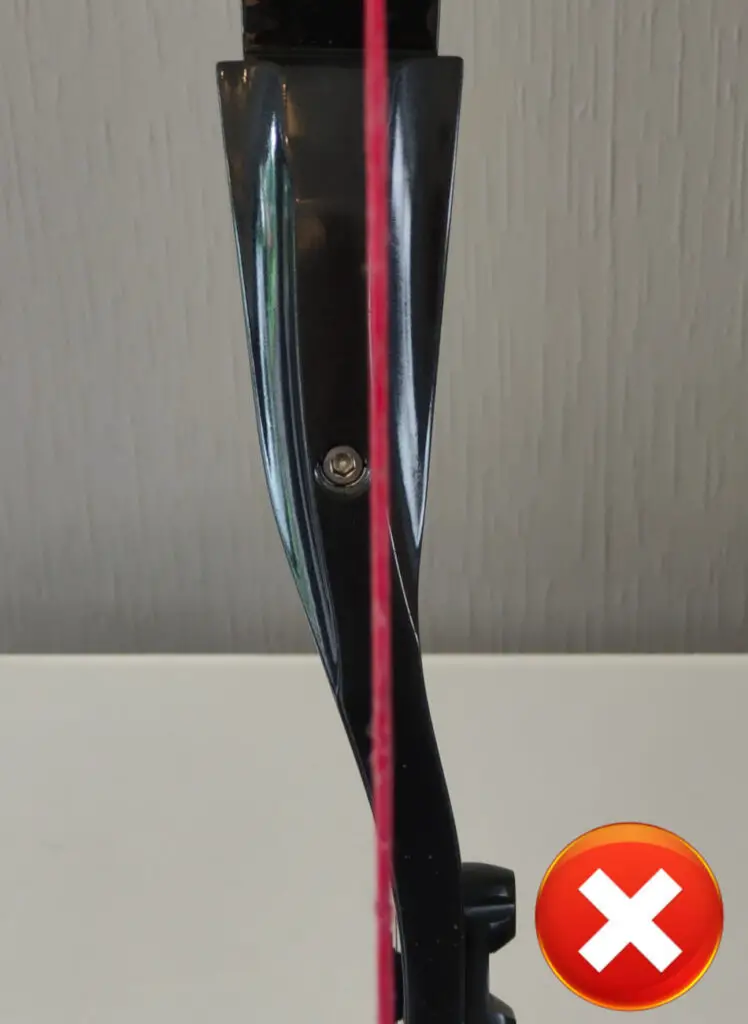
5. Check the limb alignment on both limbs by looking at the gauges: while keeping the string in the center of the riser, look at both bow gauges. If the string covers one of the two white lines that bow limb is not properly aligned. If the right line is covered, the limb is skewed to the right. If the left line is covered the limb is skewed to the right.
Tip: it can be rather difficult to check both limbs while making sure that the string is in the center of the riser. Therefore, I often take photos. This allows you to focus purely on keeping the string in the center of the riser and analyze the bow gauges calmly.
How to change your limb alignment
Okay, now you know how what changes you must make, we can start tuning the limb alignment.
To adjust your limb alignment, you must look at the limb pocket of the limb you want to change. This limb pocket is adjustable which allows you to turn the limb to the left or right. In most cases, this is configured with a screw on the side of the riser.
There are three different configurable limb pockets. Although there are no official names for these, I often use these names: Eccentric axle fitting, side screw, and washer fitting. All these systems have their pros and cons, which we discuss in more detail, in this article.
Below I discuss how these three systems work, and how they allow you to change your alignment. If you are unsure which one you have, make sure to read and watch each guide. In the guide, it will become clear whether it applies to your bow.
Side screw
The side screw limb alignment system is by far the most popular system for modern risers. The benefit of this system is that you can keep your bow strung while making changes. Additionally, it’s very intuitive and easy to adjust.
You can recognize a side screw limb alignment system by the two small screws on the side of each of the two limb pockets. You use these two screws to configure the limb alignment. To configure limb alignment, follow these steps:
- Check which limb needs to be aligned: use the guide from the previous section to check what adjustments need to be made and to which limb(s). Make sure to check which direction the limb tip should go for perfect limb alignment.
- Check which screw you have tighten and which you should loosen: if the limb tip needs to be more to the right, you tighten the left screw and loosen the right screw. The reverse is true if your limb tip needs to be more to the left.
- Adjust your limb alignment: first, loosen the screw you need to loosen and then tighten the side you need to tighten. Make sure that it’s tight because otherwise, the limbs will get unaligned while shooting.
- Check your limb alignment and make changes if necessary: it might take a couple of tries before you get it perfect.
- Tighten the locking screw: some risers have a locking screw that you use to lock the fitting in place. To tighten this screw, you first must unstring the bow and remove the limbs.
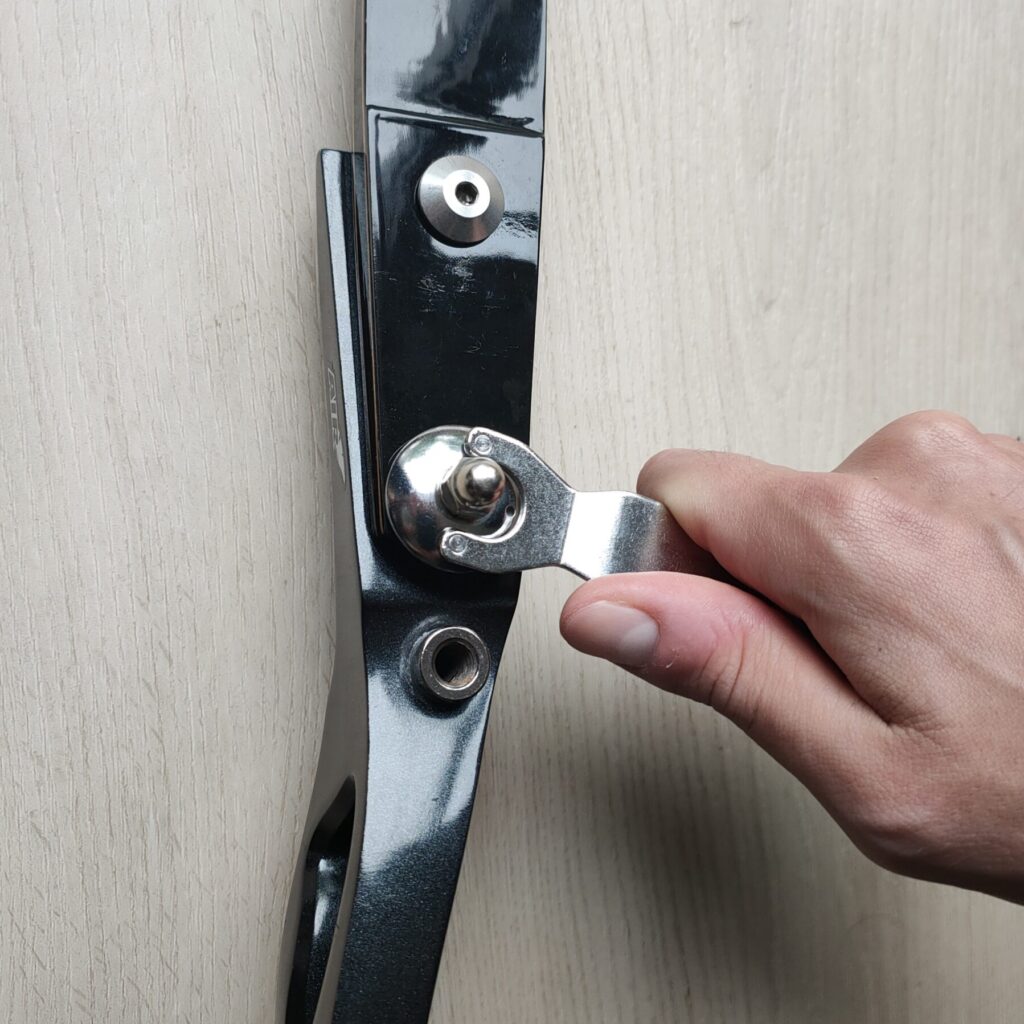
Eccentric axle fitting
The eccentric axle fitting is often found on lower-end risers. The eccentric axle fitting is cheaper to manufacture but is more difficult to use.
Risers that use this limb alignment system can be recognized by the eccentric axle fitting. Closely look at the tiller and you will see the axle is offset. This eccentric axle allows you to configure the tiller. Before you configure your limb fitting, I recommend setting the tiller height correctly first. You can do so by following this guide:
Tiller height – what it is and how to adjust it
After you have configured the tiller height, you can configure the limb alignment by following these steps:
1. Check which limb needs to be aligned: use the guide from the previous section to check what adjustments need to be made and to which limb(s). Make sure to check which direction the limb tip should go for perfect limb alignment.
2. Unstring your bow: it’s important to unstring your bow while tuning limb alignment. Otherwise, the tiller head might scratch the limb.
3. Unscrew the locking bolt in the back of the tiller: in most cases, you will need a 5/32 (4 mm) hex wrench to do this. You should now be able to turn the tiller head.
4. Configure turn the tiller head with your proprietary key: make sure to note which direction you twist. In some cases, it might take a couple of tries to figure out which way you need to turn.
5. String your bow and check limb alignment again: once you have made your changes, you should check your limb alignment again. It might take a few tries before you aligned the limbs correctly.
Tuning limb alignment with this system can be a bit cumbersome. It can take about 30 – 45 minutes before you aligned both limbs. Simply because it takes some time to figure out which way you need to turn and because you must unstring the bow every time you want to make changes.
Washer fitting
The washer fitting allows you to configure the limb alignment by adding or removing washers. This was one of the first limb alignment fittings. Therefore, you mostly find this on older high-end risers.
You can recognize a riser with this system by the two large hex screws on either side of the riser. These screws are attached to the unit that allows you to click the limb in place. When you fully untwist the hex screws you can add or remove washers to one side of the riser. Which side you need to add or remove the washers depends on your model.
To change your limb alignment, follow these steps:
- Check which limb needs to be aligned: use the guide from the previous section to check what adjustments need to be made and to which limb(s). Make sure to check which direction the limb tip should go for perfect limb alignment.
- Check on which side you should add or remove washers: you can find this information in your owner’s manual. You can also check if any of the two sides already have washers. In most cases, you add or remove washers to the left side.
- Unstring your bow: since the screws are attached directly to the limb fitting retainment nob, you need to unstring your bow. Don’t untwist these screws without unstringing your bow!
- Untwist both screws: remove the screws to remove the unit from the riser. You will then be able to add or remove washers.
- Add or remove washers: to move the limb tip to the left, you need to add washers to the left side. To move the limb tip to the right, you remove washers. The reverse is true if your bow has washers on the other side.
- Reattach the unit to the bow: insert the unit back into the bow and tighten both screws.
- Check your limb alignment again: you might have to repeat these steps a few more times to get your limb alignment perfectly.
As you can see aligning your limbs is quite complicated with this system. It involves a lot of steps and is not intuitive. Additionally, you can finetune limb alignment, because you can only do so much by adding or removing washers. Therefore, you won’t get it 100% perfect while using this system.
How important is limb alignment?
Your limbs must be correctly aligned for optimal performance. This helps to improve the accuracy of your bow and ensures a long lifespan of your limbs. Therefore, it’s important to check whether your limbs are correctly aligned if you change your riser or limbs.
It’s not worth obsessing over limb alignment though. Limb alignment is important, and it helps your accuracy a little. But for most hobbyist archers, the improvement is barely noticeable.
In the early days of archery, risers didn’t have adjustable limb pockets. This might seem like a disadvantage, but it also made things easier. With the adjustable limb pockets, your limbs can now be extremely skewed, which wasn’t the case earlier.
Therefore, I recommend tuning your limb alignment to an acceptable level. Don’t spend hours on getting it 100% right, that’s simply not worth it. Just make sure that your limbs are not completely skewed.
What if I can’t adjust limb alignment
If you can’t adjust limb alignment on your bow, you don’t have to worry about it at all. Limbs are relatively straight, to begin with. Some archers even believe that adjustable limb pockets are unnecessary.
For a beginner, adjustable limb pockets only make the bow more unnecessarily complicated. That’s why don’t often find them on cheaper beginner’s bows. Time spent learning how to tune your bow is better spent on learning how to shoot.
Therefore, don’t feel disadvantaged just because you can’t tune limb alignment. If the limbs are reasonably straight, you probably don’t need it.
Learn more about tuning
In this article, we have discussed one part of the bow that can be tuned. But shooting well will still be challenging if your other bow parts are not correctly configured. Therefore, make sure to tune your entire bow by following the guide below:
Also, make sure to read my in-depth articles on tuning the individual bow parts:
Final words
I hope this article was helpful to align your limbs. If you have any questions, comments, or suggestions, please let me know in the comment section down below. I will respond to your question as soon as possible and I will send you an email with my reply.

Tim van Rooijen
For as long as I can remember, I have always been fascinated by archery. First due to its historic significance but later because I like being outdoors. With this blog, I share my knowledge about Archery and how you can improve your shot. More about author…
Hi Tim,
First of all, I really enjoy reading your informative how-to articles so thank you so much for sharing.
Regarding this limb adjustment article, for the side screw system you wrote, “if the limb tip needs to be more to the right, you tighten the right screw and loosen the left screw”, which is the opposite of what’s described in the video i.e. you loosen the screw on the side you want the limb to move to. Did I understand it correctly?
Regards, Rob
Hi Rob,
Thanks for the compliments, I appreciate it!
You are right, I see I made a mistake in the article, the video is correct. Sometimes, it’s quite difficult to describe those things. I have tuned so many bows that I do it more on intuition than remembering which screw I need to use.
Thank you for letting me know, I changed it in the article.
Best regards,
Tim van Rooijen