One of the most important aspects is your form. With form, we mean how you stand while shooting your bow. How you keep your arms, back, head, and legs. New archers often think that only your arms are important. But that isn’t true. You use your full upper body to draw and aim the bow. And since your lower body supports your upper body, also your legs, feet, and back are vital aspects of your form.
In this article, I will therefore explain how you should stand while shooting your bow. I will discuss this in detail, but if you don’t have time to read on, read at least the bold section below for a summary:
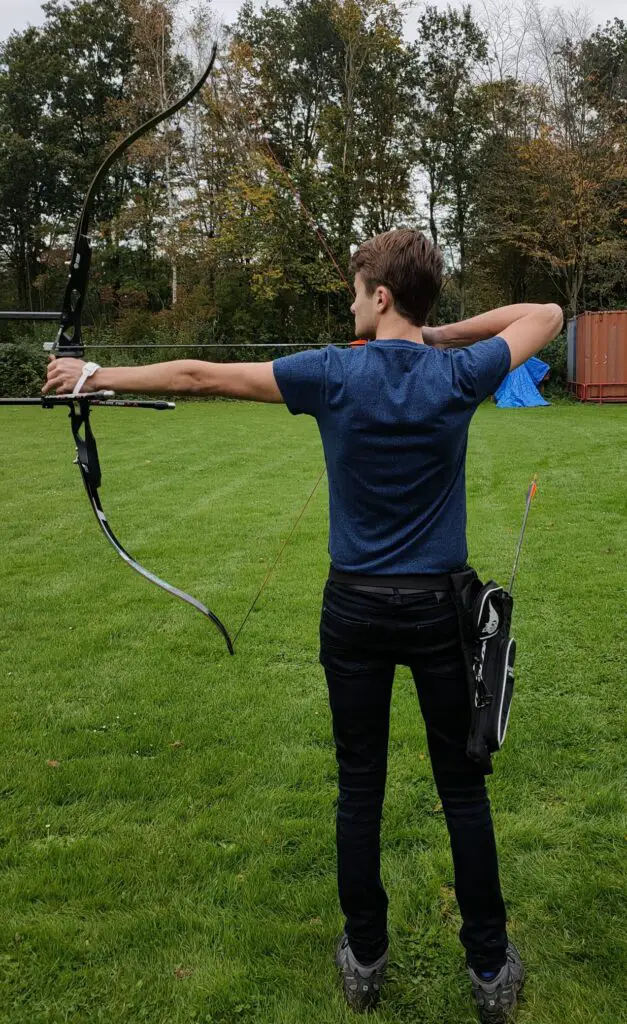
To keep the right archery form, you should stand with your feet parallel to the shooting line at shoulder width. While shooting your bow, you should keep your back and bow arm straight. Pull your shoulder blades together to get both shoulders in a straight line with your bow arm. Use a mirror to practice and regularly check your form.
In the remainder of this article, I will discuss archery form in much more detail. I will first explain what the perfect form looks like. Next, I will discuss different foot positions and how you can train and improve your form. At the end of this article, I will explain how some archers deviate from the perfect form and discuss why it’s important to have the right protection.
Before we start
Although I try to make this guide as complete as possible, it’s not possible to cover all minute aspects. Therefore, this guide aims to give you the basics. If you are serious about archery, I would highly recommend taking an archery course or hiring an archery coach.
I understand that hands-on coaching is not always available for everyone. Luckily there is a great (in my opinion even better) alternative – following an online course from the Online Archery Academy. With video examples and detailed explanations, these courses are a great way to improve your archery. I can personally vouch for them, as I have also taken the courses.
Readers from this blog will get a discount of 20% if you use the discount code IYA at checkout. If you don’t think the courses help you improve your archery, you can always use the 100-day money-back guarantee.
The perfect form
Although form differs amongst archers, there is a baseline technique that most archers follow. Some archers might deviate slightly from this technique. Beginners should try to follow this technique as closely as possible since it helps them to stay consistent and improve their accuracy.
In this section, we will discuss all aspects of your form in detail. Starting with your feet and working our way up.
Feet
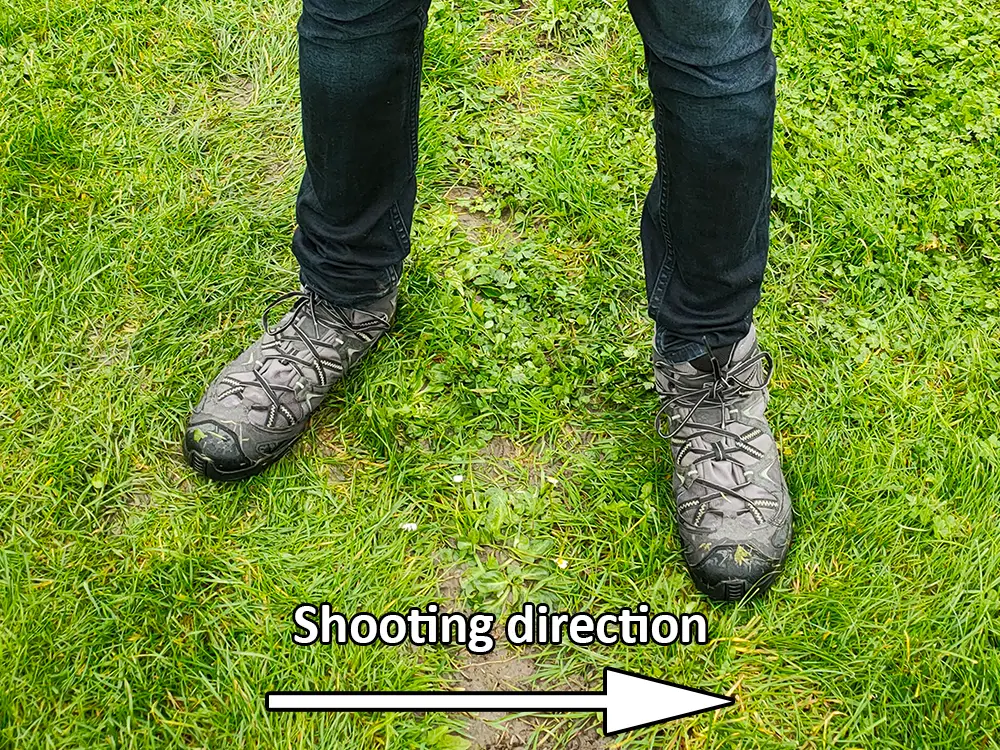
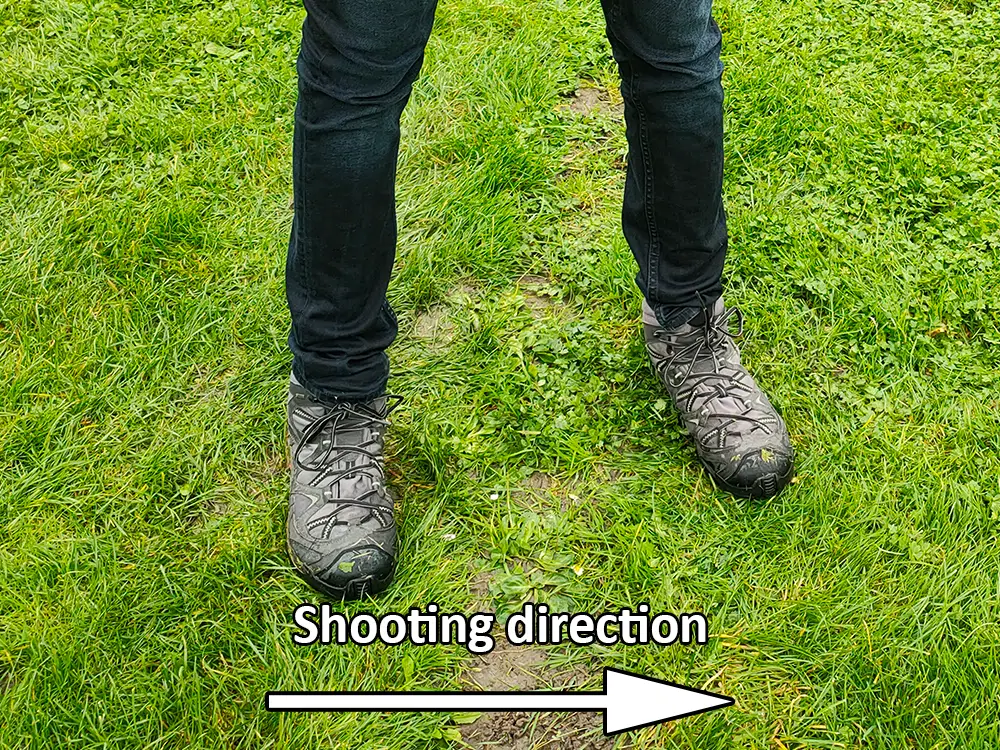
Feet positioning is very important since you need to stand stable during your shot. Therefore, there are some clear recommendations on how you should keep your feet while holding your bow:
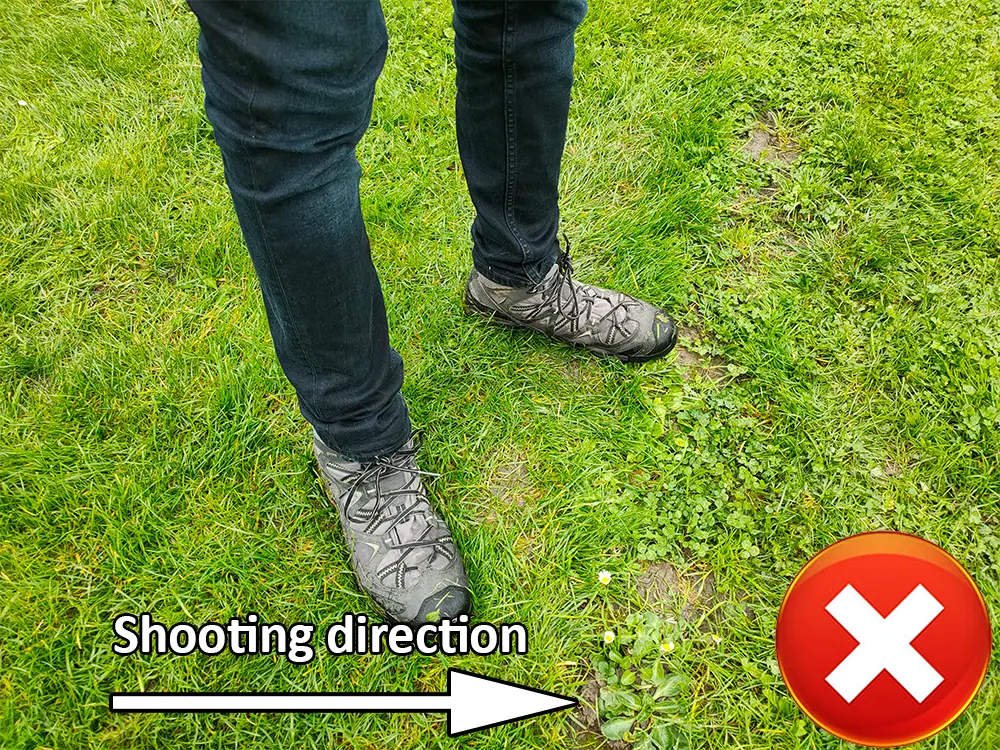
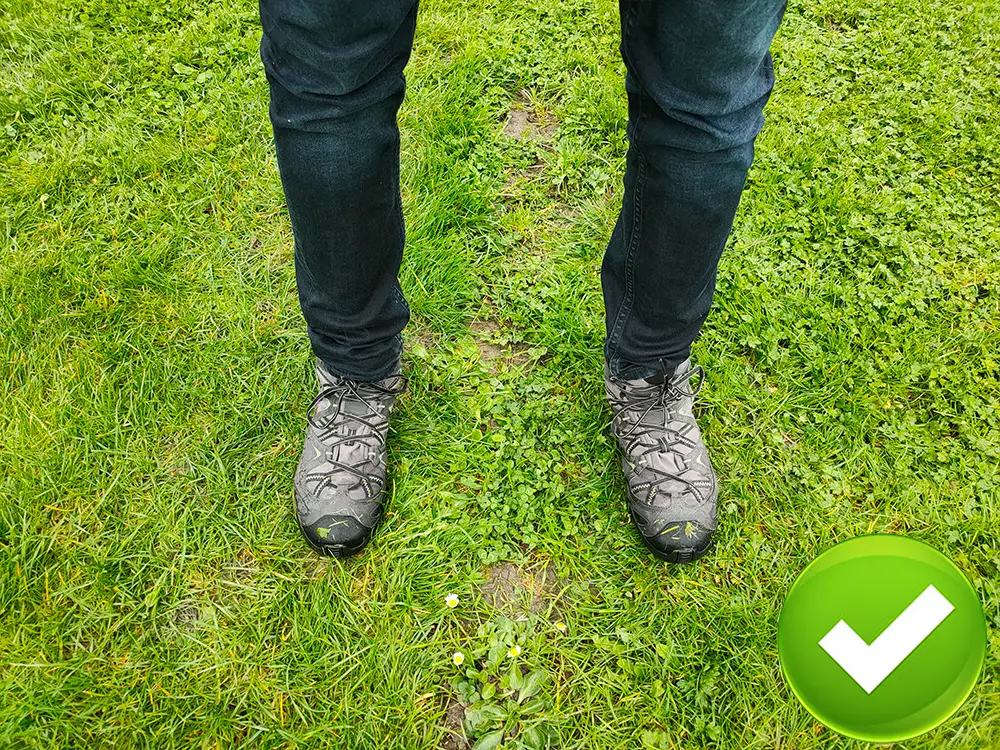
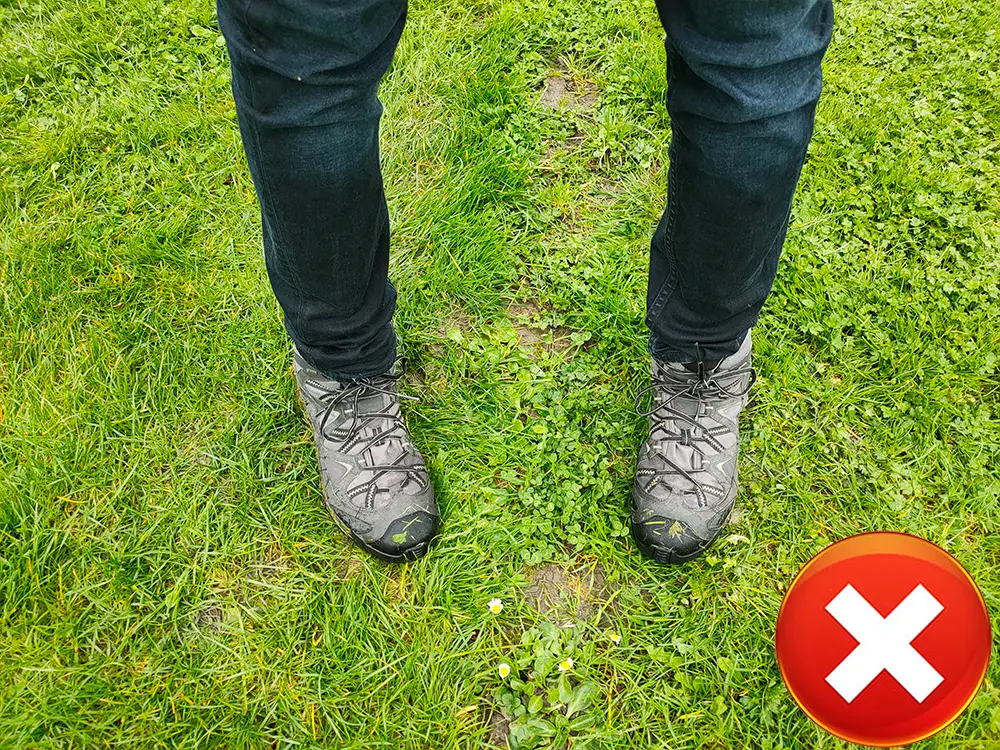
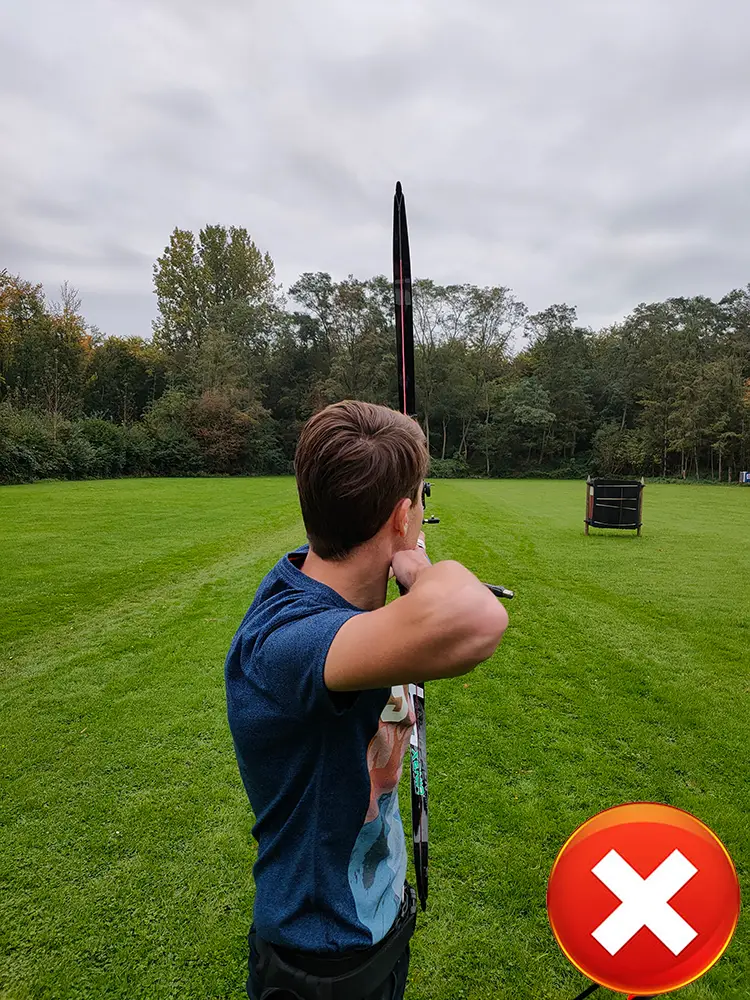
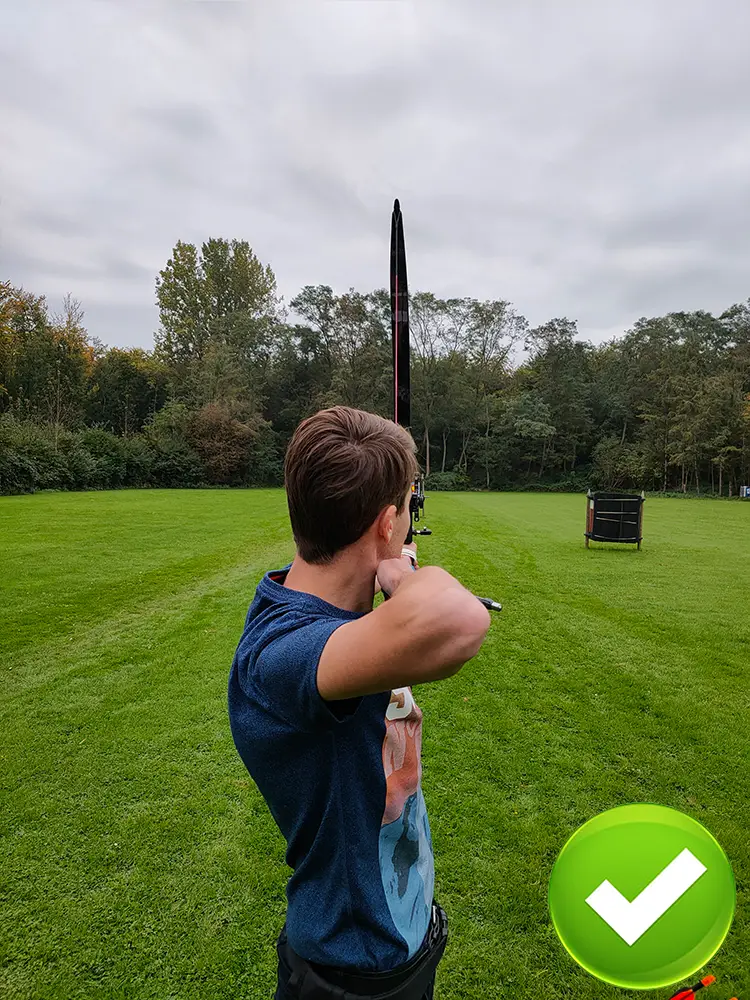
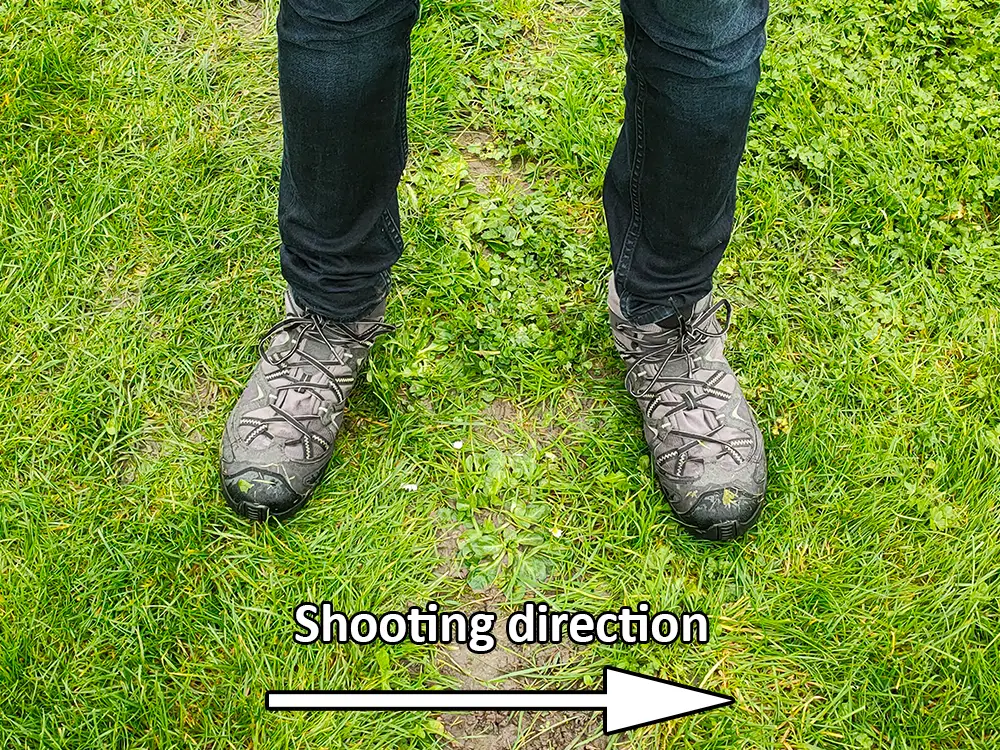
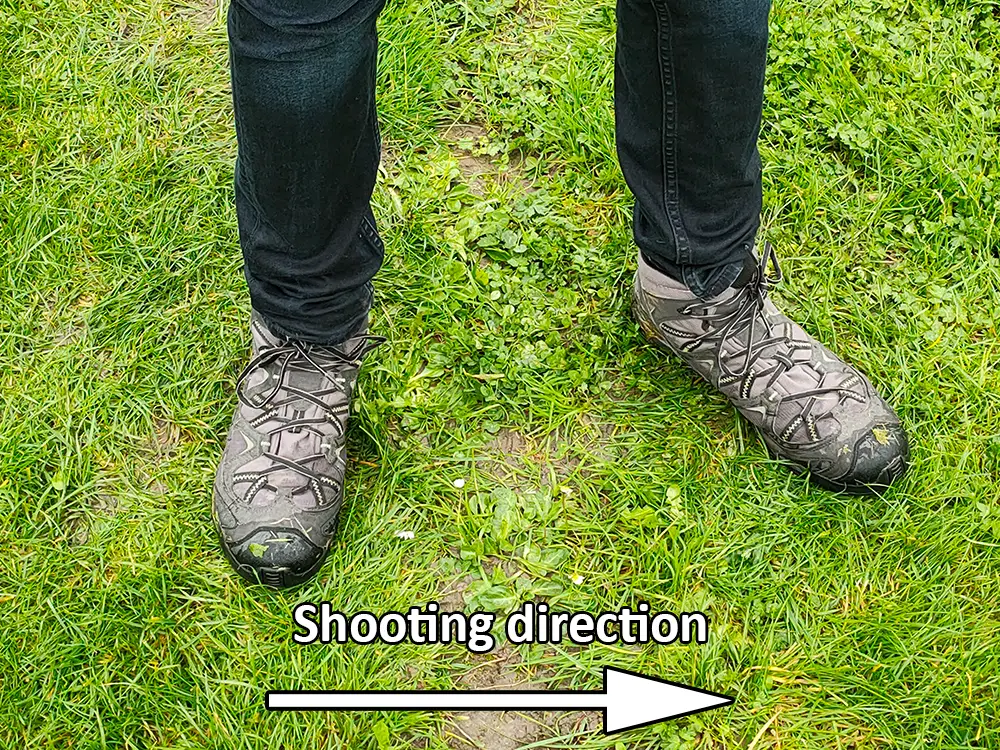
Keep your feet parallel to the shooting line: a common beginner’s mistake is to shoot a bow with both feet towards the target. This makes drawing and aiming your bow very difficult. Therefore, you should turn 90 degrees. Therefore, both feet will be parallel to the shooting line. There are some variations from this stance, which we discuss in the next section.
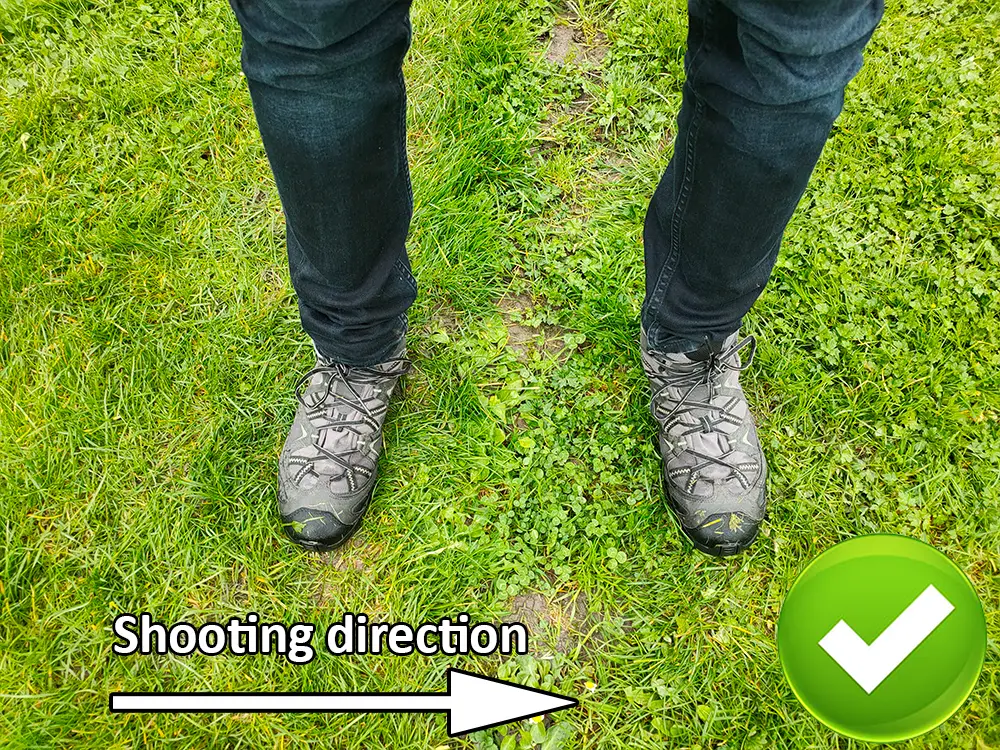
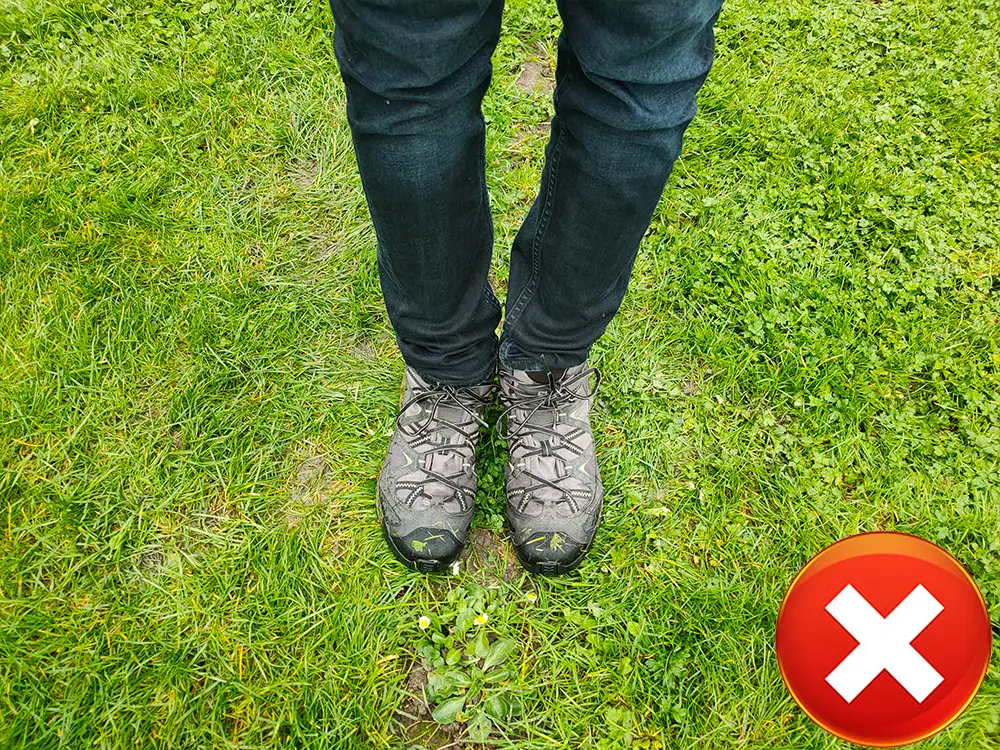
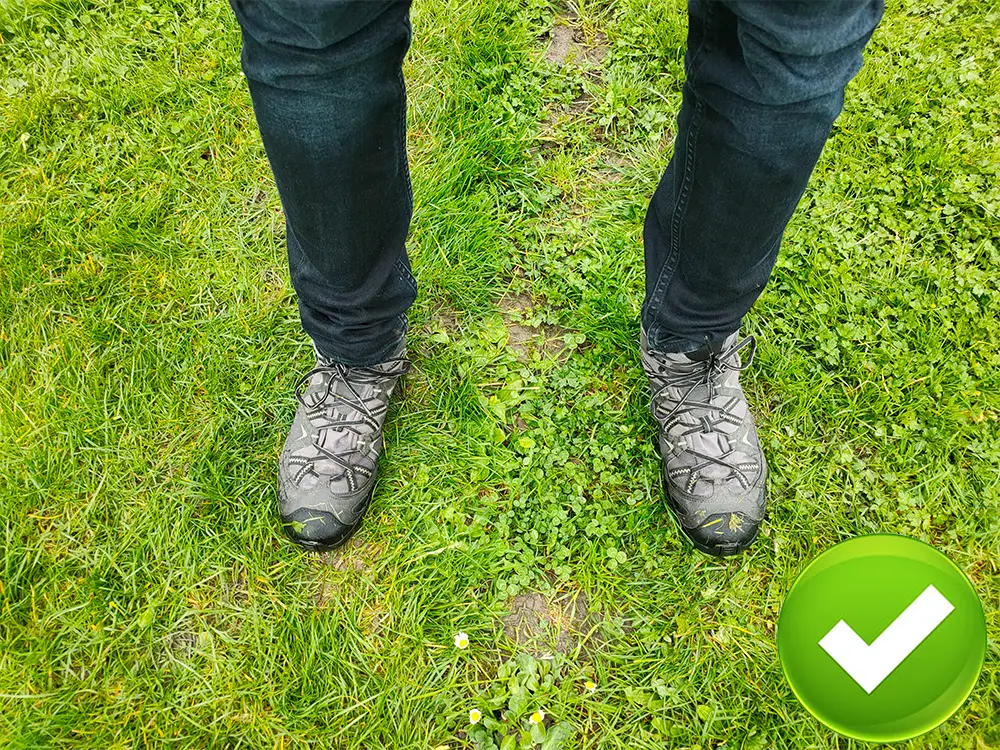
Stand with your feet at shoulder width: spread your feet until you are at shoulder width. Don’t place your feet close together since it will make it hard to balance while holding your bow. If you feel more stable you can spread your feet a bit farther than your shoulders. But make sure that you are not straining your muscles by spreading out too far.
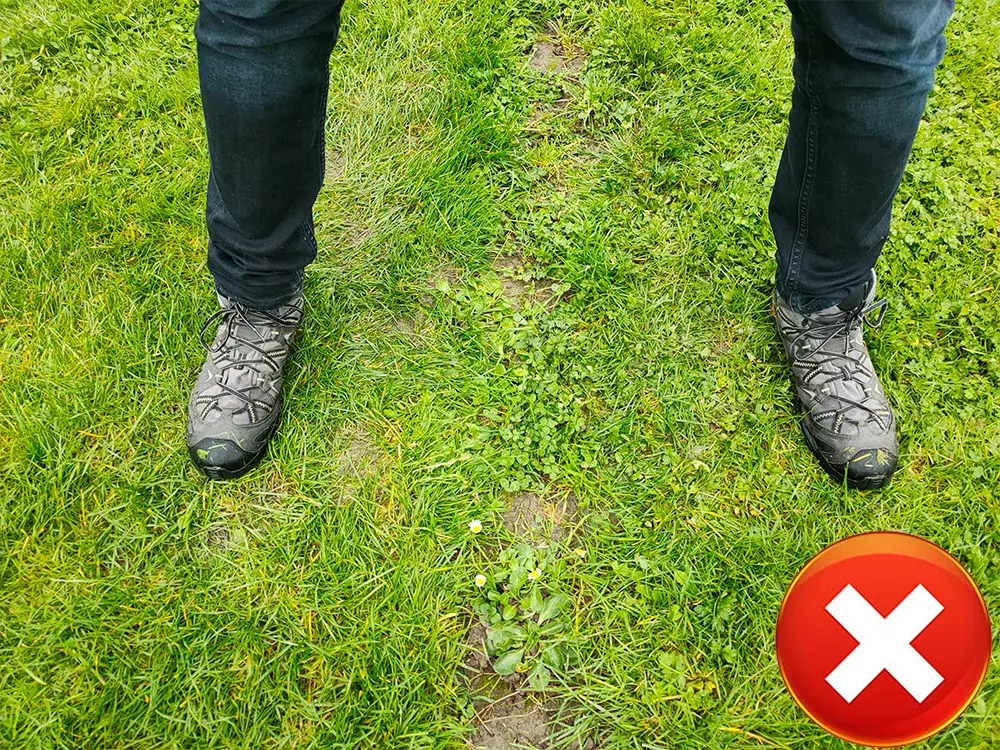
Aim your toes slightly outwards: when we walk our toes aim slightly outwards because this increases our stability. Therefore, when you shoot your bow, you should do this too. Most archers will do this without thinking about it since it feels quite natural.

Legs
Your legs support your upper body. Therefore, you shouldn’t twist or turn your legs which makes it difficult to maintain the right form in your upper body. In general, your legs need the least attention of your form. If you have your feet right, your legs should stay in the right position. But still, there are two things you should note.
Keep your knee straight: don’t go through your knees. Although some archers believe that you are more stable, it makes you less consistent and strains your back muscles more. Also, don’t overextend or lock your knees the other way. Locking your knees is bad for your joints and makes your stance less stable.
Keep your knee relaxed: stand as you would always stand. Don’t tense your knee muscles, they should be relaxed. Tensing your muscles can cause your knees and body to vibrate which reduces the accuracy of your shot.
Back
Archers use their back muscles to aim the bow up and down. We do this to adjust for elevation and to account for the distance of the target. Therefore, it’s not uncommon for archers to experience muscle strain in the back.
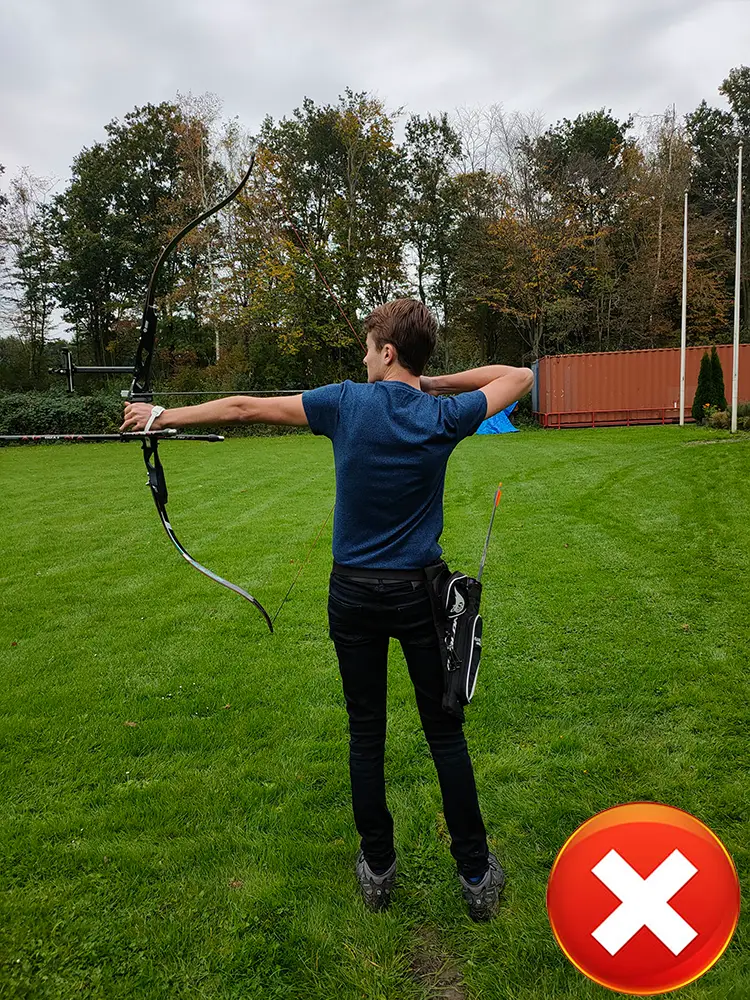
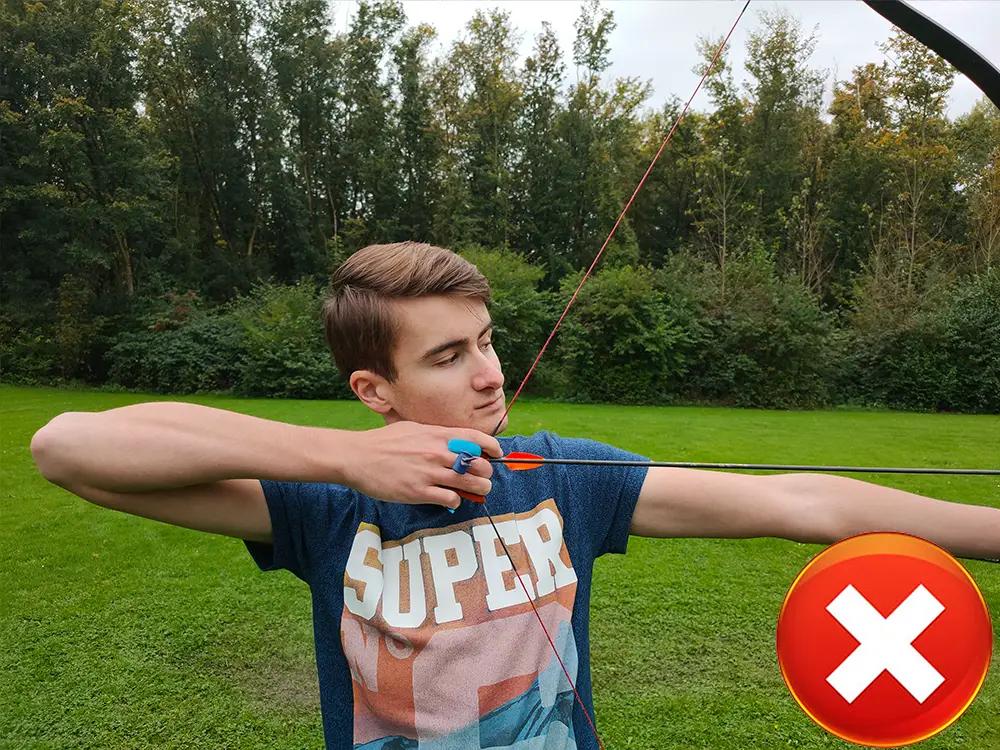
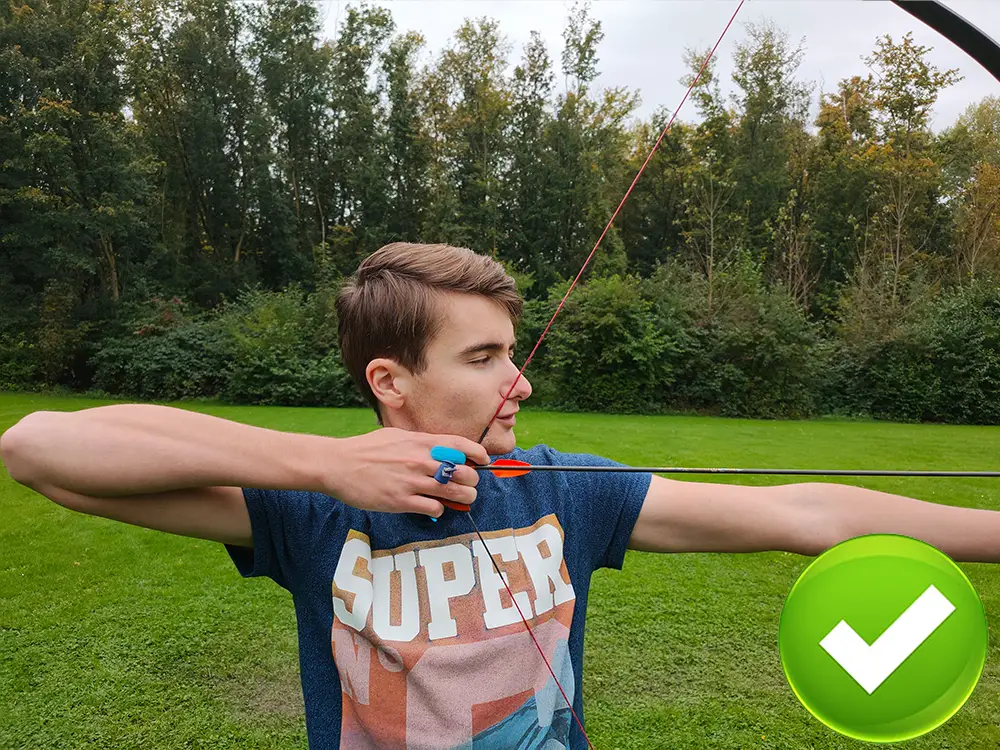
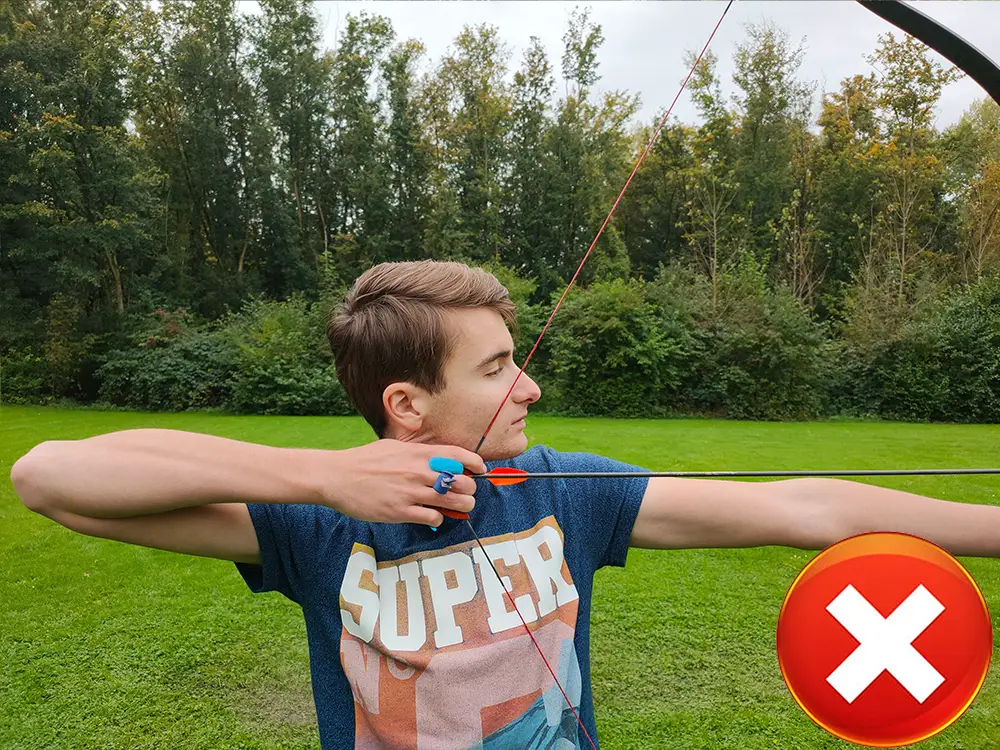
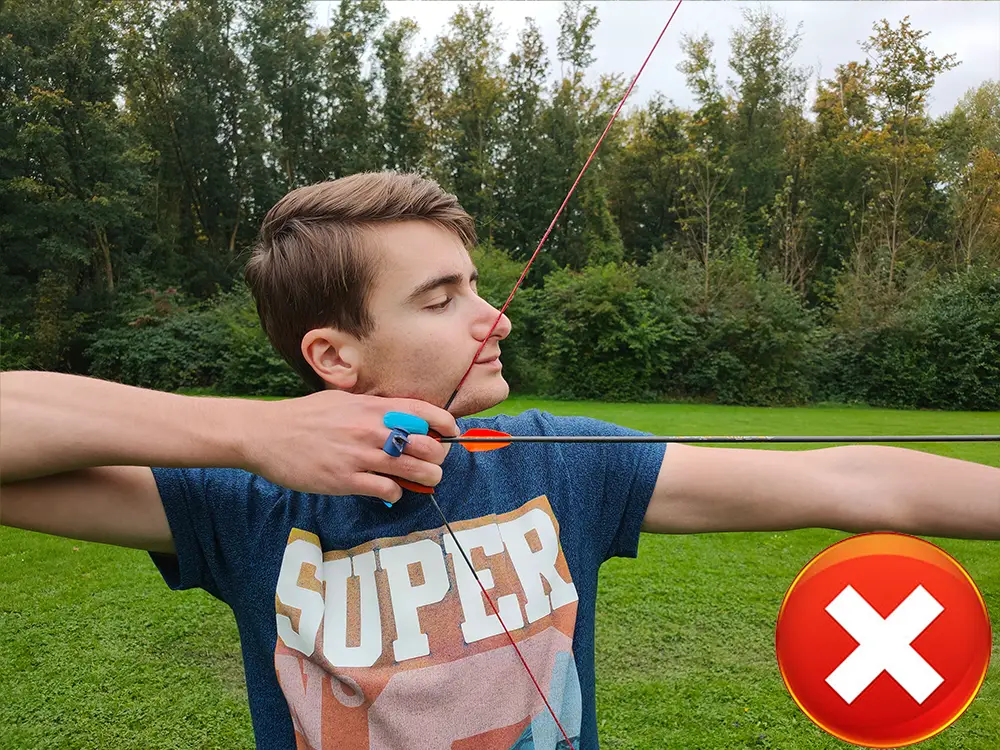
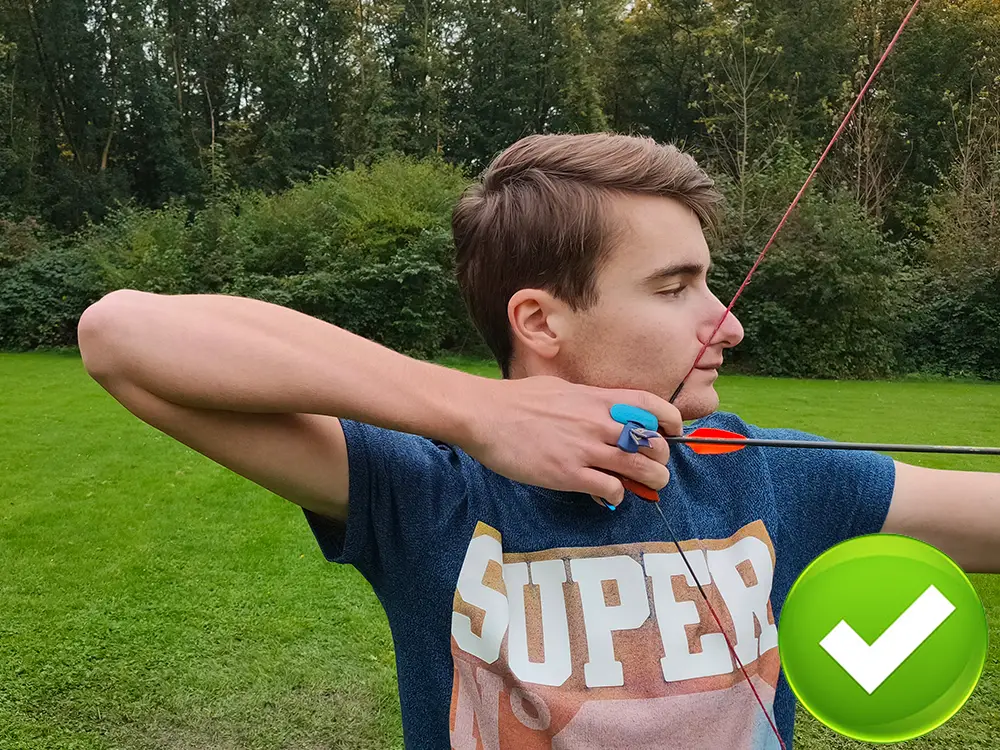
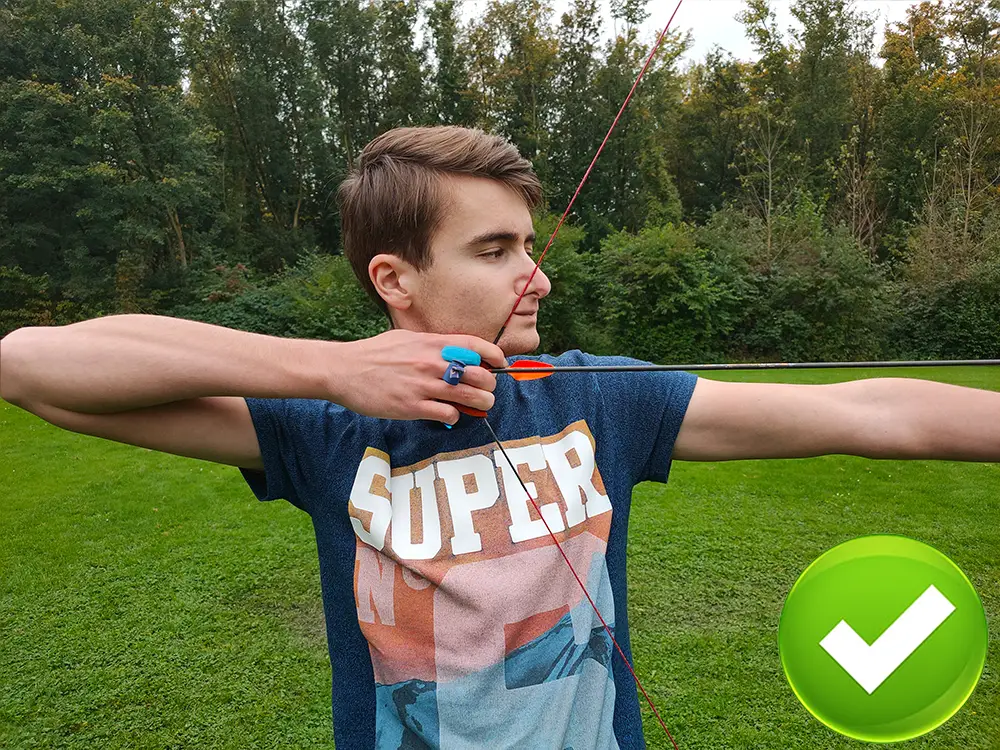
Keep your spine straight: when you draw your bow, your spine should be straight. A common mistake is to lean away from the bow. This is a natural reaction from the body because this makes it easier to hold the bow. But this also makes it more difficult to keep it at full draw.
When you keep your spine straight, you will feel that more weight is placed on your foot closest to the target. This is perfectly normal, although some archers believe that the pressure should be even. This isn’t possible if you shoot with a straight spine.
You might have to bend your spine if you aim your bow upwards. A slightly bent spine isn’t an issue. You often see Olympic archers with a slightly bent spine. But it shouldn’t be too extreme
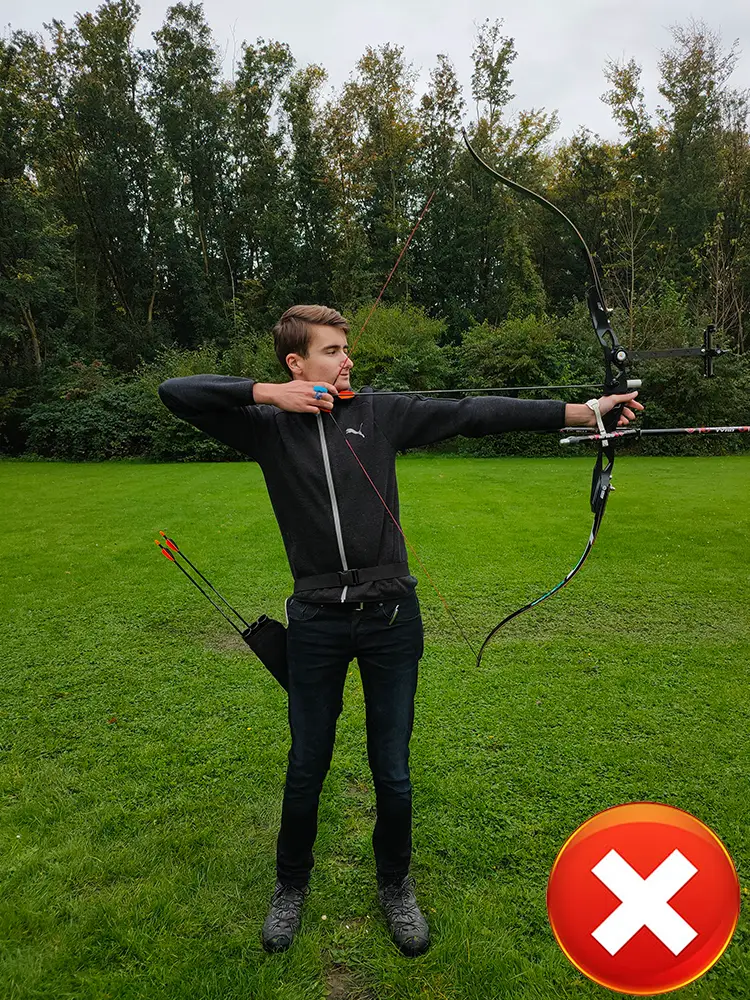
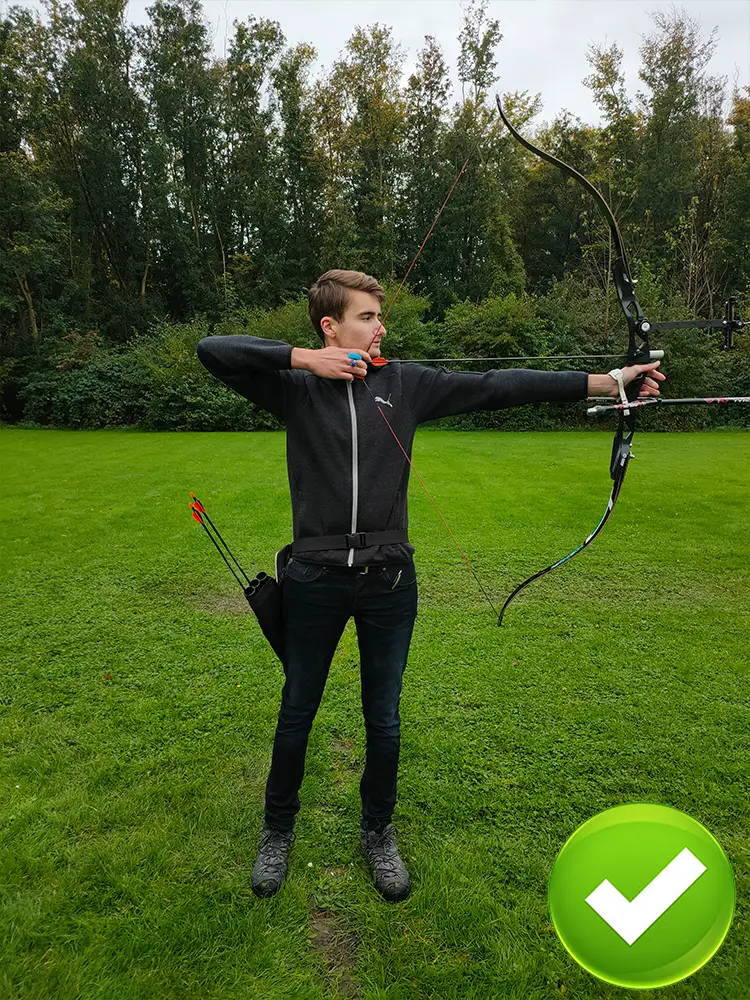
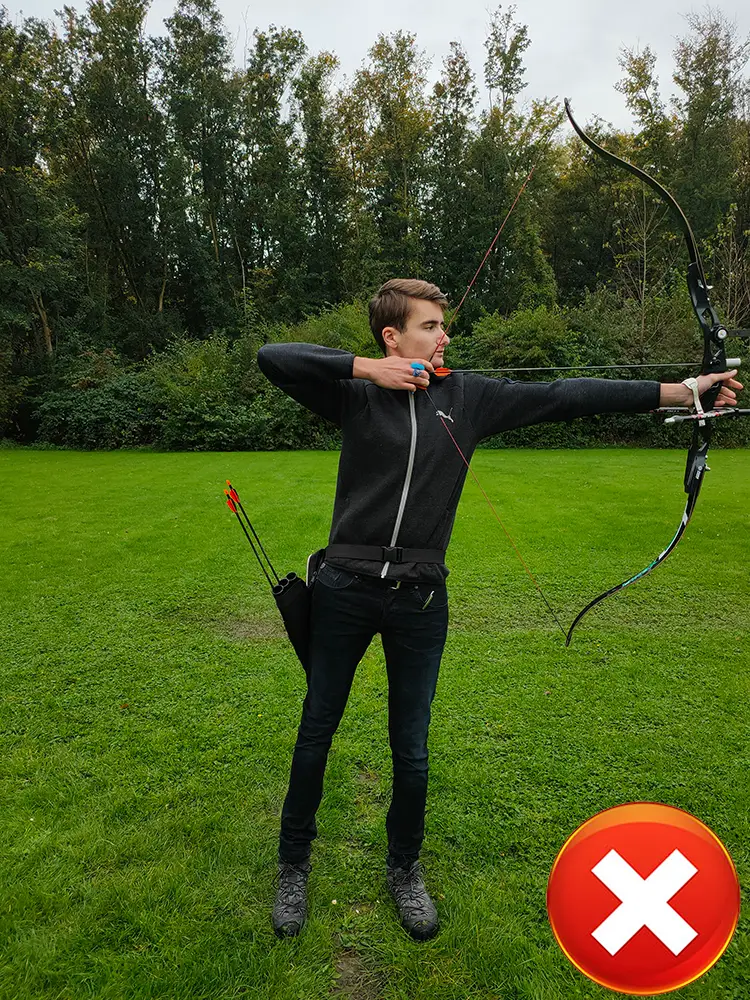
Don’t bend forward or backward: while you are shooting, you should stand straight. Don’t bend forward, but also don’t bend backward. In some cases, shooting with a completely straight back isn’t possible. I will discuss this later in more detail.
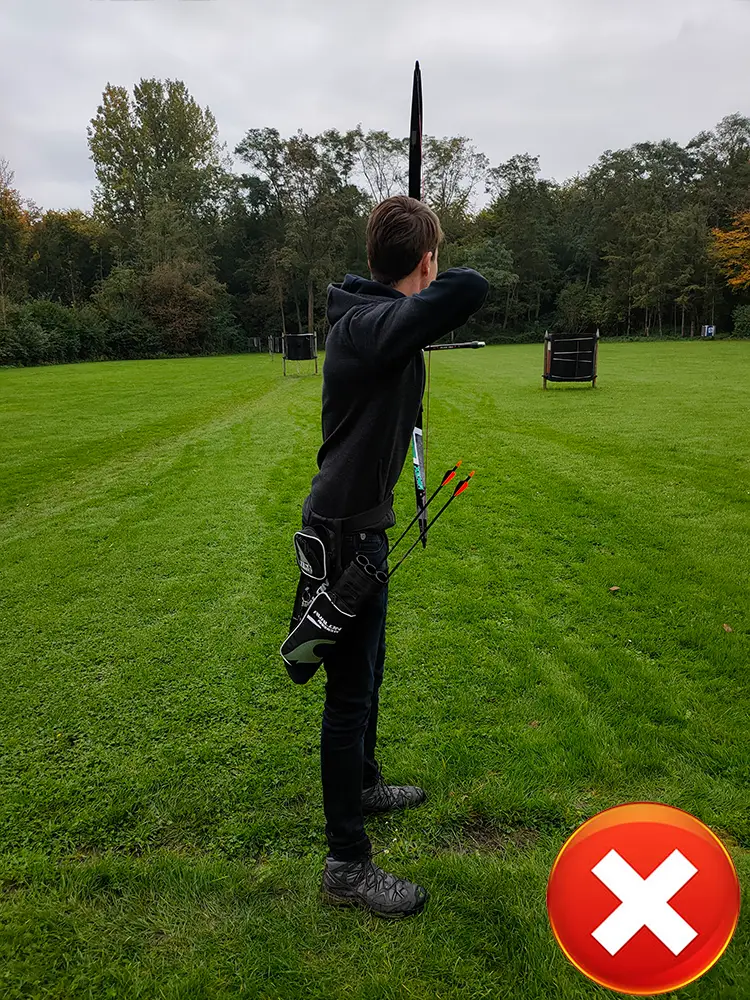
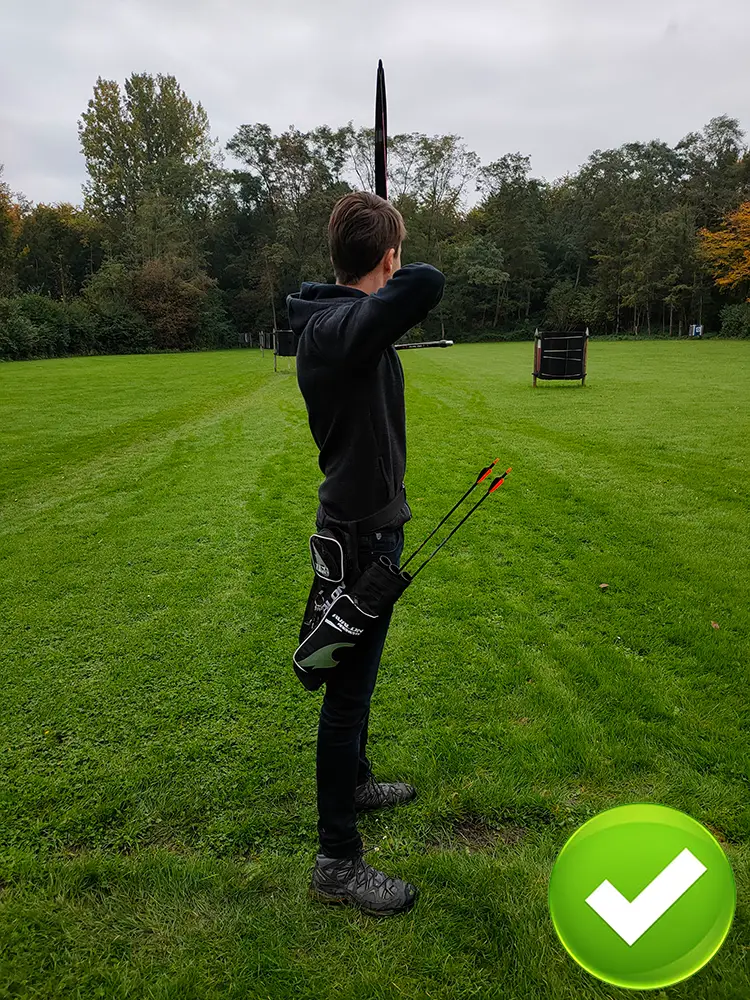
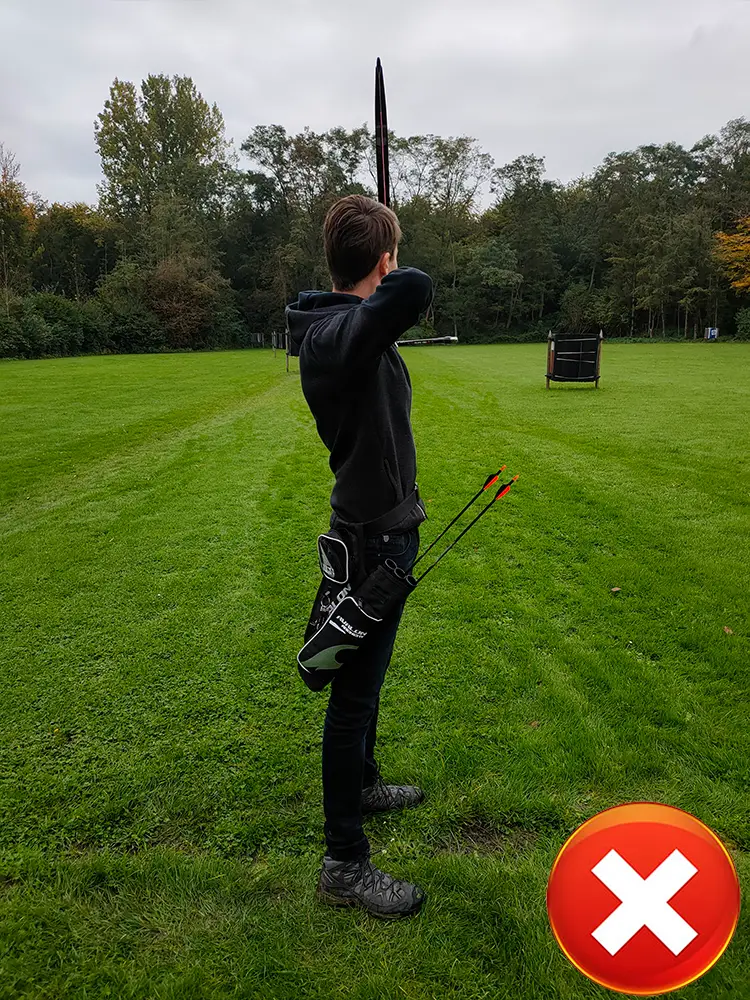
Shoulders
The position of your shoulders is probably the most important in archery. Since you can’t see your shoulders it’s something most new archers get wrong. Fatigue also often causes major issues with the form of the shoulders.
Since your shoulders can influence your draw length it’s important to keep them in a consistent position. Additionally, if your shoulders are not properly aligned holding the bow at full draw will become extremely difficult.
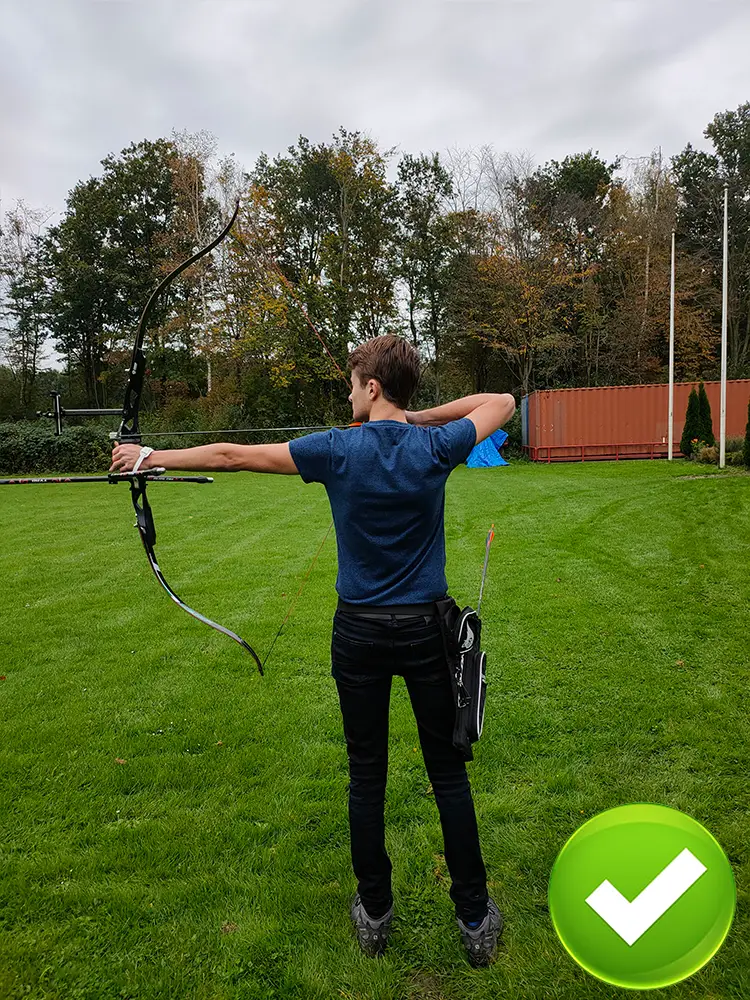
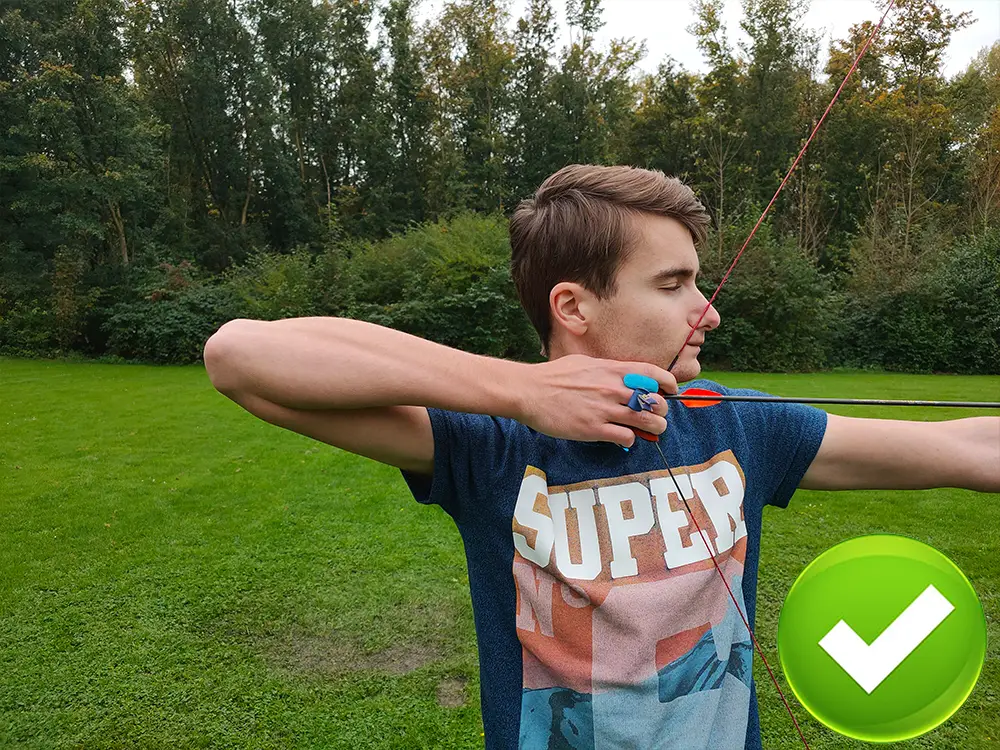
Align your shoulders with your bow arm: when you draw your bow, you should pull your shoulders backward. This makes it easier to keep your bow at full draw because your shoulders are aligned with your bow arm. This also slightly increases your draw length and increases your overall consistency.
Arms
It will not as no surprise that the positioning of your arms is very important. It is quite easy to make minor changes between shots. This causes inconsistencies in your shot, which decreases your accuracy.
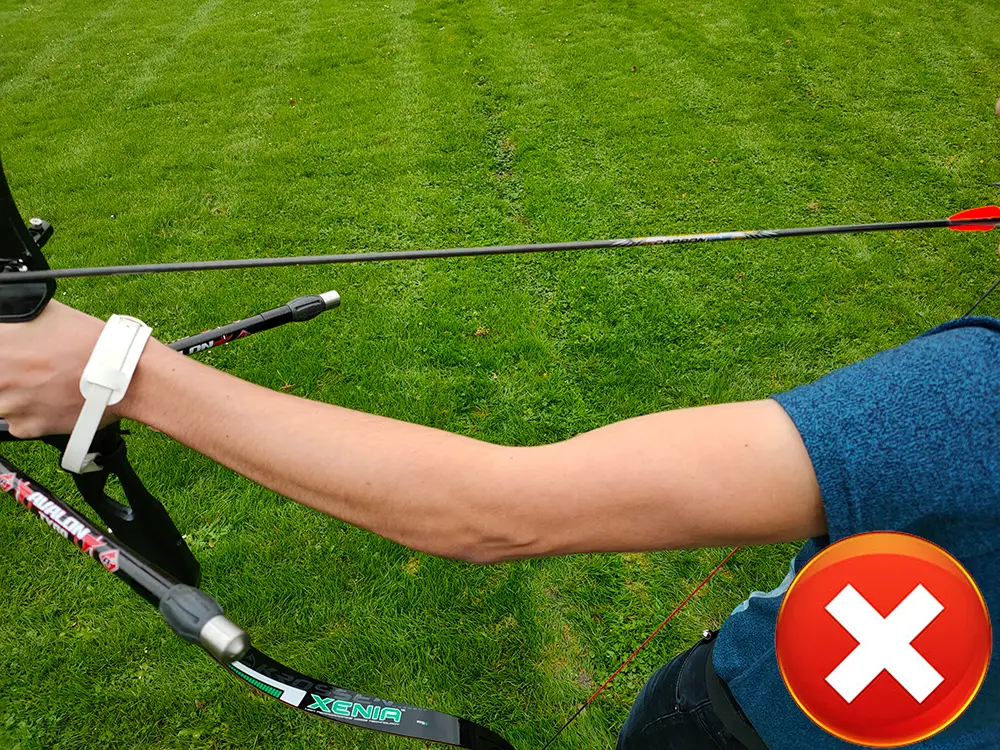
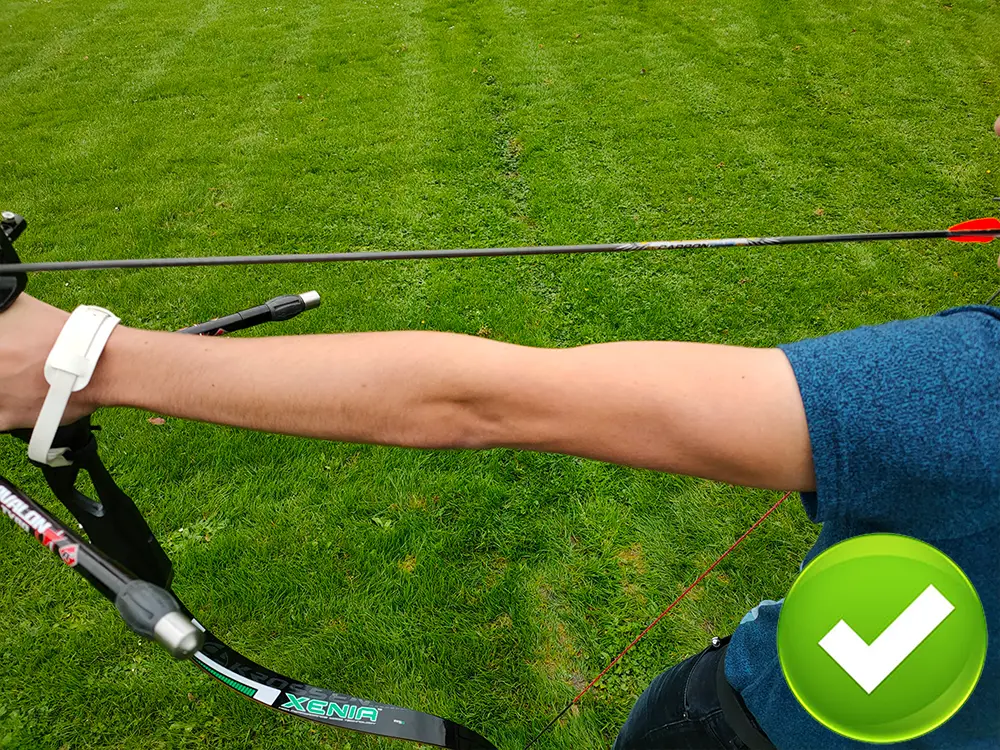
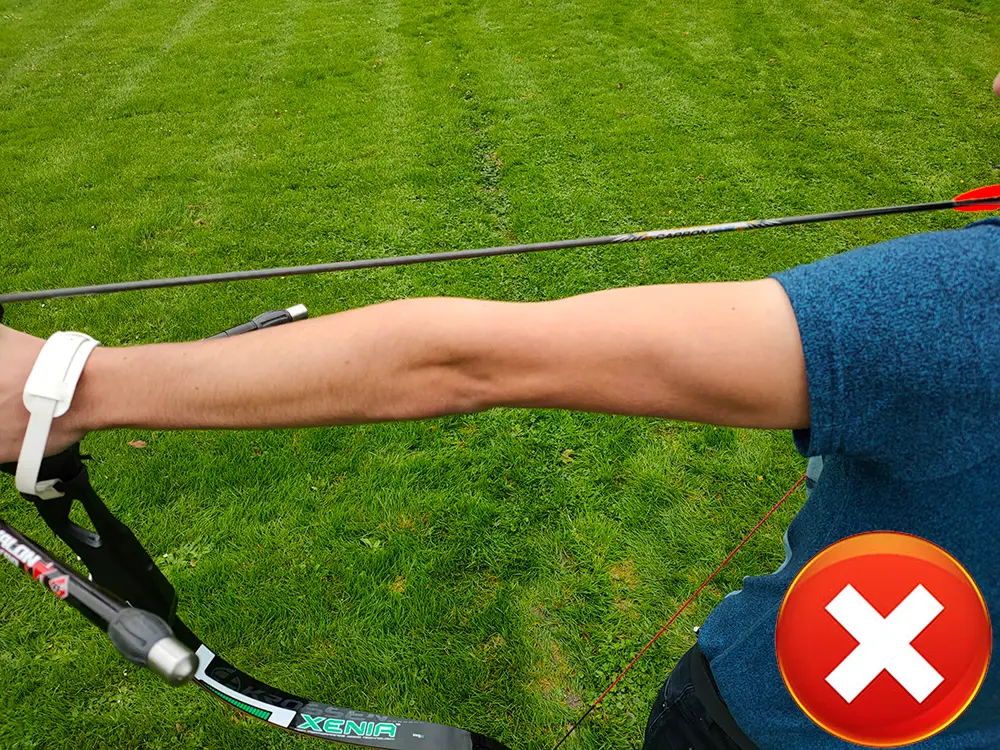
Keep your bow arm straight: if you keep your arm bent, it’s quite difficult to keep the bent consistent between shots. Increasing or decreasing the angle of the bent by a few degrees can make huge differences. Therefore, archers should shoot with a straight arm. Don’t lock your elbow though, you should still be able to bend your arm. Locking your elbow can cause muscle and joint issues. I discuss why I recommend keeping your arm straight in more detail in the article below:
Shooting with a bent vs. straight bow arm
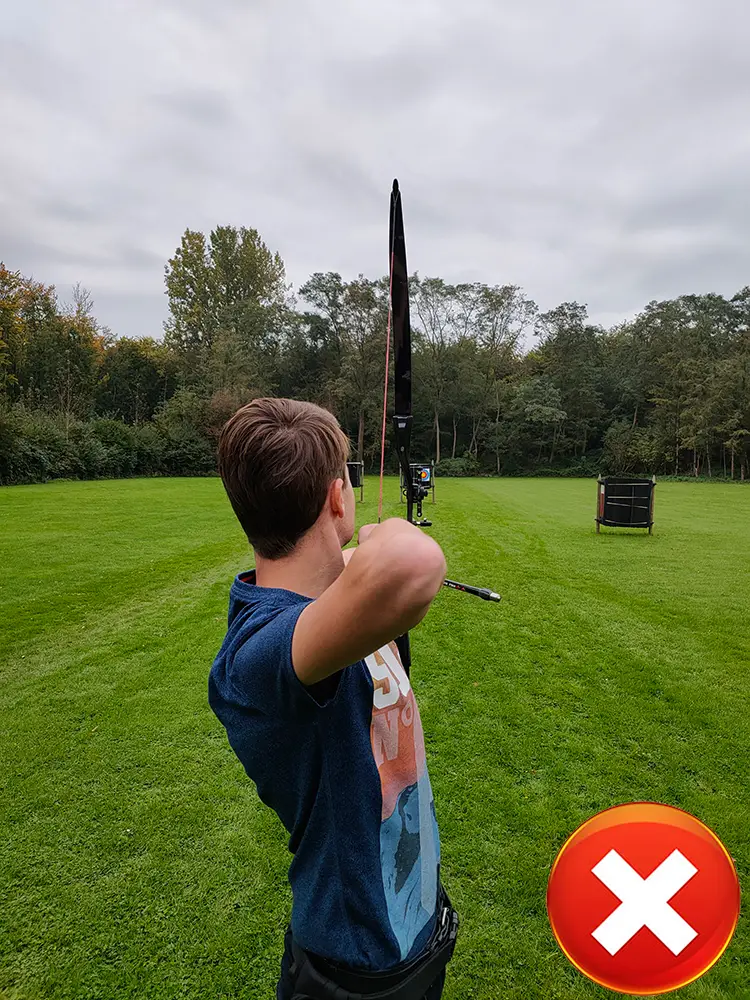
Keep the forearm of your draw arm horizontal: a common mistake for new archers is to keep your draw arm too low. In general, it’s recommended to keep the forearm of your draw arm at least horizontal. You can also aim your elbow slightly up if that feels more comfortable. If you have long arms, aiming your elbow slightly up might feel a lot better. But if you keep your draw arm too low, it will be more difficult to keep the bow at full draw.

Head
Keeping your head in the right position is important since you use your face to anchor. Therefore, if you are not consistent with the position of your head, you won’t be able to anchor or aim correctly. Anchoring is such an important topic that I have written a full article on it:
Finding and maintaining your anchor point
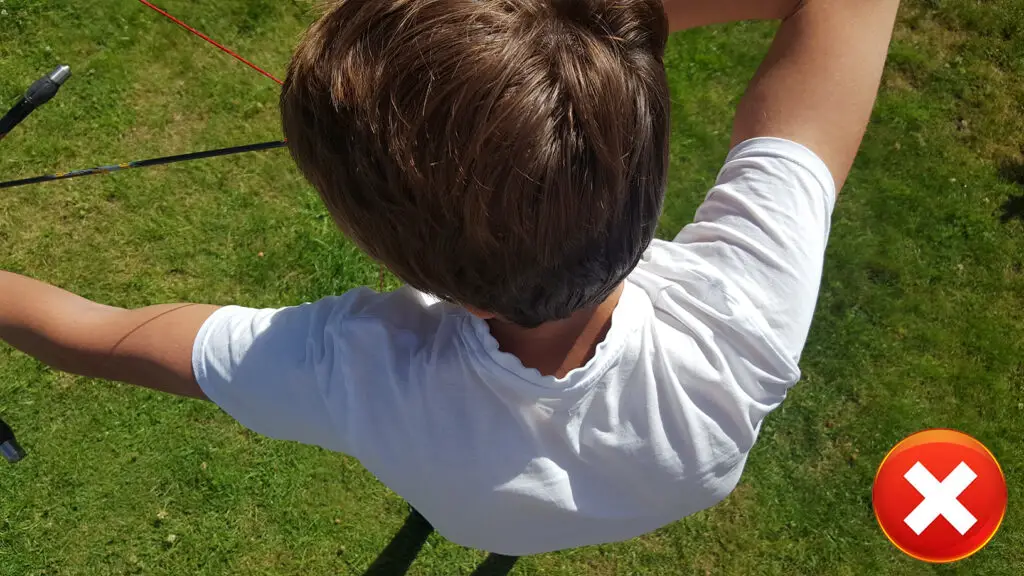
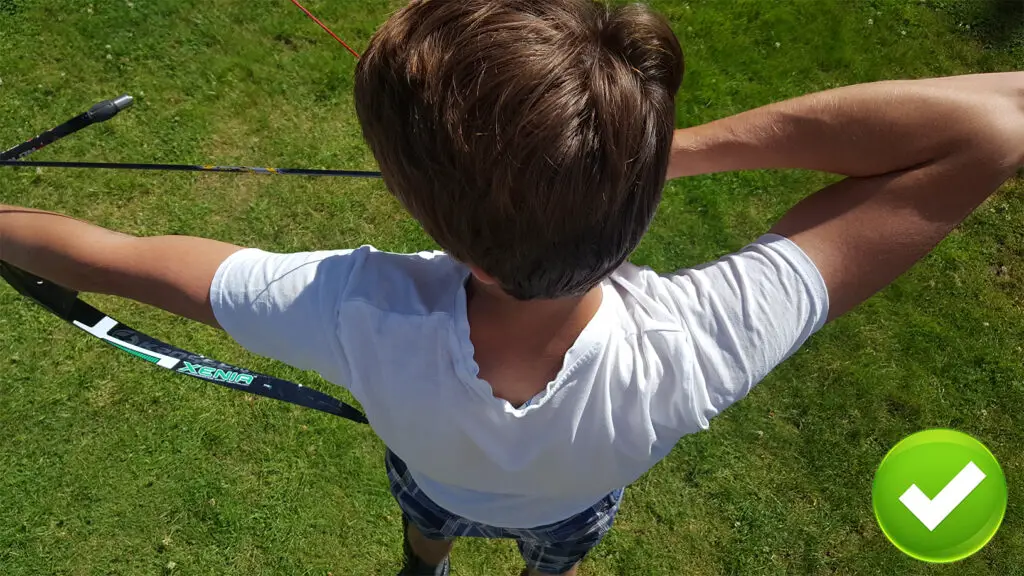
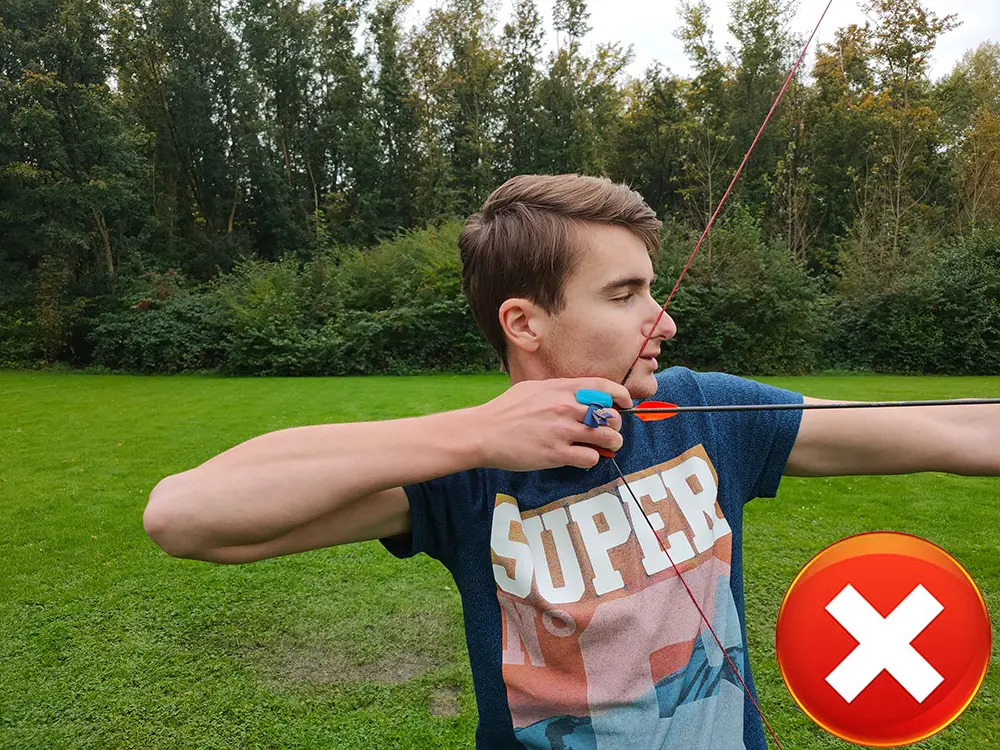
Don’t bend your neck forward: keep your neck as straight as possible. In some cases, you must slightly bend your neck. For example, when the string can’t clear your chest. But don’t bend your neck more than necessary. It’s easier to keep your neck consistently straight than consistently bent.
Turn your head 60 degrees towards your target: you must turn your head to see the target. Turning it about 60 degrees is about average. Don’t obsess over this angle every archer has their preferences. But you shouldn’t turn your head too far. This can cause muscle strain in your neck. We often use our nose as a second anchor point. Therefore, turning our head 90 degrees wouldn’t even be an advantage.
Keep your head level when drawing the bow: make sure that you do not change the tilt of your head between shots. When you start aiming, you might tilt your head to accommodate the elevation of your shot. But when you are drawing your bow, you should keep your head level for consistency.

Close your mouth: sadly, when I learned archery nobody told me this, so I had to learn this the hard way. You want to close your mouth. Meaning that there is no space between your molars. It’s difficult to keep your mouth consistently open, therefore keeping your mouth closed can save you a lot of issues. Therefore, you should train to breathe through your nose exclusively. Especially for recurve archers which anchor below their jaw, shooting with an open or closed mouth can make huge differences.

Stances
There are multiple ways to keep your feet while shooting your bow. We often call these stances. In general, most archers will use the square stance. But some archers switch to other stances later because they feel it’s more comfortable.
Square stance
If you are new to archery, you should start with the square stance. The square stance is the optimal stance for most archers. Most Olympic archers still shoot with the square stance. It’s easier to learn and keep consistent than the other stances.
With the square stance, you keep your feet parallel to the shooting line. This helps you to keep your back in the right position and gives you great stability.
Open stance
For some archers, the square stance feels uncomfortable or unstable. For these archers, the open stance might feel more natural and cause less muscle strain. If you feel unstable with the square stance, the open stance might be worth a try. Because you place one foot forward it tends to be more stable.
With the open stance, you must rotate your torso, because you should still align your shoulders with your bow arm. Therefore, if you don’t experience issues, stick with the square stance instead.
Closed stance
Some archers find it difficult to properly align your shoulders in the square stance. In these cases, it can sometimes be useful to place your foot farthest from the target a step back. By using the closed stance, you can sometimes relax your back muscles more. So, this might be worth a shot if you have issues with your shoulder alignment or back muscles.
With the closed stance, you still must twist your torso, so only use this technique when you experience issues with the square stance.
Rotated square stance
This stance is a combination between the square stance and the open or the closed stance. With this stance, you rotate either inwards or outwards, but you keep the same stance as with the square stance. This stance is primarily for archers that want to shoot either the closed or open stance, but they feel that having the parallel is more stable.

Experimenting with stances
Some archers advise to experiment with these different stances, but I disagree. The square has become the standard for good reason. It’s a great stance that helps you to stay consistent. Additionally, you should turn your torso as little as possible since this can cause fatigue issues. So, stick with the square stance, unless you experience issues!
If you want to change your stance, try to keep it as close to the square stance as possible. Sometimes minor changes to your stance can make a big difference.
How to improve your form/stance
Now you know the correct stance and form, you should train it. That might not be as easy as it seems, because you can’t see yourself. Therefore, it’s difficult to spot if you are using the right technique or not. Therefore, I have a few tips.
Train in front of a mirror
Even experienced archers often train in front of a mirror to check their technique. Just draw your bow without an arrow and check whether you are standing correct. If you notice that something is wrong, you can work on it and check again. This can make huge improvements in a short time.
Film yourself and analyze your form
It’s quite easy to use the right form if you can see yourself in a mirror. When you go back to the range you may forget all these things because there are many distractions. Therefore, it’s helpful to film yourself. Either ask a friend or use a tripod.
When you are home, you can look back at your shots and analyze what you did right and what went wrong. This is something coaches often do with their trainees since it’s often easier to see than to explain.
Coaching/peer feedback
Experienced archers or an archery coach can be a great resource to help you improve your form. Don’t blindly follow all these tips, because not all archers have the right information. Make sure to always ask why you should change something. If they don’t have an answer to that question, you should take the advice with a grain of salt.
What works for other archers doesn’t have to work for you. But trying a new technique doesn’t hurt. But you shouldn’t try a new technique every day. To improve your form, you need to train a lot so don’t expect instant results.
The importance of getting it right the first time
When you have your form right from the get-go, you will have a major advantage over other archers. Sadly, many archers focus too much on other things while learning archery. Aiming, anchoring, and releasing the string all seem so important. But your form is more important. Why? Because if you start with the wrong form it may haunt you for years.
Since you can’t check your form. You must do this instinctively. If you have learned the wrong technique it will be difficult to get this out of your system. With aiming, anchoring, and releasing you can at least see or feel that you do something wrong. You can’t see this with your form.
Therefore, in your first few weeks, you should primarily focus on your form. Don’t focus on where the arrows land. Believe me, you will reap the rewards when you are using the right technique from the start.
How you might change your form
If you look at different archers, you might see that some stand differently than others. That doesn’t mean that these archers do it wrong. Archery is about what works. So, if you stand with your spine twisted and with your arms bent but you only shoot at the center of the target, you are doing it right. So, let’s discuss some reasons why some archers deviate from this form.
There is no ‘’perfect form’’
Some archers praise certain archers for having ‘’the perfect form’’. But again, archery is not about the beauty of the shot, it’s about accuracy. Therefore, it doesn’t matter how you look if you get the job done.
The technique I discussed earlier assumes that we all have identical bodies. That all our bones are straight and that we don’t have any weak muscles in our bodies. But that is of course not the reality. We all have slightly different bodies with different needs. Therefore, different techniques influence our body differently.
Bending forward
Earlier, I explained that you should stand as straight as possible. But in some cases, that isn’t possible. If you have a large chest/breast you might have to lean forward to make sure that the string clears it. The same can be true for your belly.
Although this isn’t ideal, you must bend forward in these cases otherwise you will not be able to shoot properly.
Leaning backward
We always tell new archers that their body should form a T-shape. Meaning that your back and arms are straight if you look from aside. But if you look at some archers, you will see that most have a slight cursive T-shape. This means that they lean a bit backward.
This happens due to the weight of the bow. Although most bows weigh somewhere around 5 LBS this force gets stronger because you hold it far away from your body. Therefore, the body tries to compensate for this weight, which distributes the force more evenly over both feet.
In general, I would recommend trying to avoid leaning back as much as possible. But if you are skinny and shoot with a heavy bow, that might not be possible. The sheer weight of the bow might pull you over. Therefore, don’t be too obsessive about how straight you are standing. Leaning back a bit isn’t an issue, but it shouldn’t be too extreme.
Traditional and heavy bows
The tips I provided in this article help you to shoot as accurately as possible. If you shoot a heavy traditional bow, these tips might not work well. With these heavier bows, you often need to work with your back muscles to get the bow to full draw. Therefore, it might seem to target archers like these traditional archers are using bad technique. But it’s necessary to even shoot the bow.
Look for example at Joe Gibbs a well-known longbow archer.
So, if you mostly care about the draw weight of your bow, you might want to read other articles. If you mostly care about being as accurate as possible, like most target, 3D, and competition archers, these tips will help you to improve this.
Why you need protection
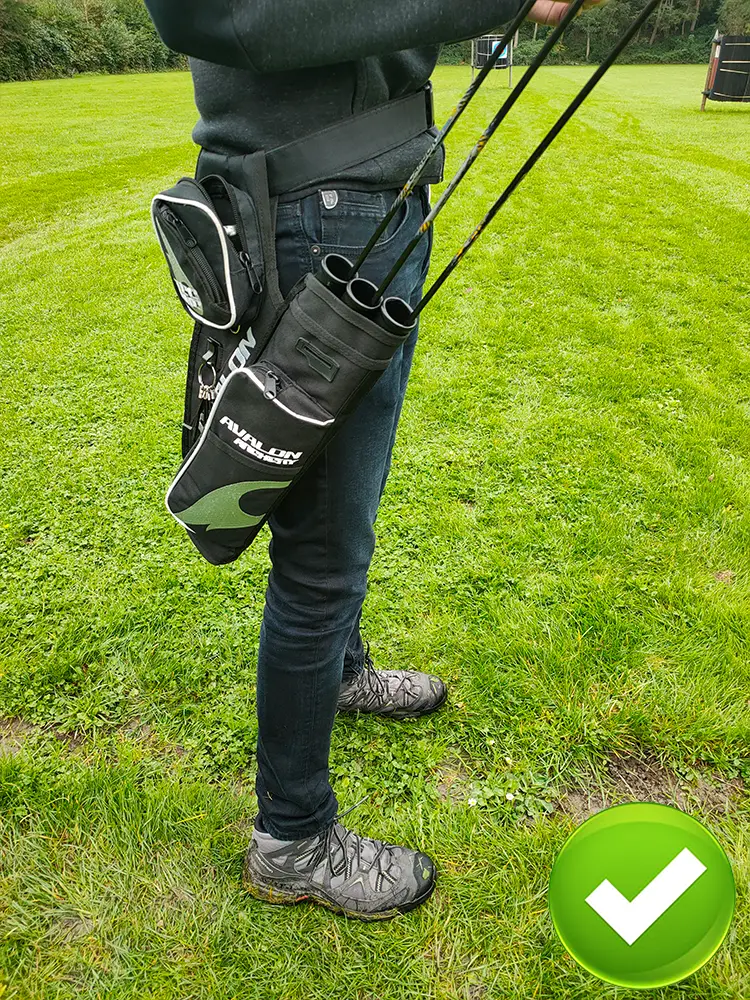
It is a best practice for all archers to wear an armguard. But especially for new archers, it’s important to wear one. When you use the right technique, the string will come very close to your forearm. If you overextend your arm a bit, you will start to hit it. This can create nasty string slap marks on your arm and is painful.
When this happens, you might be tempted to shoot with a bent arm. But that is not the right technique. Therefore, you should buy an armguard because you don’t want to be afraid of string slaps.
Generally, I recommend archers to get a long arm guard like this one. These longer armguards also protect the inside of your elbow. When you lock your elbow, you might hit your elbow which hurts even more than on your forearm.
If you already practice archery for a while and you have never experienced string slap in your elbow, you might want a shorter armguard. The longer armguard is less comfortable than these shorter versions. Therefore, I would recommend this shorter armguard if you aren’t afraid of string slap in your elbow.
In addition to the arm guard, some archers need a chest guard. Theoretically, this is primarily important for ladies and people with large chests, but I see more and more archers wear it. You can try shooting without it. If you think you may hit your chest you want to use a chest guard. A simple chest guard like this one from Bicaster Archery will do.
Learn more to improve your accuracy
Archery is such a technical sport; therefore, you can make huge improvements just by changing some minor things. If you want to learn more about archery technique, read the articles below:
- Finding and maintaining your anchor point: tips and tricks
- How to improve your release – recurve archery
- Shooting with a bent vs. straight arm
- Is it necessary to swing your bow?
- How to prevent flinching in archery (aka target panic)
- Mastering the clicker
The shot cycle
Maintaining the right form is an essential aspect of the shot cycle, but there is much more to shooting a bow correctly. To master the entire archery technique, make sure to check out the other articles too:
How to shoot a bow (an overview)
- Step 1: stance
- Step 2: nocking
- Step 3: grip the bow
- Step 4: grip the bowstring
- Step 5: maintain the right form (this article)
- Step 6: draw the bow
- Step 7: anchor
- Step 8: aim
- Step 9: release
- Step 10: follow through
Final words
This is one of the longest articles I have written so far. Form us such an important aspect of archery that I had to discuss it in detail. I hope you found this article helpful and that you can use it to improve your archery!
Before you go, don’t forget to use the coupon code IYA if you are buying one of the courses from Online Archery Academy. As mentioned earlier, I highly recommend taking a structured course. As this will greatly deepen your archery knowledge and skill.
If you have any questions, comments, or feedback, please leave them down below. I will answer as soon as possible and send you an email with my reply!

Tim van Rooijen
For as long as I can remember, I have always been fascinated by archery. First due to its historic significance but later because I like being outdoors. With this blog, I share my knowledge about Archery and how you can improve your shot. More about author…