In archery, we often emphasize the importance of a good release. If you have a sloppy release, it can wreak havoc on your accuracy. But for a good release, you need a good grip on the bowstring. You want the grip to be tight enough that you can comfortably and safely draw the bow. But you don’t want it to be too tight because you might influence the arrow’s flight path. Therefore, in this article, I will explain how you should hold the bowstring. Here is a summary in case you are in a hurry:
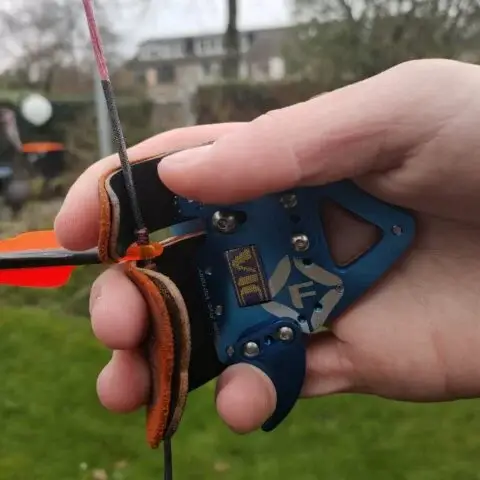
If you are shooting a recurve bow, you should place one finger above the arrow and two fingers below. Make a strong hook out of your fingers and place it behind the string. Don’t place the string on your fingertips. Also, make sure that you can’t see your nails, otherwise, your grip will be too firm.
There is a lot more to discuss because the technique I just explained isn’t the only technique. In this article, I will explain these other techniques and explain why most use this one. I will also discuss some common mistakes and how to avoid them
Before we start
Although I try to make this guide as complete as possible, it’s not possible to cover all minute aspects. Therefore, this guide aims to give you the basics. If you are serious about archery, I would highly recommend taking an archery course or hiring an archery coach.
I understand that hands-on coaching is not always available for everyone. Luckily there is a great (in my opinion even better) alternative – following an online course from the Online Archery Academy. With video examples and detailed explanations, these courses are a great way to improve your archery. I can personally vouch for them, as I have also taken the courses.
Readers from this blog will get a discount of 20% if you use the discount code IYA at checkout. If you don’t think the courses help you improve your archery, you can always use the 100-day money-back guarantee.
Drawing techniques
There are three distinct draw techniques that you can use to draw a bow. Let’s discuss these in more detail.
Finger draw
With the finger draw, we use two or three fingers to draw the bow. Some archers place three fingers below the arrow, while others place one finger above the arrow. With this type of draw, we only use the index finger, middle finger, and ring finger. Both the pinky and the thumb are not used in the draw.
This is the technique that 99% of all archers use. The technique is easy to learn and allows you to shoot heavy bows without an issue. Therefore, when you are just getting started, this draw would make the most sense. For this reason, after this section, I will focus on this drawing technique.
Pinch draw
When children play with a toy bow, they will probably use the pinch draw. With this draw, you don’t place the fingers on the string, but you pinch the arrow with your thumb and index finger. Therefore, this draw is only possible with low draw weight bows. Anything above 10 LBS cannot be shot with the pinch draw.
Therefore, serious archers don’t use this drawing technique. The only benefit of this drawing technique is that it doesn’t require finger protection, because the string is not scuffing your fingers.
Thumb draw
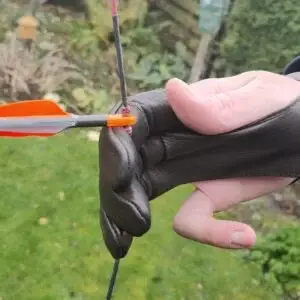
The thumb draw is originated from traditional Asian archery. For example, the famous Mongolian horse archers use this type of draw. With this technique, you don’t draw the bow with three fingers, but merely with your thumb.
You first fold the thumb around the string and then place your index finger over it. Your index finger helps reinforce your grip. You release the arrow by simply lifting your index finger. The force of the string will push the thumb out of the way which releases the shot
You can draw heavy bows with this draw techniques because your thumb is very strong in this configuration. The major disadvantage of this technique is that it is more difficult to learn. If you do it wrong, it can be very painful. Therefore, archers that want to master this technique start with a low draw weight bow.
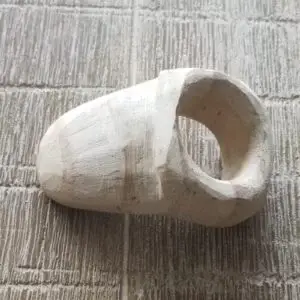
Just like the finger draw, you must wear protection. Usually, this is either a piece of wood or a thick piece of leather that you fit over your thumb. This device is often called a thumb ring.
Archers that shoot with this style primarily do it to recreate ancient Asian archery. The finger draw is just easier to master and thus allows you to shoot more accurately faster.
Finger draw techniques
As mentioned earlier, most archers will shoot with a finger draw. From the English longbowmen to the Olympic recurve archers. They all shoot (or shot) with the finger draw. But there are a lot of different ways you can hold your string. You can either shoot with three or with two fingers. You can also place all your fingers below the arrow or one above it. Let’s discuss them one by one, starting with the most popular one.
Three-finger Mediterranean style
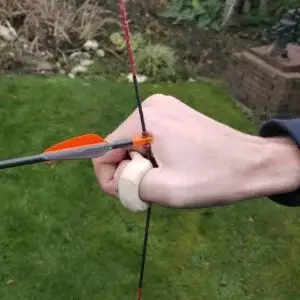
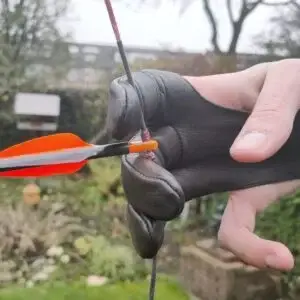
The most popular drawing technique is the Mediterranean three-finger style. With this style, you place one finger above the arrow and two below it. The major advantage of placing one finger above the arrow is that you more evenly apply pressure to the string. This is beneficial for your accuracy and makes it easier to tune your bow.
For these reasons, this drawing technique is the gold standard in recurve archery. Also, a lot of traditional archers that shoot instinctively use this drawing technique.
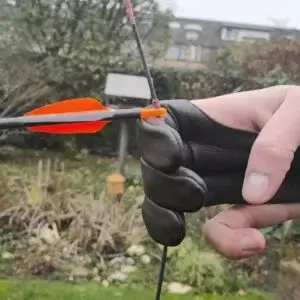
Three-finger Traditional style
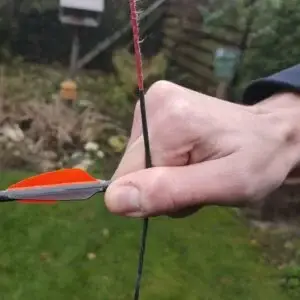
With the three-finger traditional style, you place all your fingers below the arrow. The advantage of this shooting style is that it allows you to place the arrow closer to your eye. Therefore, this technique is primarily used by archers that shoot without a sight and aim along the arrow.
A disadvantage of the Mediterranean style is that you can start to pinch the arrow. This can cause your arrow to fall off your arrow rest and can decrease your accuracy. Therefore, some archers prefer this drawing style since you can’t pinch the arrow.
Some archers also find this drawing style more comfortable. To avoid arrow pinch you must spread your index finger and middle finger apart. Some archers feel pain in the webbing between their fingers with the Mediterranean style.
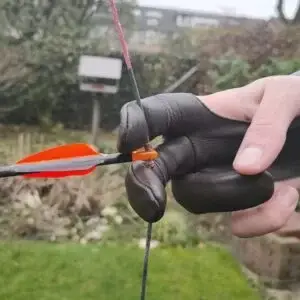
Two-finger Mediterranean style
In general, the more fingers you have on the string, the easier it is to retain the string while drawing the bow. But there is also a good point to reduce finger contact with the string to a bare minimum. The more you touch the string, the more you can interfere with the string.
Therefore, some archers prefer to shoot with only two fingers. The index finger and middle finger are the strongest fingers anyway, so most people can also shoot with two fingers. Some archers also believe that the pressure is more evenly distributed above and below the arrow.
Also, compound archers that shoot without a release use the two-finger draw technique. Since the string is at a steeper angle, adding a 3rd finger tends to make drawing the bow less comfortable.
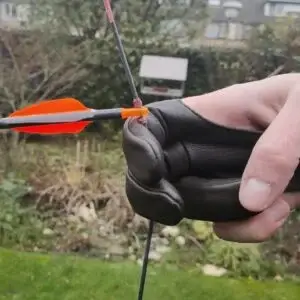
Two-finger Traditional style
Probably the least common technique is the two-finger traditional style. Instead of placing one finger above the arrow, you keep both fingers down. This technique makes the most sense on traditional short recurve bows. But I rarely see archers shoot with this drawing technique.
Which style you should use
I advise you to stick to the drawing style that is most common for your bow. So, if you shoot a recurve bow, stick with the Mediterranean draw. If you shoot a traditional bow and aim along the arrow, stick with the traditional 3 finger draw.
Most archery products and techniques are based on these two styles. That’s why you only see three-fingered archery gloves and not two-fingered. Also, all tabs you will find are made to be shot with 3 fingers.
Although there are some positive points of using a two-finger draw, it makes getting the right gear and learning the technique more difficult. So only go this route if you want a challenge!
How deep your grip should be
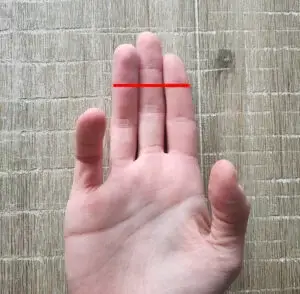
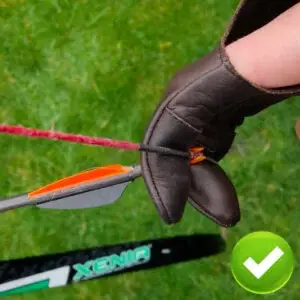
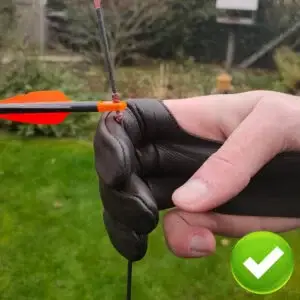
Now we know where to place the fingers on the string, we must talk about how deep we should keep the fingers in your string. The consensus is that the string should be on the intermediate phalanges. Which is the second last bone in your fingers.
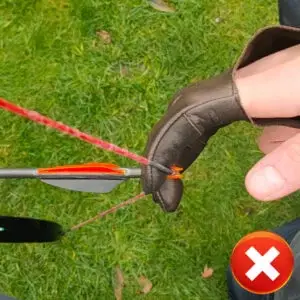
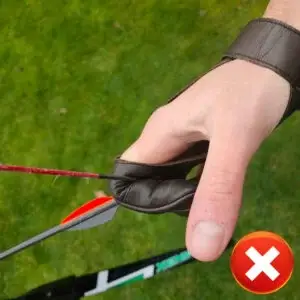
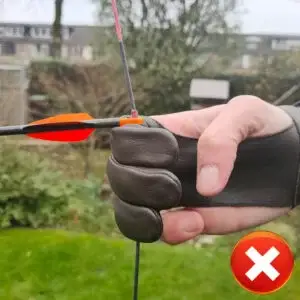
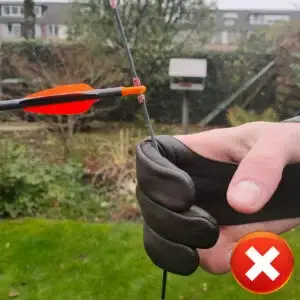
Some archers believe that you should keep the string on your fingertips, but I advise against that. Keeping the bow on your fingertips will strain your muscles more and is less secure. You don’t want an accidental discharge so make sure that the string can’t slip away.
Don’t overdo this though. Your fingers should stay in an open hook. If you can see your nails while drawing the bow, your grip on the string is too tight.
Consistent finger placement
We want our fingers as close to the arrow as possible without hitting it. This makes sure that the strength we use to pull the bow back is transferred in the arrow as efficiently as possible. If we place our fingers too far down, the draw length will slightly decrease, and the arrow will be shot less efficiently.
What is especially important that you place your fingers consistently on the string. If you slightly change the position where you keep your fingers on the string, you will slightly alter the forces on the string and thus the arrow’s flight.
If you are using a tab this isn’t much of an issue because you must fit the cutout in the tab around the arrow. This helps you keep your hand roughly consistent. You can of course still slightly shift your hand up and down. But if you use a finger glove you must be extra careful.
Thumb and pinky position
Since you don’t use your thumb and pinky to draw your bow, you might think that their position doesn’t matter. That is partially true. There is indeed no set technique on how you should keep your thumb and pinky. But what is important is that you keep it consistent.
How your pinky can cause consistency issues
When you fold your pinky towards your hand palm you will increase the tension on your ring finger. Give it a try and you will feel what I mean. Most people can’t even keep their ring finger straight when you pull your pinky towards your palm.
Therefore, if you keep your pinky straight the first shot and keep it in your palm the next, it will alter the tension on your ring finger between shots. Although this hasn’t a huge effect on your accuracy everything counts when you want to be as accurate as possible.
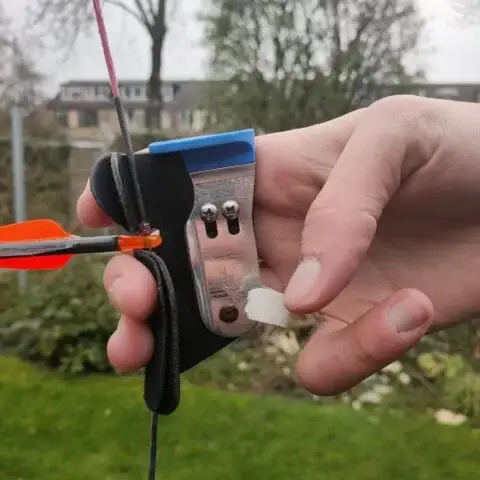
For this reason, competition recurve archers often use a tab with a pinky hook. This hook gives your pinky a place to rest and makes sure that the tension stays consistent between shots. It simply gives you one less thing to worry about.
How your thumb helps you anchor
If you anchor below your chin, you should use a tab. A tab has either a thumb rest or an anchoring shelf. If you use a thumb rest, you use your thumb to anchor. Therefore, you must place your thumb consistently on the thumb rest. Otherwise, you will anchor differently every time which can cause major inaccuracies in your shots.
Read the article below to learn more about anchor points:
Finding and maintaining your anchor point: tips and tricks
Arrow pinch
When you are at full draw, your fingers shouldn’t be touching the arrow. As explained earlier, you might pop the arrow off the arrow rest. But it can also cause you to give the arrow a flick when you fire the shot.
Most modern taps will have a finger divider which makes sure that you spread your finger enough to accommodate the arrow. But even with a tab, you must check whether you are not accidentally hitting the arrow.
With a finger glove, you must be extra careful. It is easier to pinch the arrow without noticing it since your entire finger is covered by the glove. So, make sure that you don’t touch the arrow. This is yet another reason why some traditional archers prefer to shoot with three fingers below the arrow even when they don’t use the arrow to aim.
Finger protection
Some archers claim that finger protection isn’t necessary. But let me give you a few reasons, why you should always use finger protection:
- Makes shooting more comfortable: shooting with finger protection is much more comfortable than shooting with bare hands. This doesn’t only make your shooting experience more enjoyable it also increases your accuracy. When your fingers are getting sore, your muscles will tense, and you will start to lose the feeling in your fingers which makes it harder to shoot.
- Improves release consistency: our skin isn’t a smooth surface. Therefore, using finger protection helps to create a smoother release which increases your accuracy.
- Improves anchoring consistency: as mentioned earlier tabs have an anchoring shelf which makes it easier to anchor consistently. The pinky hook and or thumb shelf also makes sure that the tension in your hand is consistent
For these reasons, you will never see a professional archer shoot without finger protection.
Tab
If you shoot with a sight, you want to use a tab. The tab makes it easier to anchor and makes sure that you are holding the same part of the string every time. There are very simple tabs available and some more advanced tabs.
I recommend getting one of the more advanced tabs, they offer more customization options. Most archers, that buy one of those simple tabs buy a more advanced one after one or two years.
I recommend this SAS Elite tab. It has both an adjustable thumb rest and a pinky hook. Therefore, you can completely customize the feel of this tab. You can even remove these two features in case you want to run it barebones.
Read my dedicated article about tabs, for more guidance on how to pick the right tab:

Finger glove
Finger gloves are more intuitive to use. You simply hold the string like you would without finger protection. It is also more flexible; you can hold the string in different positions. Although this makes it more difficult to be consistent it also allows you to try different finger draw techniques.
A finger glove is primarily suitable for traditional archers when you anchor on your check. If you would use a rigid tab to do that, you might hurt your face. Make sure that the padding on the fingers is thick enough. Some gloves are so thin that it almost feels like you are not using any finger protection.
Therefore, I recommend this ArcheryMax finger glove. The glove has extra padding around the fingers which makes drawing the bow more comfortable.

Finger guards
Finger guards are small pieces of rubber that you attach to the string. Therefore, you don’t wear the finger protection, but the protection is built into the bow. This is particularly useful if you must share a bow with other archers. Therefore, these devices are often used on rental or loaner bows.
Another benefit of finger guards is that they tend to be cheaper since they are such simple pieces. Especially because you don’t have to think about different finger sizes.
But for most archers that have their own bow, finger guards are not a good option. They make the string heavier, which reduces arrow speed and increases the strain of the bow a little. These guards are also less comfortable than a tab or a glove.
Click here for the finger guards that I would recommend.

The shot cycle
Holding the bowstring is only a small aspect of the complete archery technique. To master the entire archery technique, make sure to check out the other articles too:
How to shoot a bow (an overview)
- Step 1: stance
- Step 2: nocking
- Step 3: grip the bow
- Step 4: grip the bowstring (this article)
- Step 5: maintain the right form
- Step 6: draw the bow
- Step 7: anchor
- Step 8: aim
- Step 9: release
- Step 10: follow through
Final words
I hope this article was helpful to improve your drawing technique. Generally, I think it’s best to stick with the drawing technique that is most common for your shooting style. I would only change it if you experience issues. There are good reasons why recurve archers use the Mediterranean style and traditional archers the traditional style.
Before you go, don’t forget to use the coupon code IYA if you are buying one of the courses from Online Archery Academy. As mentioned earlier, I highly recommend taking a structured course. As this will greatly deepen your archery knowledge and skill.
If you have any questions, comments, or feedback, please leave it down below in the comment section. I will respond to your question as soon as possible and you will receive an email notification once I replied.

Tim van Rooijen
For as long as I can remember, I have always been fascinated by archery. First due to its historic significance but later because I like being outdoors. With this blog, I share my knowledge about Archery and how you can improve your shot. More about author…