An often overlooked part of archery is the release. Most archers think that it’s really easy, you just grab the string and release it when you want to fire. Like most things in archery, it seems simple but there are a lot of things you can do wrong. To get a clean release you have to work with different techniques. You do not only have to focus on what you are doing with your draw hand but your entire body.
The release is the most important part of the shooting process. If you have a great draw and anchoring process but your release is really sloppy, the end result will be disappointing. On the other hand, even with a bad draw, you can get decent scores, if you have a solid release and anchoring process. In this article, I will explain how you can get a clean and stable release in recurve archery. Most tips will also work for compound archery because a large part of the form and technique are the same. But some parts are more focused on shooting with a tab instead of shooting with a release.
Before we start
Although I try to make this guide as complete as possible, it’s not possible to cover all minute aspects. Therefore, this guide aims to give you the basics. If you are serious about archery, I would highly recommend taking an archery course or hiring an archery coach.
I understand that hands-on coaching is not always available for everyone. Luckily there is a great (in my opinion even better) alternative – following an online course from the Online Archery Academy. With video examples and detailed explanations, these courses are a great way to improve your archery. I can personally vouch for them, as I have also taken the courses.
Readers from this blog will get a discount of 20% if you use the discount code IYA at checkout. If you don’t think the courses help you improve your archery, you can always use the 100-day money-back guarantee.
Use the right technique
Although it might seem simple there is a lot of technique involved in getting the right release. You can have great equipment but without proper technique, the release will be inconsistent. I won’t explain the entire sequence from start to finish, because it’s quite obvious for the most part. Instead, I will focus on some common mistakes that are made.
Hook your fingers
When I started with archery I placed the string at my fingertips. My reasoning behind this was that I would probably interfere with the arrow if I placed it deeper in the tab. This is not how you should do it, the fingers should be solidly hooked around the string. If you hold the string with your fingertips, your fingers will get tired and you will have to strain your hand to retain the string. This grip also makes it easier to be inconsistent with your finger placement. Therefore my advice is to place the string as far in your hooked fingers as it will go.

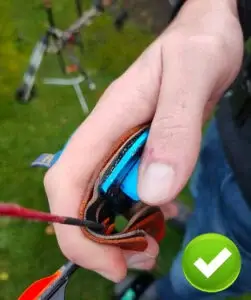
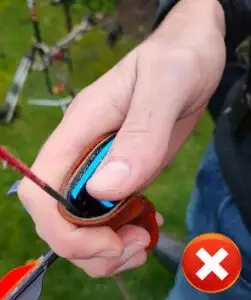
Place your fingers consistently
When you are shooting you have to be wary to place your fingers consistently. It often happens that archers grip the string a little bit differently every time they shoot. As mentioned above the hook grip may help, but you also have to make sure that the tension on your fingers is the same, every time you shoot.
Some archers shoot with a relaxed index finger, while others also hook it around the string. In general, most archers say that it’s better to use the index finger, but I don’t really have an opinion on it. I have seen archers shoot well with both techniques. But, you should be consistent and not change the placement of your index finger between shots.
Keep a consistent tension
When you are holding the string in your hook your hand will be under a lot of tension. It is important that this tension is consistent. If you slightly let the string slip forward, your shots will be inconsistent. A good way to identify this issue is by checking your second anchor point. Your second anchor point can be your chin, nose, or a kisser. If you do not hit your second anchor point consistently, while your first anchor point stays consistent, you are probably let the string slip forward. This is why I always recommend using a second anchor point.
Read this article, for more information about anchor points.
Use your back muscles
Just after you shot the arrow your hand should go backwards due to the tension in your back. If your arm doesn’t want to move backwards you are probably don’t use your back muscles. The motion backwards does not help your increase your accuracy but is the result of the tension in your back muscles.
If you don’t use your back muscles you will probably slouch resulting in a sloppy and inconsistent release. To prevent this you should pull your shoulder blades together. This might feel strange when you first do this, but it will dramatically increase the consistency between shots. Be wary however to not overdo it. You have to pull your shoulder blades together, but your chest should not move forward. It can strain your muscles if you overdo this.
In our daily lives, we don’t often use our back muscles, therefore you can feel muscle strain. If this prevents you from firing your bow you can do exercises at home or train these muscles at the gym. Click here if you want more information about how to train these muscles.
Another option is to reduce the draw weight by buying weaker limbs. New archers often overestimate their strength. Therefore you might find that your back muscles are less strong than you expect. If you can’t shoot 15 arrows without feeling muscle strain, I believe it’s a good idea to reduce the draw weight. For more information on draw weight, read this article.
Relax your bow hand and arm
Another common mistake beginning archers make is to tense their bow hand while shooting. If your bow hand is not relaxed you will probably move the bow either up or down, which influences the flight of the arrow. This often happens when you shoot with a bow that is heavy or you may be afraid to drop the bow. Both causes are easily fixable by reducing the draw weight or using a wrist or finger sling.
If your bow hand or arm is under too much tension your arrows will go either way up from where your aiming, or way below. If this happens be sure to relax your hand and arm and draw with your back. You should feel the tension in your draw hand, not your bow hand.
Pulling the arrow trough the clicker
I wouldn’t recommend new archers to shoot with a clicker, because it requires a good and consistent form. If you shoot with a clicker with an inconsistent form, it will be really frustrating. One time you will pull it right through the clicker unintentionally and another time you feel like it won’t make it at all. This happens because your draw length is still too inconsistent, so you need to be more consistent before using a clicker.
If you are however quite consistent with your draw length a clicker is a great way to refine it. Many archers that start with the clicker don’t know how to pull the last piece of the arrow through the clicker. For most archers, it feels like you are already anchored and ready to fire, but you still have to make the final push. A common mistake is to use your bow hand to push the arrow through the clicker. But this creates problems because you will tension your bow arm and hand, which we discussed above.
Instead, you should use your back muscles to pull the arrow through the clicker. This motion should only be about ¼ of an inch (1 cm). If you find that you can’t consistently do this with your back muscles, you might have either of these problems:
- Your clicker isn’t properly adjusted: if you can’t consistently pull the arrow through the clicker you might need to adjust it, making the draw either shorter or longer.
- Your back muscles aren’t trained enough: if your back muscles aren’t trained enough then you might experience muscle strain while shooting with the clicker. You might want to train your back muscles more, or you need to postpone using the clicker until they become strong enough. Shooting with a clicker requires extra-strong back muscles compared to shooting without, because you have to hold the bow at full draw longer.
- You might have consistency issues with your draw: as I explained before, you really need to have a consistent draw in order to shoot with a clicker. You might not have developed this consistency yet. If this is the case the wisest thing to do is to postpone using the clicker until you are more consistent with your draw length.
Shooting with a clicker can be quite a challenge. So you should expect that your scores are lower for at least the first month. But when you manage to consistently use it, you will see great results.
Get the right tab
Using a good tab can not only increase your accuracy but can also increase your overall comfort while shooting. What is a good tab for you depends on your body, shooting style, and preference. Therefore I would recommend buying a tab where you can configure most features of the tab. For my tab, I actually use all the features of the tab. The thumb rest and pinky hook give me a great way to consistently tension my fingers.
If you consider buying a new tab I would highly recommend reading my in-depth article about tabs. We will discuss all features of tabs and what features you should consider.
Train your grip strength
If you have issues keeping your fingers consistently around the string, you might have issues with your grip strength. If grip strength is the issue then you will get a tired feeling in your hand and it could even start shaking. Luckily you can easily train this by doing a few exercises every day. For more information read this article on sport-fitness-advisor.com.
Work on your anchor
Your release and your anchor are closely connected. If you are anchoring incorrectly this can also make consistently releasing the arrow difficult. I have dedicated a full article on how to find and maintain a consistent anchor point. If experience problems with your anchor point, it’s important to work on that first. Having a consistent anchor point is the first step in archery, so this should have your first priority.
Continue to learn about anchoring: finding and maintaining your anchor point: tips and tricks
The shot cycle
A lot of archers think that the shot cycle ends with the release, but that is not true. You still have to make sure to follow through until the arrow hits the target. So check out my other articles, to learn more about the archery technique!:
How to shoot a bow (an overview)
- Step 1: stance
- Step 2: nocking
- Step 3: grip the bow
- Step 4: grip the bowstring
- Step 5: maintain the right form
- Step 6: draw the bow
- Step 7: anchor
- Step 8: aim
- Step 9: release
- Step 10: follow through
Final thoughts
I believe that having a consistent and clean release is after anchoring the most important thing in archery. Because if you have a great form and anchor point but you totally mess up the release the arrow will go in any direction except the one you were aiming at. Most archers tend to master the release quite fast and start working on other parts of their technique.
While you are working on different techniques you sometimes slowly start changing your basic technique. This often happens when you start using the clicker. Therefore you sometimes have to go back to basics and focus on your release again to see if you are still consistent.
Before you go, don’t forget to use the coupon code IYA if you are buying one of the courses from Online Archery Academy. As mentioned earlier, I highly recommend taking a structured course. As this will greatly deepen your archery knowledge and skill.
I hope you liked reading this article. If you have any questions or feedback, please leave them in the comments below. I will respond to any comment as soon as possible.

Tim van Rooijen
For as long as I can remember, I have always been fascinated by archery. First due to its historic significance but later because I like being outdoors. With this blog, I share my knowledge about Archery and how you can improve your shot. More about author…