For archers nocking an arrow seems very simple. But if you are new to archery, you might wonder what you should do to nock your arrow. In this article, I will explain how you should nock an arrow in 5 simple steps. See the paragraph below for a summary in case you are in a hurry.
To nock an arrow correctly, make sure that the fletching is facing away from the plunger. If your string has two nocking points you place it between them. If your string has one nocking point, you place the arrow immediately below it.
This might make it seem easy, but how you nock your arrow depends on your equipment. If you shoot with a compound bow, you must nock your arrow differently. Also, a lot of people find the process rather clunky. Therefore, I discuss how to nock an arrow like a pro in 5 simple steps.
Before we start
Although I try to make this guide as complete as possible, it’s not possible to cover all minute aspects. Therefore, this guide aims to give you the basics. If you are serious about archery, I would highly recommend taking an archery course or hiring an archery coach.
I understand that hands-on coaching is not always available for everyone. Luckily there is a great (in my opinion even better) alternative – following an online course from the Online Archery Academy. With video examples and detailed explanations, these courses are a great way to improve your archery. I can personally vouch for them, as I have also taken the courses.
Readers from this blog will get a discount of 20% if you use the discount code IYA at checkout. If you don’t think the courses help you improve your archery, you can always use the 100-day money-back guarantee.
Some terminology
Before I can discuss the 5 steps, we need to discuss some terminology. I will use these terms a lot so you must understand them. If you are familiar with these terms, you can skip this section
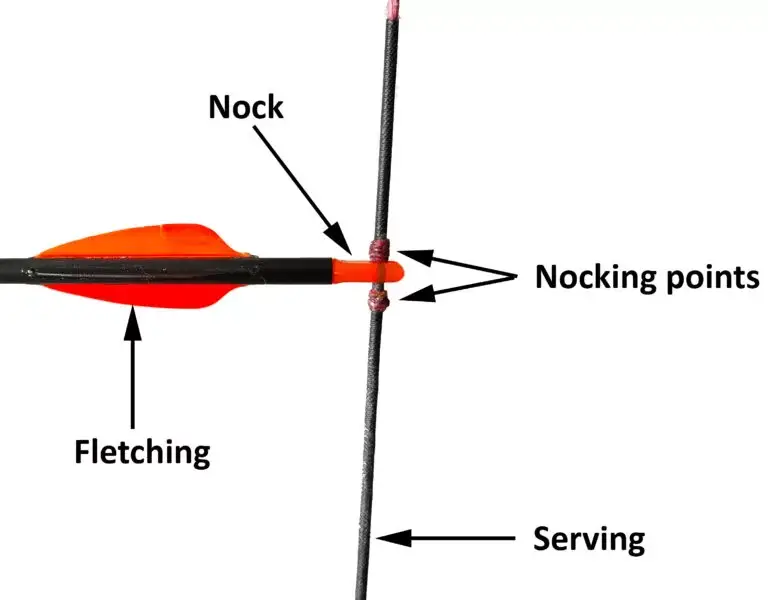
- Serving: serving is the thin wire that is wound around the string to protect the string from abrasion. Every part of the string that encounters the bow or the archer is protected by serving.
- Nocking points: these pieces in the middle serving of your bow help you to be consistent with your arrow placement. Some bows have two nocking points, while some only have one. When there is only one nocking point it’s also often called a nock locator.
- The nock: the small piece of plastic that attaches the arrow to the string is called the nock. To nock an arrow means attaching the arrow to the string.
- Shelf: almost all bows will have a shelf. Only longbows, Mongolian bows, and some traditional bows don’t have a shelf. This is the flat surface in the cutout of your bow.
- Arrow rest: recurve and beginner’s bows have an arrow rest above the shelf. When you shoot your bow, the arrow should be on the arrow rest. Traditional bows are shot directly off the shelf.
How you nock an arrow in 5 simple steps
There are multiple ways to nock an arrow. In this section, I will discuss the method that is easiest when you are just getting started.
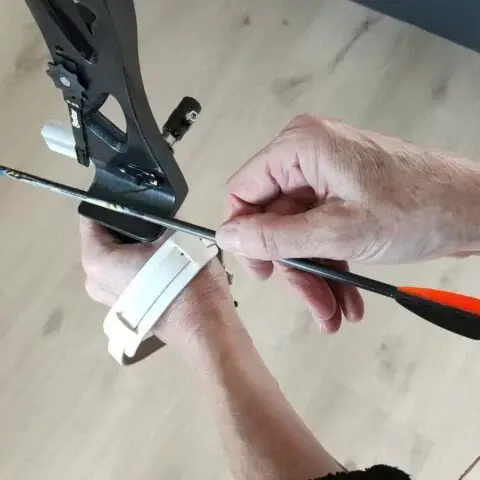
Step 1: Place the arrow on the shelf
The first step is to place the arrow on the shelf with the nock pointing towards the skin. This is the part that tends to be the most clunky for new archers. There are two methods to do this. You can put the arrow through the gap between the string and the riser or you can go around the string.
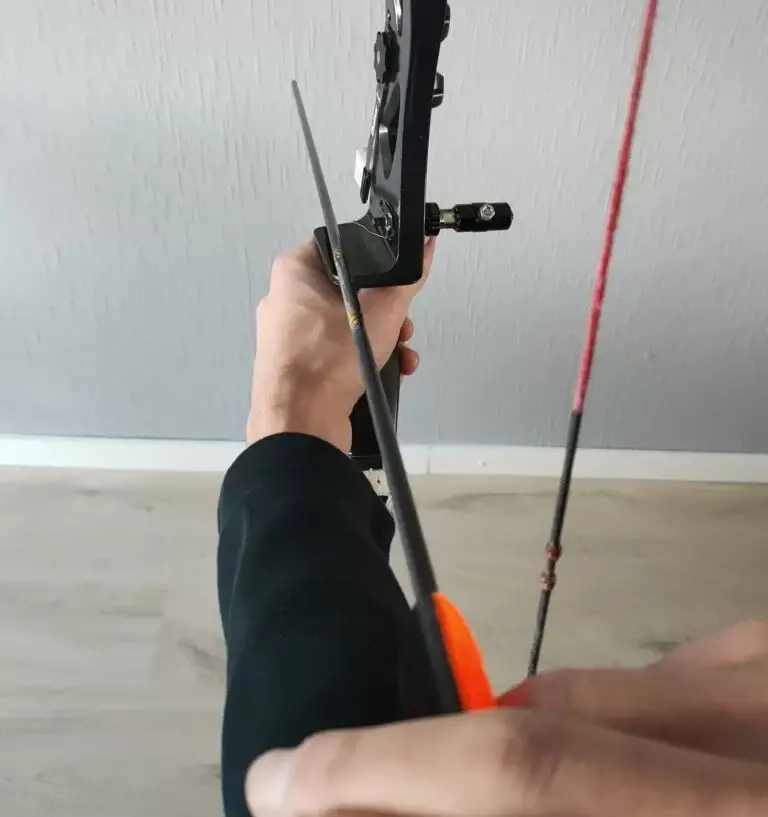
If you are shooting close to other archers, make sure that you don’t keep your bow horizontal while doing this. Because then you will hit other archers. In most cases, going through the gap between the riser and the string tends to be easier and faster.
If you shoot a bow without a shelf, you must put the arrow directly on your hand. Make sure to wear hand protection while you shoot these types of bows!
Don’t worry if you struggle a bit with this. That is completely normal all new archers do it. The more you shoot the easier it will become. Make sure to point the bow down the entire nocking procedure. Only raise your bow when you want to draw and shoot your bow.
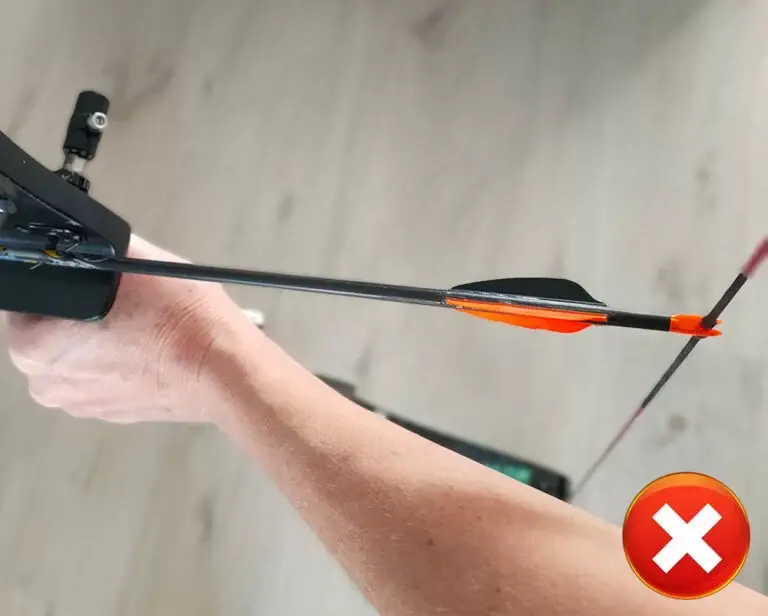
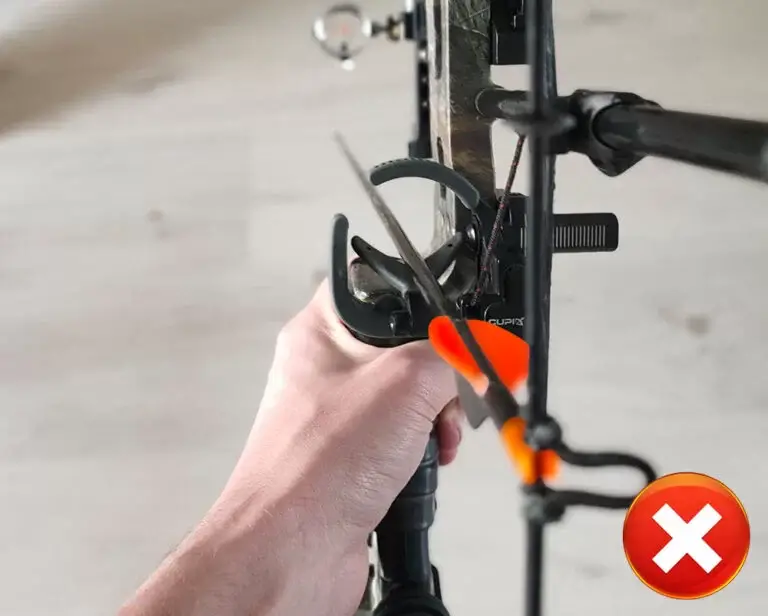
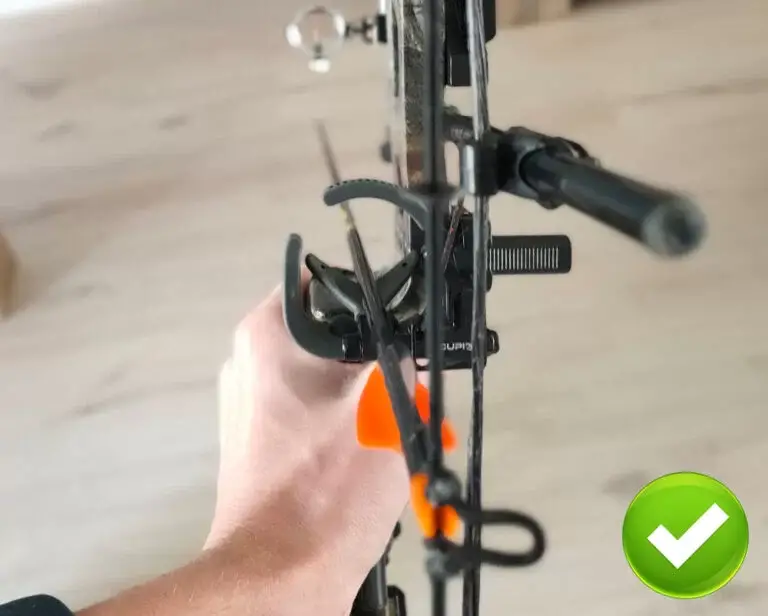
Step 2: Check the arrow’s orientation
An arrow can be attached to the string in two orientations, but only one is right. If you don’t do it correctly you might cause clearance issues which decreases your accuracy. Below I will discuss how you should nock your arrow based on your bow type.
Recurve and traditional
On recurve and traditional bows, the fletching should point away from the riser (the middle section of the bow). In most cases, you can see how you nock the arrow based on the colors of the fletching.
The two colors should be closest to the riser and the ‘’off-color’’ should be pointing away from the riser. In some cases, the fletches might be one color or three different colors. Then this trick doesn’t work.
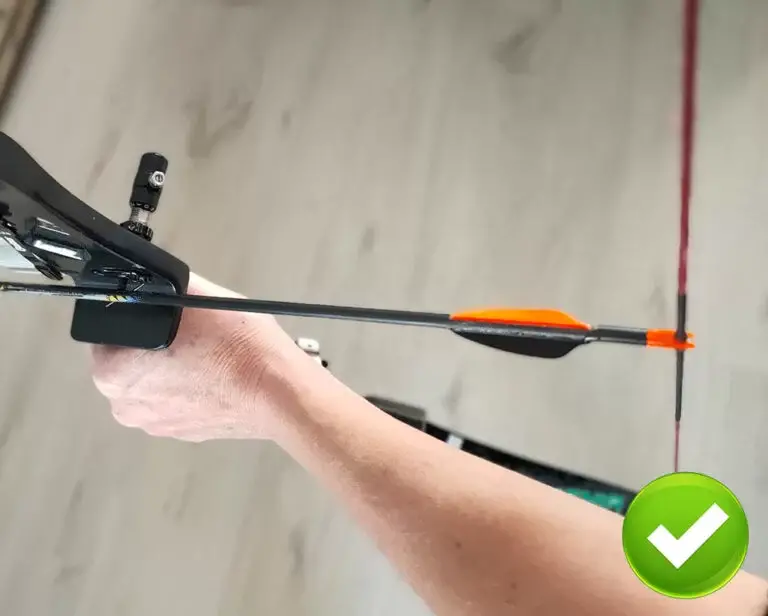
Compound
Compound bows are generally shot with a shoot-through arrow rest. That means that the arrow doesn’t rest against the bow or a plunger. The arrow is held up by an arrow rest that allows the arrow to be shot right from the middle.
Therefore, on compound bows the off-colored fletching should point up, to avoid clearance issues with the arrow rest.
Sometimes, the nock is not inserted in the arrow correctly. Luckily, you can easily fix this on the field, I explain this in more detail in the FAQ.
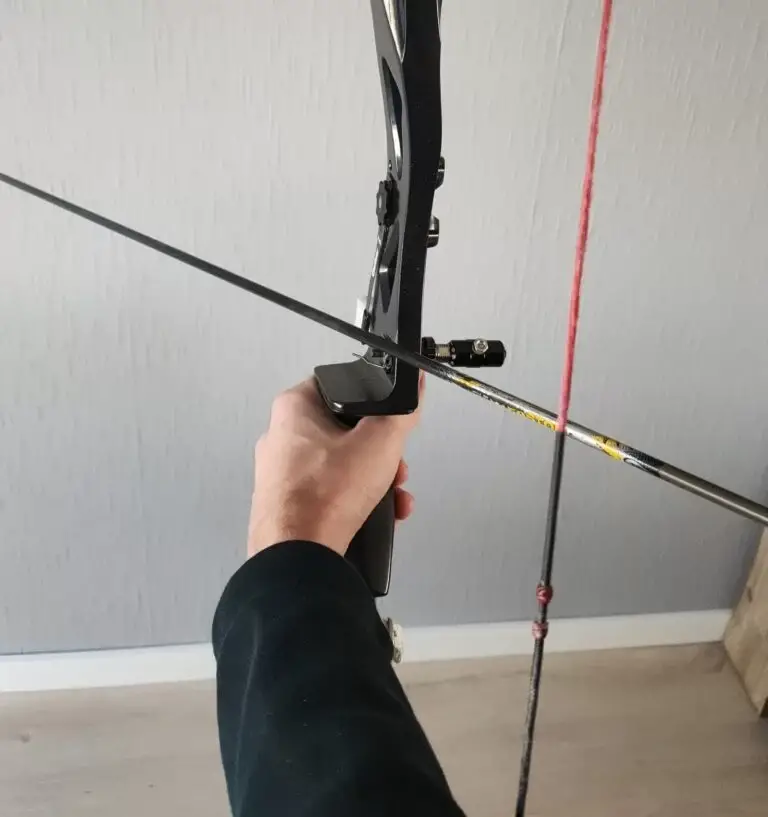
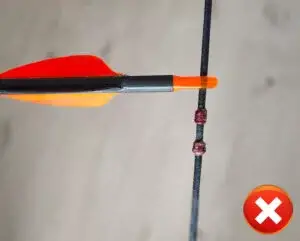
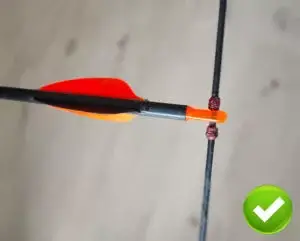
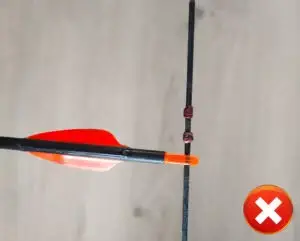
Step 3: Place the nock between the nocking points
Now the arrow is in the right orientation, we can get it towards the string. You want the nock between the two nocking points of your string. In some cases, you might only have one nocking point. If that is the case, you should attach the arrow just below the nocking point.
The arrow might slide up to the upper nocking point, but that isn’t an issue. That is why you always need an upper nocking point, otherwise, the arrow wouldn’t stay in place while drawing the bow.
On some rental bows, you might find thick rubber pieces on the center serving. These rubber pieces are called finger guards and act as finger protection. Essentially these finger guards also act as nocking points. So, you should nock your arrow between the two finger guards.
Step 4: Press the nock on the string
Now comes the easy part, just press the arrow on the string until you hear or feel a click. When you take your hand off the arrow, it should stay on the string. Even when you point the bow down, the arrow should stay firmly on the string.
If the arrow falls off the string when you point it down, the nock doesn’t fit the string. Don’t try to shoot a bow with a loose nock fitting because it can cause you to dryfire the bow. When this happens, you must either change the string or the nocks on the arrows to solve the issue. I will explain this in more detail in the FAQ.
Step 5: Place the arrow on the arrow rest
The last step is to place the arrow from the shelf onto the arrow rest. If you shoot with a traditional bow you can skip this step since you don’t have an arrow rest. When you have finished this step, you can draw your bow and shoot.
FAQ
Below I will discuss some frequently asked questions regarding nocking an arrow.
Can I also place the arrow immediately on the arrow rest?
Some archers may tell you to put the arrow immediately onto the arrow rest instead of the shelf. The advantage of this technique is that you can skip the last step. But in my experience, the arrow often pops off the arrow rest while you are trying to nock the arrow.
It tends to be quite finicky to get the arrow on the arrow rests. Arrow rests are made to be small and flexible because this reduces interference with the arrow. But some arrow rests are more rigid, so with those arrow rests you can indeed place the arrow immediately onto the rest. So, you can always test it with your equipment to see if that works for you.
Read the article below for more information about arrow rests:
How to choose an arrow rest for your recurve bow
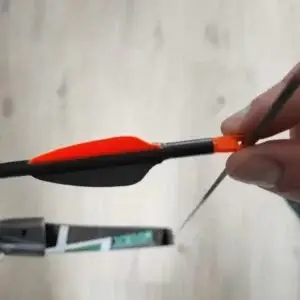
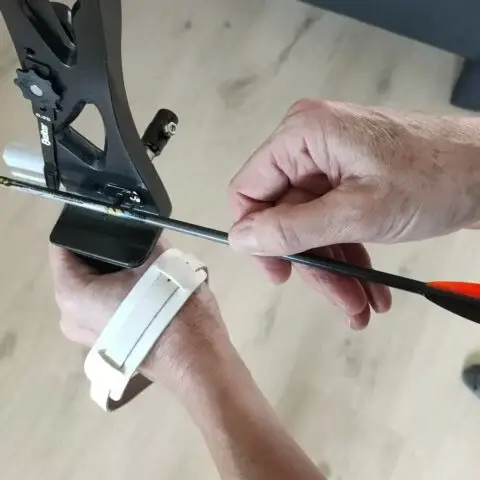
What if my nock isn’t indexed correctly?
Your nock should be indexed correctly to avoid clearance issues as explained earlier. Luckily, it’s quite easy to solve this issue, you just turn the nock. Depending on the nock you are using you can do this by hand, or you might need a tool.
Just insert something in the nock, such as a screwdriver, and hold the shaft. To make it easier to grip the shaft, you can use an arrow puller or an anti-slip mat. You can even use another arrow to act as a lever. You can see how to do this in the video down below.
How do I nock an arrow while using the clicker?
When you are using a clicker, nocking an arrow becomes more difficult. You can do this in step one by placing it under the clicker immediately. But you can also do this after you attached the arrow to the string. It doesn’t matter how you do this, just try some different techniques, and use what you like.
In the article below, I discuss in much more detail how you nock an arrow while using a clicker:
How to solve nock fitting issues?
Your nock shouldn’t be too tight, nor should it be too loose. A loose nock fitting is easy to detect. If the arrow falls off the bow when you point it down, the nock is too loose.
A too-tight nock fitting is more difficult to detect, but here are some clear indicators:
- You hear a hard clicking sound when you nock the arrow
- The nock deforms when attached to the string
- It requires a lot of force to attach the nock to the string
If you think your nock might be too tight, I would highly recommend reading the article below. In that article, I show two methods you can use to check whether your nock is too tight. I also explain how you can solve nock fitting issues.
How to choose the right nock (size and fitting)
Do I really need nocking points?
Yes, it is important to have at least the upper nocking point. If you don’t have any nocking points you won’t be able to consistently place the arrow onto the string. You must keep the place on the string consistent because it can otherwise negatively influence your accuracy.
The shot cycle
Nocking the arrow is only one step of the archery shot cycle. It’s also one of the easiest steps to learn. To master the entire archery technique, make sure to check out the other articles too:
How to shoot a bow (an overview)
- Step 1: stance
- Step 2: nocking (this article)
- Step 3: grip the bow
- Step 4: grip the bowstring
- Step 5: maintain the right form
- Step 6: draw the bow
- Step 7: anchor
- Step 8: aim
- Step 9: release
- Step 10: follow through
Final words
I hope you found this article helpful. If you have any questions, comments, or suggestions, please leave them down below. I will answer as soon as possible, and you will receive an email notification once I replied.
Before you go, don’t forget to use the coupon code IYA if you are buying one of the courses from Online Archery Academy. As mentioned earlier, I highly recommend taking a structured course. As this will greatly deepen your archery knowledge and skill.

Tim van Rooijen
For as long as I can remember, I have always been fascinated by archery. First due to its historic significance but later because I like being outdoors. With this blog, I share my knowledge about Archery and how you can improve your shot. More about author…